Thursday, August 29, 2013

LATE AUGUST FLOWERS

 
With all the rain we have had in late summer this year, the begonias are bursting with color.  I wanted to share the front lawn in a riot of color.

But before I show you that, the same begonias add color to the driveway.


Now onto the front......
 
 
The vintage French blue child's rocking chair is overflowing with flowers.
 
 
From the street, color follows to the front door.  The crape myrtle is sharing its last blooms of the season.
 
 
A welcomed entrance ready for visitors.


On a final note, I hope everyone has a safe Labor Day weekend.


Sunday, August 25, 2013

NEW USE FOR A SCARF HOLDER

I'm sure you have seen these great new holders to hold the trendy scarves that are out there today.  My sister,  Merri, will be credited for this inspiration.  When I visited Mom in Illinois this summer, she had arranged her scarves, in color order on these nifty new hangers that she bought at The Container Store.

When I first saw the hangers in Mom's closet, I thought that if I could use these same hangers for ties.  Mr. Thrifty has accumulated numerous ties.  He likes to rotate them, so he uses wire hangers in his closet.  It was an unsightly mess.


Logically, we should have used a plastic hanger considering the weight of the fabric has collapsed the hanger itself.


While looking for a birthday present for him, I spied these scarf hangers at Stein-Mart.


  These hangers only have 10 holes as opposed to The Container Store ones that have 20.  That was OK.  These are solid wood and have a masculine look to them.  I bought 6 hangers.  I needed at least one empty hanger to keep his rotation.

 
As you can see, the tie fits perfectly into the hole.
 
 
 I tried to organize the ties into the same  color family.
 
 
Once completed, I separated the group of hangers with the empty one in-between the unworn ties and the worn ones.  That way, the worn ties could be on one side of the empty hanger and rotated after it was filled.(I hope that makes sense?)


Why don't you try your hand at using some of these scarf hangers to tidy up your closet?  As Martha Stewart always says, "It's a good thing!"


Wednesday, August 21, 2013

LEARNING A LESSON ABOUT PACKAGED SEEDLINGS

 As the school schedule has settled in, I would like to share some lessons that we have learned around the house this past summer.

 Before I proceed, I must say that this post is completely my opinion on this product.


At the beginning of the spring, I spied a package of lily of the valley seedlings.  The package cost $2.98.  I love the fragrance of this flower.  I figured that it was worth a try.


  Planting them in my faux concrete window planter was the initial planting bed. Once they were somewhat established, I was going to plant them in my flower bed up on the hill.  The roots took off quickly.


As they grew, I noticed something peculiar, but I kept on watering.


These seedlings looked nothing like the picture on the package.  I decided to allow them to grow until I returned from Illinois.


  These were not lily of the valley plants.  A lesson learned.  No more buying  packages of seedlings at big box stores.  From now on, I will only go to a nursery.

I never did figure out what plant I was planting.  Anybody out there know what this plant is?
 

Saturday, August 17, 2013

AUGUST-BACK TO SCHOOL -PART II


Our first week of school is now behind us.  The girls are back in the groove with their various activities and sports.  I remain the family taxi driver for the duration.


Using the vintage photograph of my Grandmother's 7th-8th grade class picture was the start of creating a fun back to school foyer display.

Filling a European milk bottle found in Belgium  with numerous school-bus yellow pencils began the layering process.  Setting the photo on top of miniature editions of old composition notebooks added to the mix.  Encasing these items in the lantern gave a stage for the school theme. The vintage suitcase gave the lantern some height. 


The tried and true burlap runner was a good textural base for the top of the vintage dresser.


Adding some composition books and chalk added fun details.


While at an estate sale last weekend, I found 3 vintage school books at 50 cents apiece. The Grammar School Reader was published in 1909 by the Scott, Foresman and Company.  The Tale of Two Cities had a copyright of 1906.


The third book was the New Essentials of English.  This book was copyrighted in 1920.


Inside the front cover was an amazing illustration of Oral and Written language.


These books laid in the hands of those that came before us.  How remarkable is that?
 
Finishing out the foyer was a vintage school ceiling fixture turned into a floor spotlight and an old oak school chair.


The collection of all these items brought my idea to life.
 
 
And to honor my Grandmother and all of those that came after her, the scene is complete.


Monday, August 12, 2013

AUGUST-BACK TO SCHOOL IN 1906

I get pretty emotional when the new school year comes around.  I recall the days when I had to return to school as a teacher.  Those first two weeks back would render be absolutely exhausted getting into the routine.  I empathize with my daughters.  I know they are excited to go back to see their friends, but starting the work grind up once again is a challenge.  So to my two girls and all those kids and adults going back to school today, I'm thinking of you.  Oh yes, I will say prayers for all of you to have a good year.

So let's get started on the August Back to School Foyer.  I wanted to use my lantern as the focal point of this diorama.  I needed inspiration.  It didn't take long to find it.  Upstairs in my tub of vintage family pictures, I picked out one of my favorites.  It was a picture of my Grandmother's class picture taken in 1906 at St. Boniface School.   

St. Boniface was one of the few Catholic schools in the South end of Peoria.  My great grandmother was a parishioner there.  Early stories tell of Great-Grandma Novak being in charge of the parish dinners.  She would go house to house asking for donations of chickens to be used at the parish hall dinners.  She would collect,  kill and clean them and then fry them up for the church dinners.  Grandma used to tell me what an extraordinary cook she was.

A little history first....St. Boniface Parish was originally built as a small framed church in 1881 on Louisa and Antoinette streets.  The 26 German speaking families who lived on the south side were the founding families of the parish under the guidance of the 1st pastor, Fr. Frederick Von Schwedler.

Having outgrown the small church, in 1894 the cornerstone was laid for the new Romanesque-Byzantine styled church.  The new church was built in little more than a year costing $34,000.00.


In 1924, a terrible storm destroyed 2 towers of the church and rectory.  The towers were quickly repaired but it was decided to replace the rectory with the present one located on Louisa St. in 1925.(The first school building was originally located there.)  And this is where my story takes us.

The year is 1906 and shown below is the class of 7th and 8th graders.   My Grandmother was born in 1896.  She would have been 12 at the time.  One of the first things I noticed about the picture is how small she looks.  She is the girl sitting to the right of the one in the front row holding the chalkboard.   Grandma was always small for her age, but she made up for that in many ways.  She was one of the most inspiring people I have ever met in my life.   You would never have found a woman more kind and gentle.  She was a very spiritual woman her entire life going to church daily into her 90's.


This vintage photograph will be the focal point of my 'back to school' foyer.  The next post will detail all the trimmings added to make this a unique foyer display.
 

Friday, August 9, 2013

CHRISTMAS IN AUGUST- AMERICAN GIRL DOLL- MAKING BEDDING FOR MOLLY'S DOLL BED

I wanted to backtrack and tell you that the American Girl Elizabeth's bed  in the last posting cost  $118.00 in the catalog.  I'm sure that between Mr. Thrifty's building and my sewing recreated the bed for under $35.00. 

 The Molly bed in the  catalog costs  $94.00 for the new edition.  I don't remember how much the original cost, but I'm sure it was about the same cost. Recall the frame that Mr. Thrifty built for Molly, the American Girl doll.
 
 
This frame did not need to be stained because all of the wood would be covered with fabric.
 
Jo Ann Fabrics had a red mini-whale corduroy fabric.  The trimming was a bit more of a challenge to acquire.  On the American Girl bedding, a candy striping thread embellished the red bedspread.  I found a twine with white and candy resembling the trim.  Red pillow ticking would make the perfect choice for the pillow covering and the mattress.  The cross-stitched pillow would need some creativity.
 
 Here is the actual retired American Girl bed for Molly.

This is the mattress embellished with red cross-stitch thread ties.  The headboard cover was slipped on top of the headboard.  The red and white trim was glue gunned right onto the fabric.


Making the accent pillow was a bit more difficult.  I found an image of a cross-stitched rose on the Internet.  I did a photo transfer onto a piece of white cross-stitch fabric and sewed up the pillow.  To make the fringe, I pulled strings on the ends of the pillow creating a fringe affect.


Adding the coverlet with candy striping edges completes the bed.

The headboard cover just slipped over the frame.


Another successful replication of the American Girl Molly bed is complete. This bed set cost  about $25.00.  That was quite a savings.

Why don't you try your hand at one of these furniture projects?  Your daughters will cherish them for many years to come.


Monday, August 5, 2013

CHRISTMAS IN AUGUST-AMERICAN GIRL DOLL-MAKING THE BEDDING FOR ELIZABETH'S BED

Once the bed frames were made for Molly and Elizabeth, it was time for me to get creative.

Here is the picture of the actual bed from the American Girl catalog.


  I went to  the Jo Ann Fabric store to look for fabrics that would replicate the actual American Girl bedding for these beds.  

The bedding for Elizabeth's bed had to be a light blue with tiny white flowers to simulate the original.  Unwashed linen, light blue cross-stitch thread and light blue lace would finish the look.

Recall that the frame looked like this.
 
 
Let me show you how I dressed Elizabeth's bed first.
 
After measuring the completed frame, I had to make 4 bed chamber panels, 3 skirt lengths, a mattress, pillow and pillowcase and a canopy topper. 
 
I used Velcro strips to attach most of the pieces.  These strips were attached to the bottom of the frame for the skirts, and the top of the frames for the chamber curtains.
 
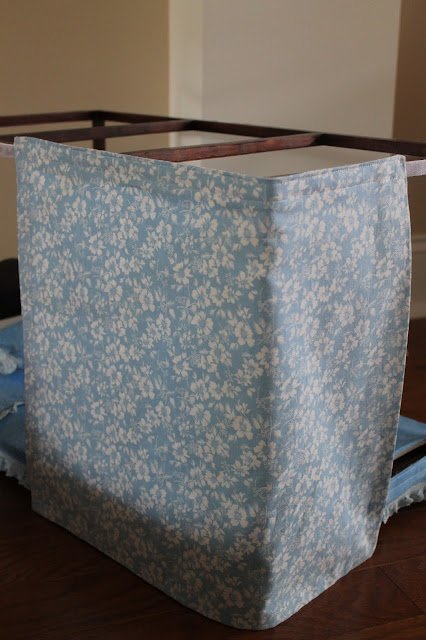
Here is the frame with all of the Velcro attached including the bed skirts.
 
 
And a close-up of the skirt.  The below picture shows how to attach the Velcro to the frame of the bed.
 

The three skirts are attached to the frame.

 
The mattress and pillow were made out of the natural linen.  The cross-stitch thread was placed to make the mattress look like those of long ago.
 
 
A close-up.
 
 
A pillowcase and coverlet were sewn.
 
 
A close-up of the pillowcase.
 
 
I sewed 4 chamber curtains and attached the fuzzy part of the Velcro to the top of the wrong side of the piece.  Here you see 2 pieces with the frontal view and 2 with the wrong side of the curtains.
 

The chamber curtains were attached.


Each chamber curtain is gathered and trussed with a satin ribbon.


The canopy is sewn. 


The lining of the canopy is off white silk.
 
 
Finally, the canopy is laid over the top of the bed frame.
 
 
Now, Elizabeth, the American Girl Doll can have a restful night of slumber.
 
 
I am happy with my interpretation of Elizabeth's elegant bed.  What do you think?
Stay tuned for Molly's red corduroy bed in the next posting.