Wednesday, July 29, 2015

VINTAGE ST. FRANCIS GARDEN STATUE

 
In my father's garden stood a white china statue of St. Francis perched in a small covered house on top of  a pole.  Here St. Francis guarded the entrance to his tilled soil.
 
The house itself looked rather weathered and worn.  Moss had collected on the roof lines.
 

The roof itself was constructed of roof shingles that gave the appearance of a shabby abode.


The statue itself sat on the dowel rod at the base of the house.  Trim work around the base had fallen off and needed to be repaired too.
 
I like the roughness of the house and thought it lent itself to the austere history of St. Francis.


With a few minor repairs, this sanctuary could prove to be useful once again.  The broken Plexiglas trim needed to be removed.


Even though the screws were pretty well rusted, a strong arm loosened them.


A bit of wood glue was used around the wooden dowel to make it strong again.  The trim piece on the front was re-nailed.

 
   Upon pulling the statue out, I noticed that there was a bird broken off part of the statue.  Mr. Thrifty was ready to repair the break.
 

He pulled out his adhesive of choice.


With the bird secured in its place, I was ready to proceed.  Strange that it seems that St. Francis' hand is giving the bird a blessing.

 
That was until I saw the chip on the statue's shoulder.  It turns out that the bird belonged on the shoulder, not in the place of the missing hand.  It was too late to remove the newly glued bird because the glue had already dried.  Since the missing hand was unavailable, I would forge ahead and leave the statue as is.  St. Francis loved animals anyway.

 
Before the house was repaired, I placed St. Francis under a glass dome to sit on the foyer table.
 
 
Now that the house was fixed, St. Francis was ready to be placed in the perennial bed.
 
 
St. Francis will now be a permanent fixture in my garden overseeing the flowers and birds.  I am thrilled to be able to keep this fixture at my house as a memory of the past.

When Mr. Thrifty came home from work, I told him about putting the St. Francis outside in the flower bed.  It then came to me.  If the house sits in the soil, it will deteriorate faster.
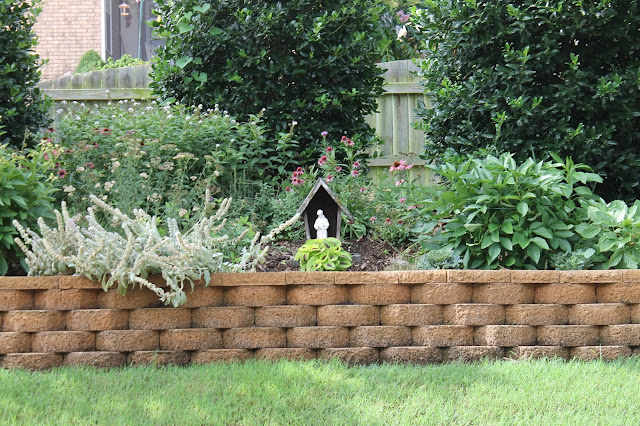
He suggested using a leftover paver from building the retaining wall.


After taking the paver outside, I dug a hole underneath the house.  I laid the paver in the dirt and set the St. Francis house on top.  Now, the house will be safe.


When I look out the back window every morning, this will be what I see.  How delightful!

 
That is a good thing.


Friday, July 24, 2015

A FUN HOUSEWARMING GIFT

What does one give a friend for a housewarming present?  Well, this friend loves shabby chic, Jane Austen and gardening.  So let's start on this project.
I found this cute china bowl with a lip at an estate sale.  It could be a bowl used to pour cream onto strawberries. 

Going to Home Depot led me to this precious little ivy.  The pot is only 1-1/2
  inches wide.


To allow for better drainage, I layered tiny paver rocks into the bottom of the bowl.


When I pulled the plant out of the tiny pot, I saw the wick coming out of the bottom.  It is important to lay this wick amongst the paver rocks.

After placing the plant in an upright position in the bowl....


I added some of that great composting soil from out back in the flower bed.


I would warn about watering such a tiny plant.  I would rather spritz the plant with a bottle of 
water instead of pouring water onto it.  I think that the plant is too delicate to withstand the pressure of  the pouring water.


I was lucky enough to pick up this Jane Austen Air Freshener.  The shabby pink and baby blue colors in the packaging helped too.


Using  piece of shell pink ribbon, the plant and the freshener were attached.


The petite planted ivy and air freshener will be a novel house warming present. 
I hope she likes it.


Before taking the gift to her, I took out one of my domes and placed it over the plant.  I think this will allow the plant to retain more moisture.


Monday, July 20, 2015

REVING UP A CAN OF PROGRESSO CHEESY CHICKEN SOUP

                                  On this beautiful May morning, I was organizing my food pantry and trying to figure out a quick dinner.  During our cold days this past February, I had purchased 2 cans of Progresso Cheesy Chicken Enchilada soup.  It is a wonderful canned soup and great for those cold nights when the girls come home from softball and tennis practices.  They need to have something to warm up their core after  being outside.


I had a can of El Paso Enchilada sauce also in the pantry.

 Normal recipes usually call for adding a can of Cream of Chicken or Cream of Mushroom soup to use as a base in a recipe.  Why couldn't I use a stand alone soup and do the same thing?  I pulled the 2 cans of soup off the shelf, looked at them and thought to myself, 'well, it's going to be 89 degrees out there today and they are not going to want hot soup but.......
I have many great memories of Mom cooking in the kitchen.  Occasionally she would say, 'I need to whomp it up'.  In Roth-speak that meant, this dish needs some major enhancing to make it more palatable to the taste.  To this day I use the same expression.  When I will say the same thing, the girls giggle a lot.  Mom had a way of making the food presentation and meals always worthy of guests.  I know that this is where my joy of being in the kitchen comes from.  Ok, so back to the soup.
I have the advantage of going to the Internet and googling 'what can you do with a can of cheesy chicken enchilada soup?'  This following recipe comes from the Betty Crocker website.  I took the basics and threw a few more ingredients in to 'whomp it up'.


  • Total Time 55 min


  • Servings 5

  • Ingredients

    1
    can (18.5 oz) Progresso™ Traditional Chicken and Cheese Enchilada Soup
    1
    can (10 oz) Old El Paso™ hot or mild enchilada sauce
    2
    cups shredded cooked chicken
    2
    cups shredded Monterey Jack cheese (8 oz)
    10
    corn tortillas (6 inches)
    2
    medium green onions, thinly sliced

    • 1 Heat oven to 350°F. In medium bowl, stir together soup and enchilada sauce. Spread 1 cup soup mixture in ungreased 11x7-inch baking dish.
    • 2 In large bowl, mix 1 cup soup mixture with chicken and 1 cup of the cheese; reserve remaining soup mixture. On microwavable plate, stack tortillas and cover with paper towel; heat on High 1 minute to soften. Place 1/4 cup chicken mixture along middle of each tortilla. Roll up and place seam sides down in baking dish with sauce.
    • 3 Pour remaining soup mixture over enchiladas. Sprinkle with remaining 1 cup cheese. Sprinkle green onions on top. Bake about 30 minutes or until cheese is melted and sauce is bubbly around edges.
      Since I had 2 cans of the Progresso soup, I added 1 large can of El Paso mild enchilada sauce, an extra handful of cheese, some frozen chopped white onions and green peppers that I always stow away in my freezer.  To give it more kick, I added 1/2 teaspoon of chili powder for heat.
      Since I had so much more liquid that the original recipe, I scooped out about 1 1/2 cups of the sauce before I added the chicken to the bottom of the glass casserole dish.  Once I added the chicken to the sauce, it still was rather soupy.  So as I filled the warmed up flour tortillas(my family likes these over the corn shells), I would take a large scoop of the cheesy chicken sauce and drain a bit of the liquid out before placing it in the shell to wrap it.  My recipe made 10 hearty enchiladas in the dish.
      I poured the remaining sauce on top making sure to cover every bit of rolled flour tortilla.  After adding another layer of cheese, I opened up the pantry again and found a bag of Fritos.  I took a handful out and placed them in a sandwich bag and smashed them.  These were sprinkled over the cheese.  I thought that that extra bit of crunch would give a bit more texture. 


      I can never go wrong with a Mexican dish to please my crowd.
      I was right. It was a huge hit.  This one will go in the recipe file.

      Wednesday, July 15, 2015

      PAINTING THE PILLARS HIGH GLOSS WHITE

      When we moved into the house, the pillars in the foyer/dining room were painted with flat white paint.  Yech!  Nothing is worse than white flat paint.

      Two quick coats of high gloss white paint did the trick.


      The pillars really accent the repose grey paint in the foyer.  Thanks Mr. Thrifty.


      The overall white gloss paint really sets off the pillars a lot more now.
      This was a good idea.


      Sunday, July 12, 2015

      PAINTING THE GREAT ROOM REPOSE GREY


      The decision to paint the Great Room came with a lot of issues.  I was ready to get rid of the Mocha paint that was on all the walls on the main level.  Since the entire room(foyer, Great room, and kitchen) is all open, the problem was, where do we stop with the new repose grey.
       
      Since the Great Room wrapped around to the eat in kitchen, we decided to stop at the back door.  The question was would we be able to get a clean line down the two edges where the corners met?
       
      So, it was time to tape it all up.  Mr. Thrifty is very good with the sash brush, so he doesn't use tape on the crown moldings.
       

      There you see my little painting elf.  He does such good work and he is a neat painter.

       
      I think the repose grey paint will freshen up the room and make it look cleaner.  I like the contrast between the white crown molding, baseboards and the grey walls.  The room looks dark because of the plastic taped onto the windows.


      The grey paint goes well with the furnishings.(Did any of you notice the mocha beige reflection in the mirror?)
       

      Even at night, the color is so fresh.


      Even though we left the mocha color on the wall to the left, it really looks similar to the new grey paint.  The paintings edges came out very neatly.


      The final step was to give all of the baseboards a fresh coat of high gloss white paint.
       
      I think I will hold off painting  more walls in this room.  Both the mocha and grey compliment each other and it does define  the spaces.


      Wednesday, July 8, 2015

      PAINTING THE FOYER REPOSE GREY

      After 5 years in this house, I was ready to paint.  Well, at least let me clarify that, have someone else paint.  I am so lucky to have Mr. Thrifty whom does a much better painting job than I do be willing to accommodate me.

      Another reason that I wanted to paint was the original was flat.  I do not like flat paint.  I understand that is normally the cheapest, but you can't keep it clean.  Even finger prints that are clean will leave behind the oil when touched.  I was ready to go the eggshell or satin route.  After the painting was finished, I was very pleased with the results.

      When we had the house built, the contractor painted the rooms the then neutral-mocha beige.  It was fine then, but I was ready for a change up.  I recall a conversation that I had with the Mr. back then and he said, 'let's wait 5 years'.  Ok, I was ready now.  If you hadn't noticed in my decorating the past few years, I always came back to grey.  I have scoured the blogs trying to find just the right color of grey.  Repose grey by Sherwin Williams was the winner.

       I will let you know that they do not have a color swatch for the repose grey, but they still have the formula in their computer system.  Don't be afraid to ask for it.

      Here is the before picture in the foyer before painting.
       
       
      The overall look after painting just one wall made me happy.  It appeared to be a nice contrast to the crown molding and baseboards done in high gloss white.
       
      The grey really compliments the silver accents on the wall.  Look at the difference between the left side of the room and the right.  Clean, clean, clean!
       
       
      The black accents show well too.
       
       
      In the dining room, the mocha paint remains--for awhile.

       
      What do you think?  Do you have the urge to paint a new neutral?
       

      Saturday, July 4, 2015

      Wednesday, July 1, 2015

      THE UPCYCLED BALUSTER FLAG POST

      This post has probably been in the making for at least 5 years. I still recall purchasing the chippy baluster from the New Hampshire salvage yard 13 years ago. I bought two of them at the time. I found them very interesting and wondered to myself what and where these were  initially used in their initial use.

      My idea for this project was to make a flag pole with multiple flags hanging from the baluster.  I think this will be one awesome 4th of July centerpiece.


      The following picture shows the top of the post.  In order to add the finial to the top, this needed to be shaved off.


      Getting one of Mr. Thrifty's toys out completes this job.  I know he is doing me a favor by completing these tasks for me, but it also is time for him to use these tools.  To be honest, the safety goggles don't make me feel safer.  I would rather defer to him to do the work with the electric tools.


      I have to admit that the Mr. does teach me some skills.  For example, making an X on the end gives you the exact middle to place your drill bit when making the hole.  Notice the screw sticking out of the finial.  Sorry for the poor picture.


      Drill a pilot hole into the center where the two lines meet.  Proceed to drill the finial into this hole.  How easy is that?


      Now this is where it gets tricky.  Before we started the project, Mr. Thrifty asks me what angle I wanted the holes driven for the flag post.  Duh???  I had no idea.

      Because of his engineering background I suppose, he begins to tell me that he needs to make a jig so the holes will be at the exact same angle when drilled with the drill press.  At this point, I smile, and just wait for further directions. 

      This next picture shows the jig at a 30 degree angle.  Ok??


      When he proceeded to fit the jig into the drill press, it was too tall, so he needed to improvise.  So....


      It might be easier to visualize the baluster laying into the jig.  At the bottom, notice the clamp that will help the baluster remain stationary.


      Now we are ready to drill our first of 24 holes.  I bet you are wondering about the multiple turquoise dots all over the baluster.  I made these marks with a Sharpie so we would know where to drill the holes.  However, once we drilled the first hole, the random placement of the other holes were not going to work.

      So the Mr. suggested making 3 holes on the 4 sides of the baluster and then coming back and making a line of 3 holes in between each set of holes to create 24 holes.  So this is what we did.


      The next step was to find two pieces of scrap wood in the pile to create the base for the post.  Once again, using a metal ruler, I found the direct center to drill a hole to attach the baluster to the base.


      To make the hole stable, he used the drill press using a paddle bit to drill the hole so it could be attached using a washer and a screw.


      You might be wondering about the blue duct tape.  He will drill the hole to the bottom of the tape.


      The finished hole.


      Even though it is now painted, this is what the base looks like when finished.


      So before I paint the post, one flag is inserted into one of the holes.  It is the perfect angle.


      A coat of primer is applied.


       Because I didn't have any white chalk paint on hand, I ran over to Wal-Mart and picked up a small jar.

       
       So with the chalk paint finished, the post has a unified look.
       

      Years ago, I sewed a runner used the stars and navy background and added a crimson red border of trim.  This runner was draped over the porch post.


      Once the flags were inserted, the July 4th post was finished.  I love it!


      The post looks great sitting behind the chaise lounge in the Great Room.


      I am thrilled with the results.  The vision was exactly as I had hoped, of course, with a lot of help from Mr. Thrifty.


      Now the area is ready to celebrate the 4th.