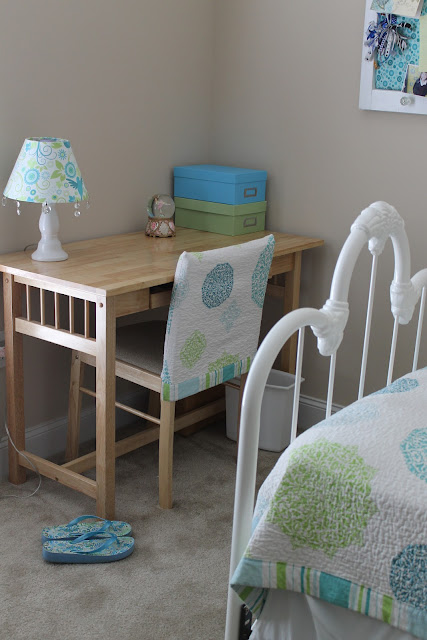
My youngest daughter wanted to use our old queen size bed for her room. When I purchased the queen quilt, all was well. Well, that was until she realized that the bed took up too much floor space in her room. Then, we substituted her old twin white iron sized bed into the room to solve this problem. But then I had a bulletin board, lamp and chandelier that worked well with the quilt, but the quilt was hanging all over the floor. I didn't want to buy a new quilt, so I re-sized it. Scary thought.
I put it off and finally one day tired of tripping over the queen quilt, I pulled out my sewing machine and scissors and got to work.
The first step was taking the seam ripper and going along the edges of the binding, so I could reuse it. I cut off a good 18 inches, trimmed the binding and sewed the quilt back together.
Then, I had this 18 inches of extra material left. I never liked the style or color of her desk chair, so I made a chair cozy to detract from the look.
On the back, I used the leftover binding.
I couldn't resist taking of picture of her flip flops. How many girls have shoes to match their room decor?
Now, the room is complete. It's too bad that it doesn't always look this neat. At least, I can see it clean in this picture.
With about 30 minutes work, this task was complete.
Tuesday, May 28, 2013
Friday, May 24, 2013
CREATING A QUEEN SIZED DUST RUFFLE
It is funny that when the girls wanted to decorate their new rooms, they both wanted the same colors. That was going to be a challenge, because how many turquoise and lime green coverlets could one person find?
We decided on a cute comforter for number 1 daughter's room. Deciding on a dust ruffle became more of a challenge. A white dust ruffle just would not do.
I found some cute complimentary lime green graphic fabric at Hobby Lobby. I measured the perimeter of the three sides of her box spring, multiplied by 2(for ruffling) and made sure that my skirt was 18 inches long. That meant cutting through the fold on the material itself. I know that sounds tricky. Say the perimeter was 360 inches x 2=720 inches and then divide by two for the length of fabric. In this case, 6 yards of material would do.
When I measured the top of the box spring, it was equal to a twin size flat sheet. I happened to have an old turquoise twin flat sheet in the linen closet, so I pulled that out.
This latticed like fabric worked well with the existing comforter.
I placed the flat sheet on top of the box spring and hand pinned each ruffle.
It you look too close, you will see that the stitching is not the prettiest, but you don't see the flat sheet with the mattress laid on top of it. This is the view looking down on top of the box spring.
It really didn't take that long. Once all three sides were pinned, I just sewed the seam on the machine. I wanted them to be billowy, so I never hemmed the dust ruffle.
Looking at the bed now, I'm glad that I didn't settle for a white dust ruffle. That would have washed out the room. The lime dust ruffle gives it that look that pops color into the room
Monday, May 20, 2013
TEENAGERS FIRST SEWING ATTEMPT-GORGEOUS SCARF
My oldest daughter wanted to make a simple scarf for herself, two for graduating seniors and some birthday presents for close friends. She asked me to look for some fabric that would be easy to work with and appropriate for teens. I found the following jersey material at Hobby Lobby. With my coupon, I paid $14.84 and we were able to make 7 scarves.
The cream stripe had a bit of laciness(not sure if that's a word?) so it so it was just natural to apply a thick lacy trim to the bottom edges.
We began by folding in half and made two cuts lengthwise. That made six. The remaining top edge was turned sideways to get the seventh piece.
All the long edges were turned under and were stitched.
Then the delicate ecru lace trim was attached to the ends of the scarf.
By the time she got to the 4th scarf, her confidence was established.
And the finished project.
This was a wonderful first sewing project for her. One of her friends joked, "Oh, and you made this?" And proudly she responded, "Yes, I did."
The mere fact that she had completed a project and it looked professional was a great esteem building lesson. I have noticed that she is much more sure of herself in finding scrap material and creating something with it.
Later, she didn't have money to buy her sister a birthday present. She pulled out some scraps of shabby chic material and sewed a wallet for her with a flap for dollar bills and sections to store her school id and library card.
The lesson of doing something completely on her own was the greatest gift of all.
I'm sure that there will be many more projects in her future.
Thursday, May 16, 2013
A TEENAGER'S JEWELRY HOLDER (MADE BY HER)
Years ago, I put together a earring holder when my first daughter had her ears pierced.
This piece lasted her for about 4 years and she eventually ran out of room on the mirror frame.
She decided that she wanted to create her own larger jewelry holder. She told me her idea and what materials she wanted to scrounge from my craft room. It sounded like a good plan so we went out to get her supplies.
We went to Hobby Lobby and purchased some Chevron material. Her dad cut out a piece of wood to use as a base for the material. Prior to adding the fabric, she layered 3 pieces of thin cork board onto the wood using spray adhesive glue.
She wanted to use chicken wire for the other two sides.
She went into the garage and picked out one of my old windows. First, she took it outside and scrubbed the frame. Lots of the old paint chipped off which is good. Once dry, she spray a matte sealer all over the wood.
Next she attached the material padded section into the middle of the frame.
As you can see, she used old upholstery tacks to secure the sections of the wooden frame. Notice that she used duck tape to secure the fabric onto the wooden base.
The chicken wire was measured to fit the back of the window.
A little side note.... You can tell that she really likes the turquoise color because the fabric matches her fingernails.
Using a staple gun, she attached the wire across the back of the window pane.
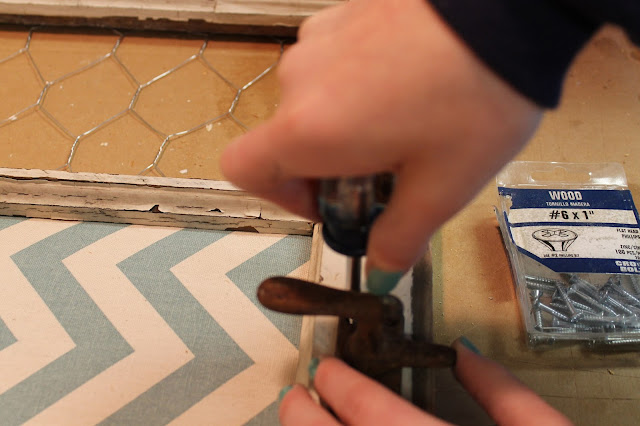
Next, she went to my box of old handles and pulled a vintage rusty handle out and cleaned it off. Once dry, she sprayed matte sealer on the handle to avoid rust getting onto her necklaces.
Once she screwed it in, she realized that the screw wasn't long enough so her dad recessed the hole in the back to attach the nut. Then a hanging wire was attached to suspend the hanger.
Two vintage crystal knobs were also attached.
And the finished project.
You can see that she left the wooden frame shabby looking.
It didn't take her long to fill the new jewelry holder.
The look of joy on her face expressed her thrill of completing the project pretty much on her own.
Her next project is going to be redoing a chair for her desk with the leftover Chevron material. That will have to wait until school is out this spring.
I am so proud of her!
Sunday, May 12, 2013
VINTAGE MOTHER'S DAY CARD
It is so easy to make my Mom a Mother's Day card. She is just so easy to love. At 90, she is still a vibrant, stimulating and overall great Mom. Every year, I try to create a special card for her. This year was no different.
I found this image on Graphics Fairy months ago. I saved it to my picture file in hopes of creating a future Mother's Day card.
Setting a background and adding a vintage frame highlighted the beautiful image of the above picture.
Necessary bling was added to complement the gold in the frame.
A decorative ribbon pulled the pastel colors out of the picture.
I always hunt for a special quotation to complete the card.
HAPPY MOTHERS DAY TO ALL OF
Thursday, May 9, 2013
MARY ENGLEBREIT-HURT NOT THE EARTH FRAMED ART
When I first bought my grandmother's house, I wanted to create a Mary Englebreit kitchen. I loved the vibrant reds that she used in her design. (This was back in the late 80's.)
Here is the before picture. Before I get started, I should warn you that these pictures were taken before digital cameras, so they are not the best quality.
Kitchen before.
Kitchen floor before.
Kitchen before.
Kitchen floor before.
The floor had been stripped ready for the new. Look at the old but very architectural vent in the left corner.
The new floor with my adorable first puppy Sweeney(blurry).
The kitchen cabinets painted high gloss white.
An added red mini blind and vintage cherry tablecloth valance.
The kitchen was refreshed with paint, the backsplash tile was re-grouted to make the room much brighter.
A wall display of some of my crosstitch projects of that day. The Mary Englebreit crosstitch was one of my favorite.
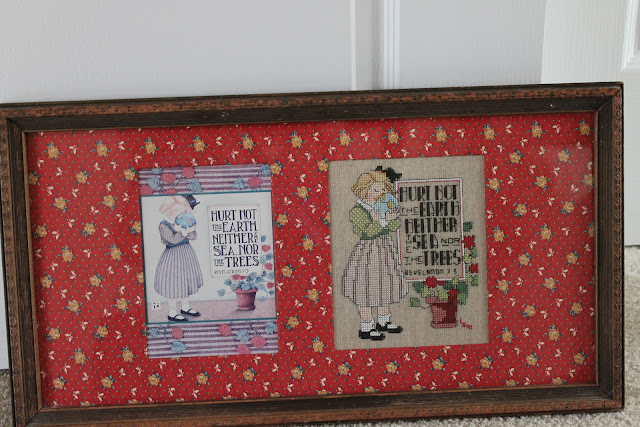
Since then, everywhere I move, I hang the Mary Englebreit picture somewhere in my home. I found the frame at an estate sale for $1.00. The frame itself was spruced up a bit with some gold buffing cream. I bought red calico fabric to create the mat.
Once the picture was crosstitched, I found the similar card in the store.
I finished stitching the picture in 1991. My that seems a long time ago.
Putting the two images together was a fun way to frame the picture.
Once the picture was crosstitched, I found the similar card in the store.
I finished stitching the picture in 1991. My that seems a long time ago.
Putting the two images together was a fun way to frame the picture.
Now it hangs in my kitchen area with a special card made by Susan. The little girl reminds me so much of the girl in the Mary Englebreit crosstitch.
Now the frame has a special place in my kitchen to remember those days of yore.
Wednesday, May 8, 2013
PEONIES
Just wanted to post a picture of the first peonies--in all their glory. I have to laugh while taking the pictures of the freshly cut blooms. In the camera lens I see little bitty black ants crawling all over the table. These are nothing like the infamous fire ants down here in the south.
Now, I'm not sure if these were the peony plants that I pulled from Grandma's house. I don't recall the beautiful ribbon of fuchsia in the white bloom. This plant might have been one that I had purchased last year. Not to worry. She is a beauty!
Now, I'm not sure if these were the peony plants that I pulled from Grandma's house. I don't recall the beautiful ribbon of fuchsia in the white bloom. This plant might have been one that I had purchased last year. Not to worry. She is a beauty!
The Illinois peony bushes are growing. Just no buds yet. I'll be patient.
Monday, May 6, 2013
FIRST COMMUNION DRESS MEMORY
I love little white dresses. I hang them all over my house. I hang them in the girls' bedroom, the craft room and the laundry room.(See Antique white baby dresses blog-Jan. 20, 2012.)
There is one particular white dress that means a lot to my sisters and me. It is our First Communion dress, and in those days, it became a very special hand me down.
The story began when my Mom had cancer(I was 4 years old). My 3rd oldest sister was taken to the store to buy the prettiest Communion dress that she could find by my Grandmother.
My sister went up to the hospital to show Mom how beautiful she looked in her veil and dress on her Communion Day. Mom died two days later. It was a very, very sad time for our family.
Skip to 3 years later and a miracle happened.
We had gotten a new Mother and my First Communion was coming soon, May 4, 1963. After shortening the hem, I wore the dress on my special day. Sorry for the blurry picture. I can't figure out how the date on the picture is April 1963 when I didn't wear the dress until May 4th?
Years later, I took the dress out and washed in very careful fearful that it would fall apart. I bought a new satin ribbon for the sash and the dress looked as good as new.
I have since mentioned to my 3rd sister that if she wanted to have the dress back, I would be happy to return it, after all, it was hers first.
Right now, it hangs in the craft room, reminding me daily how blessed life is.

Subscribe to:
Comments (Atom)


