Sunday, February 28, 2016

WALL DISPLAY FOR $1.00

After Valentines Day, I took down the Valentine garland over the cherub embellished mirror.  I wanted to keep the pink plates so I changed up the wall.

The top plate happens to be one of my Mom's good china.  Even though I use this setting for dinners, it was kind of fun to add one of them on the wall.


The second plate was a platter that I purchased for $1.00 years ago.  The crazing was so bad that I would never put food on it, but I wanted to give it a new life, so I bought it.  I have always been curious about the previous owners of this platter.  It had been used a lot. 


The third piece in the grouping was a FREE mirror!  I received it from the same lady that gave me the ceiling medallion. It is a gorgeous gold ornate wall mirror.


Once all the pieces were hung, it felt just right.  The pink colors play off the grey wall paint.


I will keep this grouping up until spring.


Tuesday, February 23, 2016

CLEANING THE CEILING MEDALLION

Do you remember the FREE ceiling medallion that I was given a few weeks ago? Well, it was time to clean it up.  It measures roughly 3 by 4 feet.  It is enormous, but gorgeous. 

The plan is to paint the dining room ceiling dark charcoal and paint the medallion white.  The problem comes in when I try to decide what type of paint to use on this piece.  The Internet suggests painting it the same color and type as the crown molding, which is high gloss white.  But I worry that the sheen on the medallion will be distracting to the chandelier hanging beneath it.  Some suggested to use flat white paint, but then it looks somewhat unfinished.  I think I will need to take a trip to the paint store and ask their opinion.  I hate being so indecisive.


A closer view shows the paint and caulking that still remains, I need to clean all the edges of the medallion off first.


The outer edges came off easily.  I was thinking that this would take about 20 minutes to completely clean. 


Turning the piece over was another story.  There was quite a bit of adhesive caulk remaining.


I found a putty knife that had a rather sharp edge.


After, 2, yes, 2 hours, I finally cleaned all of the thick adhesive off, but at a cost.  I still want to take my palm sander and get any remaining caulk off, but I will wait a few days.


Using the putty knife unfortunately had every knuckle on my hand bleeding.  Please don't look at my old looking hand.


If I had to repeat this process, I would use plastic kitchen gloves. Those might have saved my knuckles.  Live and learn.  I kept thinking, well, it was free, so what is a bit of hard work anyway?

I will get back to you when I decide on what type of white paint I will use to cover the medallion.

Thursday, February 18, 2016

PAINTING THE PARLOR BATH

 Wow, was I surprised when Mr.Thrifty offered to paint the parlor bath over this long Presidents Day weekend. Now that is a Valentine present that I would appreciate.  He is the most amazing and meticulous painter.  I am so blessed.

Thankfully, I had purchased all the paint for the bath, dining room ceiling and walls already.

Here is the view of the Mojave tan walls before painting.


We were very lucky that when the house was built, they put crown molding in every room.

I'm going to have to stop and brag about Mr.Thrifty here for a moment.  He only tapes the baseboards.  His sash brush does the ceiling molding without taping it off.  For this room I am using Acier by Sherwin Williams, which is a darker shade then what was painted in the great room.  I think the darker paint looks more striking in a small area.

The longest part of the job is actually painting around the moldings.  I have done nothing up to this point.  I am just the foreman.


Now for the second coat. 


While doing the first coat the Mr. realized that getting behind the toilet with the painting brush was a bit challenging.  He went to the garage and pulled out the short extension.


The paint extension in action.


He started painting on Sunday and by Monday afternoon, the job was completed.

I ordered a new stencil to put on one wall of the bathroom.  Now all I have to do is clean up the bath and put back all the fixtures. On second thought, I think I will stencil the one large wall in the bath before putting the room back together.

I am really excited about this room's transformation.


Sunday, February 14, 2016

VALENTINE GREETING CARD 2016

 I found this beautiful graphic on Graphic Fairy.  This image created the theme I wanted to go with this year's Valentine card.  I did add some rose colored glitter to the rose petals.


Finding a vintage dictionary page with the love definition and a flashcard with the word love on it was layered onto the card.


I used a vintage roses background paper and a pink lace heart too.


To all of you out in blogland, have a Happy Valentines Day.

****A special Valentine present only I could love, Mr. Thrifty said to me this morning, "What room should we paint first?"  Talk about the perfect way to show his love! 

So after breakfast, we are ready to go, painting the parlor bath.


Thursday, February 11, 2016

MINI VALENTINE CHRISTMAS TREE FOR THE COLLEGE DORM


Before Christmas, I sent my oldest daughter a mini Christmas tree with ornaments and other embellishments for her dorm room.  When she came home for Christmas break, I mentioned that I wanted her to keep it for next year.  She asked me if I could continue to send future seasonal ornaments so she could use the tree year round.  What a great idea!  Because Valentine's Day is so special in our household, I was on it to create a Valentine tree.
After Christmas at Hobby Lobby, I was looking at the mini ornaments in the sale aisle and came upon some great deals that I could use for the February holiday.  The sale on all Christmas items was 90%, so I started my hunt.  Knowing that I would need yet another tree when my youngest went off to college, I was looking for multiples to use for both girls. 


The pink velvet tree skirt at $6.99 and tree topper and ornaments were $2.99 regular price.  With the sale price, I paid 30 cents for the topper and ornaments and 60 cents for the skirt.  I think I hit the mother load.


I found another mini tree at 75% off.


 75% off of $7.99 was $2.00.


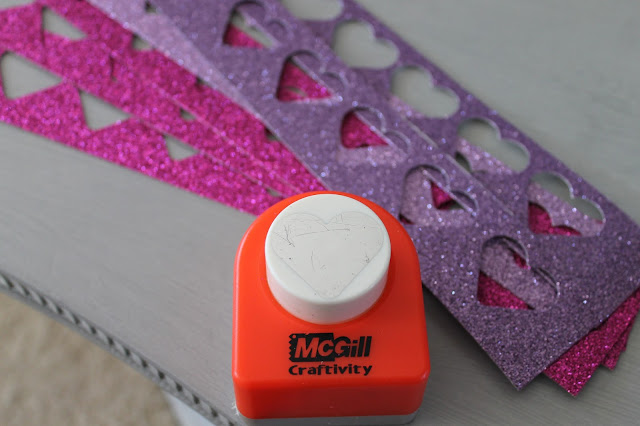
Since I couldn't find a garland, I picked up 2 pieces of glittered cardstock at 50% off and ransacked my craft supplies to find an appropriate punch-a heart.


I used the punch to make the 2 colors of hearts and decided to keep the remnants for another project.

The hearts were placed in pairs.


I pulled out 2 rolls of ribbon to use as the base for my garlands.  Using a glue gun, I glued one of each color to each other and alternated the colors on the ribbon.


Here is the first garland finished.


But when I connected it to the tree, I realized that it didn't have an anchor, so I went back and glue gunned both ends into loops.


Here is the second garland with ending loops shown.


Here is the close up of the loops.


When it came time to the tree skirt, I wanted to embellish this too to make it a bit more unique.  I went to my button jar and pulled out these marvelous mother of pearl buttons that my friend Tara gave me a few years ago.  Here is the view of the front and back of the button.


I only wanted to show the mother of pearl side in my project, so I sewed the buttons in a random fashion on the skirt.
Once placed under the tree, it looked fabulous.


Once the ornaments, tree topper and garland were placed on the tree, it looked quite festive.


I think my daughter(s) will be pleased with the finished project and it remind them of the decorations from home during OUR holiday.


I think the angels were on my side to even find such deals to coordinate a Valentine's tree for my daughter(s).   


Sunday, February 7, 2016

ROMANTIC VALENTINE MANTLE 2016


It is time to begin creating a mantle for Valentine's Day.  I picked up this baby white dress with pink embroidery at an estate sale this past summer for $1.00.  I will design the mantle around this precious item.  The first thing to do is wash and soak it in Biz whitener and odor eliminator overnight.  I really didn't have anything to lose other than the dollar, but the next morning, I thoroughly rinsed the item and hung it out to dry.  It is amazing that after a good ironing with Iron Press, it revealed how white that the  Biz had brought this dress back to life.  No damage was done to the dress.


The glass of the vintage window threw off poor lighting, but you can see the dress better in a picture later in the post.
The next item incorporated in the mantle was the gorgeous dried roses and bay leaves wreath that my dear friend Tara sent me when Mom died last May.  I draped it over one of my vintage mirrors.  Love this!

Here is a better picture of the window.


I placed Grandma's French yarn basket next to the mantle clock.


Last spring, I found this metal heart mirror on AntiqueFarmHouse.com.  I think it cost about $13.95 without s/h, but it looked vintage and the quality seemed good.


I really liked having the heart open to a mirror.


It seemed logical to hang it over the side of the rattan basket.


A few years back, I found these cute mini garlands that I put in the girls' valentine baskets.  All they had to do was assemble the floss and the pennants.  This particular garland spells out amour.  I just draped it onto the top of the basket.


Because I save the special valentines that I gave Mr. Thrifty, I pulled out the ones with pale pinks and rose and placed them haphazardly against the glass of the window frame.


The mantle is almost complete.


The wooden rose plaque added to the theme of cards and postcards.


I still needed some more texture, so I pulled out a piece of Belgian lace to drape over the mantle.  How truly romantic!


A small suitcase and rattan wine basket at the base of the mantle complete this scene.


I could leave this mantle up for a few months.  It is serene, romantic and calming in the great room.