Tuesday, January 30, 2018

SLATE FOR THE TRAY


Back on January 20th, I featured an upcycled tray.  At the end of the blog, I mentioned that I was hoping to find a piece of slate to place on top of the tray in order to serve cheeses and grapes.  I looked everywhere with no success.

While I was on one of my trips to Aldi's this morning, I was looking through the Christmas clearance items, and lo and behold, I found it!

The underside has felt pads so the wood top will not scratch.


The slate was the perfect size and an added plus was a piece of chalk to write the names of cheeses directly on top of it. 


And in the back of my mind, I hear my Grandmother's voice, ' the Lord provides for those that wait'.

Whether it was divine intervention or not, I don't know.  However, it only cost $4.99!

God is good...all the time.


Thursday, January 25, 2018

FREEZING HOMEMADE SOUP


As I had mentioned in my last posting, I have been busy in the kitchen making homemade soups to keep the troops warm and happy.

Today, I pulled out a vat(a little over a gallon of my best beef vegetable soup) and readied it for the freezer.  As a bonus, I will reprint the recipe at the end of this post.

I like to cool the soup in the refrigerator or even outside right now with the temperatures below freezing.

 
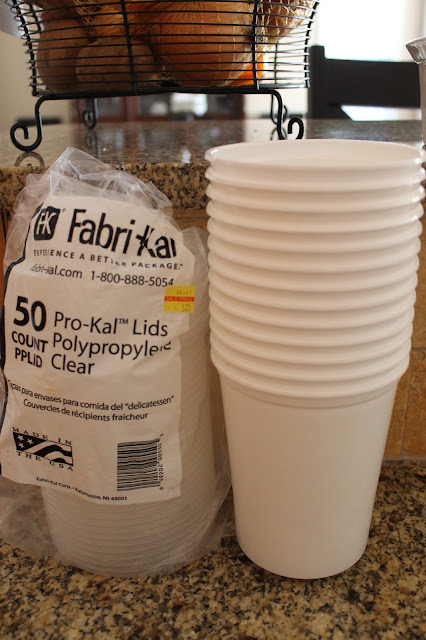
I buy these plastic containers at the Kitchen supply house here in town.  The package of 50 lids cost about $3.75 and I then buy 2 packages of the containers because there are 25 in each bag.  The total for 50 sets is just under $10.00.

I use these containers to freeze almost every sauce or soup that I make.  The great thing about them is that you can just pull one from the freezer and give it away without worrying if you get your container back.

 
These containers hold one quart each.  One quart is an ample amount for 2 people to have lunch or   dinner.

As far as marking the containers, I have found that when wet, even permanent marker smears.  So, I write the label directly on the lid.


Then, I place a piece of packing tape directly over the printed label.  There are no more accidents on the label wearing off.

I ended up with 4 containers equaling to 1 gallon of soup.  This recipe is amazing and goes from freezer to stove without losing any flavor.


LORA'S BEST BEEF VEGETABLE SOUP
 
1 stick of butter

 
2-3 smashed garlic buds
 
1 sweet onion-chopped
 
2 lbs. stew meat, cut in smaller pieces(I like a bit of marbling as it gives the soup more flavor)
 
1 large can of crushed tomatoes
 
3 teaspoons Paprika
 
2 bay leaves
 
s&p to taste--at end!!!
 
8 cups beef broth-I make mine with beef base. 
 
 Mix 2 teaspoons of base to 1 cup of hot water. I find mine at WalMart.  Depending on how thick you want your soup, adjust your own amount of broth.
At least 2 and if you like more, 3 lbs frozen mixed veggies.  I cook mine ahead because they are the steamed packets.
*I marinate my beef in a gallon ziplock bag with 4 cups of water and 3-4 T. cornstarch.  I leave it in the bag for at least 30 minutes.  I rinse and drain the beef before putting it in the onion, butter mixture.  This process will tenderize the beef.
 
Start by melting your butter in a pot on low.  Add garlic and onion and sauté for just a minute.  Add meat and cook on low for about 1 hour.
 
Next add tomatoes and cook another hour on low.  If you see your beef getting tender sooner, you are done with this step.
 
Add bay leaves, paprika and beef broth.  Cook for 30 minutes. 
 
Add cooked veggies.  Sometimes, I cut up canned potatoes in cubes and add them. 
TURN THE SOUP OFF.  I DON'T LIKE OVERCOOKED VEGGIES AND WHEN YOU REHEAT THE SOUP, THE VEEGIES AND  POTATOES WILL NOT OVERCOOK.
 
SALT AND PEPPER AT END .
 
ALWAYS TASTE BETTER THE SECOND DAY.
Excellent when put in freezer.  Just thaw and reheat.
 

Cook a pot today and freeze some for a later day.


Saturday, January 20, 2018

REDOING TRAY FOR BEDROOM 2017


Years ago, I bought this 'table top' at an estate sale.  I liked the lines of it and had always hoped to give it that ol' shabby chic white paint.  However, I am so glad that I didn't go that route.


I didn't pay much for it, but put it in 'the pile' in the garage.  Later, after inspecting it, I realized that it had some interesting characteristics, as you will see in the next picture.


I must admit, it had a lot of flaws, scratches but something was calling my name.

I pulled out a set of rod iron handles bought at Hobby Lobby at half price.  When I placed them onto the top, it all came into place.


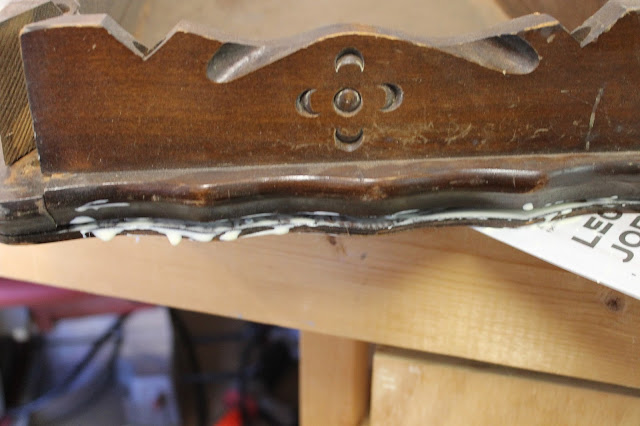
But then, I noticed one major flaw.  See the crack on the underside of the tray?  No amount of wood putty would make this right.  Since I decided to refinish instead of paint this tray, I had to think about it in another way.


More interesting characteristics.

Also, I had to contend with a floppy apron piece too.


I got out the wood glue and clamped it together.


After sanding, I used some old cherry wood stain and stained the entire piece.  I even coated the missing piece out of the bottom.  Once it was all the same color, no one would know for the better.


The piece came out beautiful.


Using some Annie Sloan wax, I rubbed a layer on.  Notice the difference in the next picture of the before on the left, and the after on the right.


Mr. Thrifty used the drill press to put the handles holes in the tray.  I did have to use 7 washers underneath the tray to get the handles to lay flush with the top surface.


And here, is the beautiful redone tray.  I'm still on the lookout for a 10 inch square piece of black slate to place on the tray if I would like to make a cheese display.

I'm happy with the results in the newly updated tray.


Monday, January 15, 2018

ONE DOLLAR GOODWILL FIND UPCYCLED


I found this ceramic trivet for $1.00 at Goodwill.  I really didn't like the mustard color, so a quick project began.


The underside picture shows that this medallion could also be hung as wall décor.


A quick coat of grey spray primer preps the surface.


A coat of grey chalk paint covers the primer.


A quick, sloppy coat of dry brushing white chalk paint over the grey paint.
Distress it a bit with sandpaper.  Seal with spray matte spray.


A bit of the mustard glaze shows through but it is ok on this piece.


Besides using as a trivet, this piece could be used as wall décor or after purchasing a piece of glass to cover it would be an interesting staging prop for a vase of flowers.


Wednesday, January 10, 2018

CHALKBOARD WITH PARISIAN UPDATE


I have had my Menu blackboard up in the kitchen eating area flanked by two frames with vintage copper measuring cups and molds attached to a flax material.


A few weeks ago, I stopped in a newer shop in town that carried Annie Sloan paints.  As I was picking up some paint, I spied this incredible Le Petit Parisien poster.  It is printed on think paper and the details are sharp in the poster.  It took 1 minute to attach it to the Menu frame with tacky.  The faux French lavender at the bottom of the photo compliments the poster.


Truly this poster looks so very vintage.


A closer look.


And in time for Christmas, just a few sprigs of greenery are placed at the top of the frame.
Placing the smaller Christmas tree with stained glass ornaments looks just right just in front of the frame.


Now this beautiful little corner of my world looks just right for the holidays.


Friday, January 5, 2018

CHICKEN GYROS

Since we have had such cold weather here in the South, I have been hunkered down in the kitchen making great homemade soup. 

But today, I want to share with you an amazing Chicken Gyro recipe.

We have a fabulous restaurant in town that sells lamb gyros.  I don't feel comfortable cooking lamb so I thought I would try a twist on the recipe.  Chicken.......
Here are the ingredients.


GYROS WITH GREEK CHICKEN

Serves 6

Prep time:  30 minutes

Cook time:  10 minutes


INGREDIENTS

2 lbs. boneless, skinless chicken breasts

1/4 c. virgin olive oil

1/4 c. lemon juice

3 Tbsp. Greek yogurt

1 Tbsp. red wine vinegar

1/3 c. red onion, chopped

2 cloves of garlic, smashed

1 1/2 tsp. dried oregano

1 tsp. dried thyme

1/2 tsp. coriander

Salt and pepper to taste

Flatbread

Tzatziki sauce

Feta, crumbled

Cucumber, sliced

Cherry tomatoes, halved

Red onions, sliced thinly


My first step was to cut the 2 chicken breasts into strips.


I forgot the red wine vinegar.


The first step is to make the marinade.  Mix the olive oil, red vinegar, chopped onion, garlic, thyme, oregano, coriander, and Greek yogurt.


Place the marinade and chicken strips into a Ziplock bag and place in the fridge.  This can be done the day before serving.


Lay the flatbread onto the plate.


Cook the drained marinated chicken in the pan with a bit of olive oil.  The chicken cooks up quickly.


Spread a good helping of the tzatziki sauce in the middle of the flatbread.


Place the chicken strips on top of the sauce.


Generously add the tomatoes, red onion slices and feta on top.  Fold once.


Fold the end over.


Fold the last side in and serve.


All I can say is that the chicken gyros were delicious.