Thursday, June 28, 2018

PLASTIC TABLECLOTH FOR DINING ROOM TABLE 2018

I am in the midst of painting and staining the Marian shrine for our home.  Because I can't show you the final results yet, I am sharing a fun trick that I used at Easter.

I have to laugh as I tell you about the latest trick I have for my dining room entertaining. Years ago, I remember my grandparents placing clear plastic over the tablecloth while serving Sunday dinners.  I'm sure that was to prevent stains while feeding the grandchildren.

Now, I would never have thought of using the plastic liner until I decided to have lobster for my Easter dinner.  The thought of dripping butter on my vintage periwinkle damask tablecloth was scary.

Originally, I had purchased this gorgeous tablecloth and monogrammed napkins done in a soft shade of lime green at an estate sale at a prominent home on Moss Avenue.  This area was a well to do neighborhood in West Peoria.  I paid $25.00 for the tablecloth and 8 napkins.  I have used them every spring since I bought them back in the mid 80's.  Yes, that's a long time ago.


On a trip to Hobby Lobby, I ventured back to the fabric department and found this great transparent liner.  I bought 2 yards and brought it home.


As you can see, it was pretty cheap and considering its purpose was money well spent.


I removed the table settings and placed the plastic on top of the delicate tablecloth.   Can you see the intricate embroidery on the right edge of the tablecloth?  The napkins carry the same monogram.


After putting back the centerpiece and table settings, you hardly notice the plastic.


I believe I enjoyed this Easter dinner because I didn't have to worry about spills and stains.  Also, I didn't have to launder the tablecloth since it was protected.  Saving cleaner fees was an added plus.  Of course, the napkins were laundered, but I wash them in cold water and gently press them after they come out of the dryer.

I think Grandma would smile at this trick of protecting one of my favorite tablecloths.

Saturday, June 23, 2018

CREATING A MARIAN SHRINE FOR THE HOUSE


I have been wanting to make a permanent Marian shrine for our home.  I have prayed to the Blessed Virgin on many occasions throughout my life.  Many blessings have come from saying the rosary.

It was necessary to create a special place for the Virgin Mary.  I have been looking for a vintage clock case that I could use as the base of the shrine.  How shocked was I when I came upon this vintage case right after Christmas at an antique mall down the street.  It was perfect--old-but I knew that I could revive this piece.  The price on the piece was $80.00 and normally I wouldn't spend that much, but I noticed that the glass had a crack in the upper left corner.  On a whim, I asked if the seller would come down in price.  After a short phone call, she came back and asked if $60.00 was ok.   Ok!!!! I couldn't pay the bill fast enough.

However, it has been so cold in the garage that I haven't been able to work on it.


Some of the trim is damaged.  I went out looking for some trim molding and the closest thing I could find was doll house molding.  It was a bit too small.  I then found a piece of molding at Home Depot and Mr. Thrifty told me that he could router the wood to match the original trim.


  How happy was I to hear that!!!


I found this broken off piece for the front inside the case.  That will be an easy fix to glue it back on.


I purchased 2 Annie Sloan Chalk paints--Burgundy and Greek Blue. 


I'm hoping to mix these two paints to make a lavender to paint the shrine itself.

The above painted secretary has the exact color that I want.  I am hoping that my shrine will have gold accents also.  I can't wait to start painting!

Enter Mr. Thrifty.  The so called easy fixing on the moldings weren't going to be as easy as I thought.
The Mr. didn't have a router bit to make the exact cuts in the wood strips that I found.  However, when the Mr. cut the doll house molding in half and butted one half up against the other, it was resembling the old molding.

 The one old trim piece fit back on.  He took off the side molding strip and gave it a 45 degree angle cut to fit into this corner.  Looks pretty good!


Now, Mr. Thrifty cut the dollhouse molding in half and butted one back to the other.


I glued the two raw pieces of molding together and attached clamps.


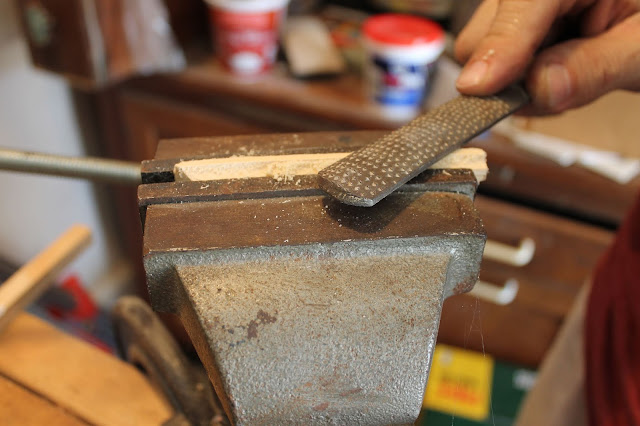
The next day, the Mr. used his file and starting shaving off the sides to match the original molding.'

Finally, it was time to match the two pieces together.  A 45 degree angle was cut on the right end and a 90 degree angle on the left end.

Isn't he amazing?

The piece was glued in place.

Tomorrow, the magic will begin.


Sunday, June 17, 2018

MUFASA


Our grade school is putting on Lion King Jr.  One of the characters, Mufasa, is being played by a brother of one of my daughter's friends.   It is easy to buy a bouquet of flowers for a girl in the play, but I had to think harder to figure out a treat for a male character.

I found this tiki-like glass jar with a straw from Walmart.  It sort of looks like a lion.  Since jelly beans were available at this time of the year, I filled the jar with them.


I pulled a picture of Mufasa off Pinterest.


I think this is a perfect treat for our Mufasa!

 I can't wait for the play!


Sunday, June 10, 2018

GRADUATION BRUNCH

As I mentioned in my last posting, graduation was upon us.  Our youngest daughter was graduating from high school.

We celebrated from the front door....


and throughout the house. 

 Instead of purchasing graduation decorations, I decorated with memorabilia from her accomplishments.  It's much cheaper that way too!


I started my prepping in early May.  Polishing silver, and collecting all of her memorabilia took some time. 

The buffet table was set with my silver plate and utensils.

The yogurt station was set next to the fruit display.  Two kinds of yogurt and granola completed the buffet.


Sliced ham and mini croissants(sliced ahead of time) were placed on the dining room table.


My little graduate took pictures.


A menu was printed off and set in a gilded frame. 


My sister, Merri made scrumptious mini-lemon bars and rich, gooey cranberry cake.


My sister, Sharon, helped create the dainty floral arrangement to accent the desserts.


I added a bowl of sliced strawberries for the yogurt parfaits.


Condiments were put in glass crystal cups.


Four cheese and spinach Florentine quiches were added along with an amazing kale, cranberry, pumpkin seed salad with poppy dressing.


I also had a coffee bar and mimosa bar filled with flavored creamers and a variety of juices.

All of the helpers joined in for a picture.  I don't know what I would have done without my sisters who kept the buffet filled during the brunch.


All in all, it was an amazing day and everyone had plenty to feast upon during the brunch.

Monday, June 4, 2018

FRUIT EXTRAVAGANZA

Graduation was upon us and I wanted to celebrate the accomplishment with a celebration.  And that meant food....

As I was contemplating the items I was going to place on my brunch buffet, I readily went with an old favorite-Fruit Extravaganza. The last time I created one of these displays was when the General was coming to town and I was in charge of having a brunch for his wife. Looking back, having two young daughters, the oldest being 4, they were my only helpers.  While my sister was the extra pair of hands this year, I guess the oldest daughter must have been my extra pair of hands back then. 

I originally found this idea in the Louisville Kentucky paper years ago around the time of the derby.  It is perfect for May because all of the wonderful fruits are readily available.  So, let's get started.

I purchased 3 round Styrofoam discs at Michael's.  The base is the larger of the two sizes.  Buy one, I think it is about 10 inches in diameter.  Then, buy 2 of the 8 inch disks.  Cut one of the 8 inch discs in half.

Using tacky found at Staples, make a one inch disc and flattened the tacky.  Use it as a glue to secure the base disc to your platter.  Then, using wooden skewers, both long and short ones, begin putting the discs together.  Place the largest disc down  first, and then the 8 inch on top.  Notice in the picture that it is off centered.  You want the back of the foam to be the same.  You will see later why this is important when it comes to the pineapples. Using your skewers, poke them into the Styrofoam until think they are secure.  I have 3 long ones in the very top half.  Can you see them?  I believe that you can't be too careful with making the base solid.  The fruit carries a lot of  weight and you don't want the base to collapse.


Make sure to rinse and drain all of the fruits prior to placing them on the foam.

Fruit amounts

2 pineapples
2 cantaloupes
1 large bunch of greengrapes
1 large bunch of red grapes
2 cups of fresh blueberries
3 cups of fresh strawberries, hulled.  Keep 5 or so strawberries with the stems on for garnish.
a bunch of heather-like foilage

Let's begin!
First, I cut the 2 pineapples in half.  Try to keep as much of the green foliage on each half as it covers the Styrofoam.  Using skewers, attach the 3 halves to the back of the foam.  It will be a bit side heavy.  This is where the extra pair of hands comes in-and don't forget the tacky!

Do you notice in this picture the half circle I cut out of the front bottom disc? This will come in handy in a second.
In prepping the cantaloupes, use the zig-zag method of cutting them in half.  Then using a melon baller, make clean balls with the inner flesh.  This can be done the day ahead.  Just remember to place saran wrap on the empty shell so it stays fresh. 

At this point, the 3 halved pineapples have been skewered to the back.  Now, using the smaller skewers, place the 3 halved cantaloupes onto the foam in a cascading fashion. Make sure that the cantaloupes are somewhat upright because when you place your fruits in them, the fruit will not roll out. The bottom melon will fit perfectly in the cut out section of the base.


In the next picture, I should have skewered the pineapples to the foam at the bottom of the tray.  That is what causes the side heaviness.  I didn't realize that they were not laying on the tray as I skewered them until I saw it in the pictures.  This is the part of the 2 woman process.


After rinsing the grapes, add bunches in the holes to cover the foam.  I use toothpicks to adhere them.
At this point, it is really just filling in the spots.


And here is our graduate!


At this point, it is wise to move your fruit tray into it's location or else you will have fruit spilling all over the floor.

Now, all the melons are filled except the top one.  Blueberries are placed in the 2nd one and hulled strawberries are in the third.  I want to thank my sister, Sharon, for assisting me in creating the display.  


 Just to add a punch of color, I insert a tooth pick and place a whole strawberry on it.


And finally, the melon balls are added.


On the next posting, I will show you the rest of the brunch display.

This is really one of the most dramatic food displays.  It certainly adds that wow into entertaining your special guests!