Saturday, April 5, 2014

PRETTY ROSE PLATTER

While at an estate sale last weekend, I found this precious little platter, for $3.00.  I thought it would be a lovely accent for my spring display. What intrigued me about the platter was the crazing  on the surface.  How many times had this platter been used as someone else's table?
 

 My $3.00 well spent.
 
 
Right now, perched on top of the post pillar, it is set up by the two corbels that came with the original pillar. 


The sight of the pastel pinks make me think of the long awaited spring coming forth.
 
 
And to add a bit of Easter cheer into the mix, old Peter Rabbit comes to visit.


Tuesday, April 1, 2014

COMPLETING THE RESCUE MISSION NIGHTSTAND

When last I wrote about the Rescue Mission nightstand, it was at this stage.  Because of the cold weather, progress had stopped.


This was the before picture.


Because of the dark stain, even though it was sanded, I still applied a coat of clear shellac to seal the wood.  


The Annie Sloan Pure White paint was then applied.  This is the first coat.  As you can see, some of the stain leaked through the paint.  A light sanding and another coat of shellac was painted on.


This picture shows the touch up of the shellac before the second coat of paint was applied.


The other drawer.


The second coat of paint shows a more even coat.


 Because the chalk paint has the feel of a flat wall paint, I wanted to topcoat it with something a bit more durable than the normal wax.  I had heard that polyacrylic would do the trick.

However, I should have tested a small area of the piece before I coated the whole thing.  Look at the results.  Some people like the crackled look, but that was not what I was looking for.


  Instead of giving the nightstand a clear coat, it crackled the entire piece, so back to the drawing board. Now, I had to re-sand the piece and start over.  This time I will use the clear wax as the final finish.

The first step was to use my mouse sander to take off the crackled finish.  The sanding pad kept gumming up with the paint.  Enter Mr. Thrifty.


So, he pulled out this belt sander.  It worked well at first, but it too became gummed up.


The next bit was a paint sanding wheel.  This worked well until I burned the drill itself out.


My last resort was to pull out the liquid stripper.  By now I have spent about 4 1/2 hours sanding.  I was really fatigued.


One heavy coat of stripper and 30 minutes later, it was ready to clean off.  One of the biggest mistakes you can make when  using stripper is to leave it on until it dries.  It will become gummy and you will find it very difficult to get off.  So follow the directions and take it off after the appropriate amount of time.


Once cleaned off, the pieces look like this.


Then I give it a final sanding, and I am ready to start with the priming process again.


This time, I used Kilz2 primer before adding the paint.  However, nothing is easy with this project.

 In the next picture you will see the bleed through from the stain.  I will persevere even though I have thought of throwing this nightstand into the garbage can more than once.  The reality is that every project comes with its unique set of problems.


Stain bleed through on the top of the nightstand.


 Time to pull out the shellac again to seal the stain.


After a  careful light sanding, a coat of shellac and a few hours to dry, the piece is ready to again start painting the Annie Sloan Pure White paint again.


Adding two coats of paint and the piece is ready for the clear wax and buffing.


Then the handles were added to the door fronts.


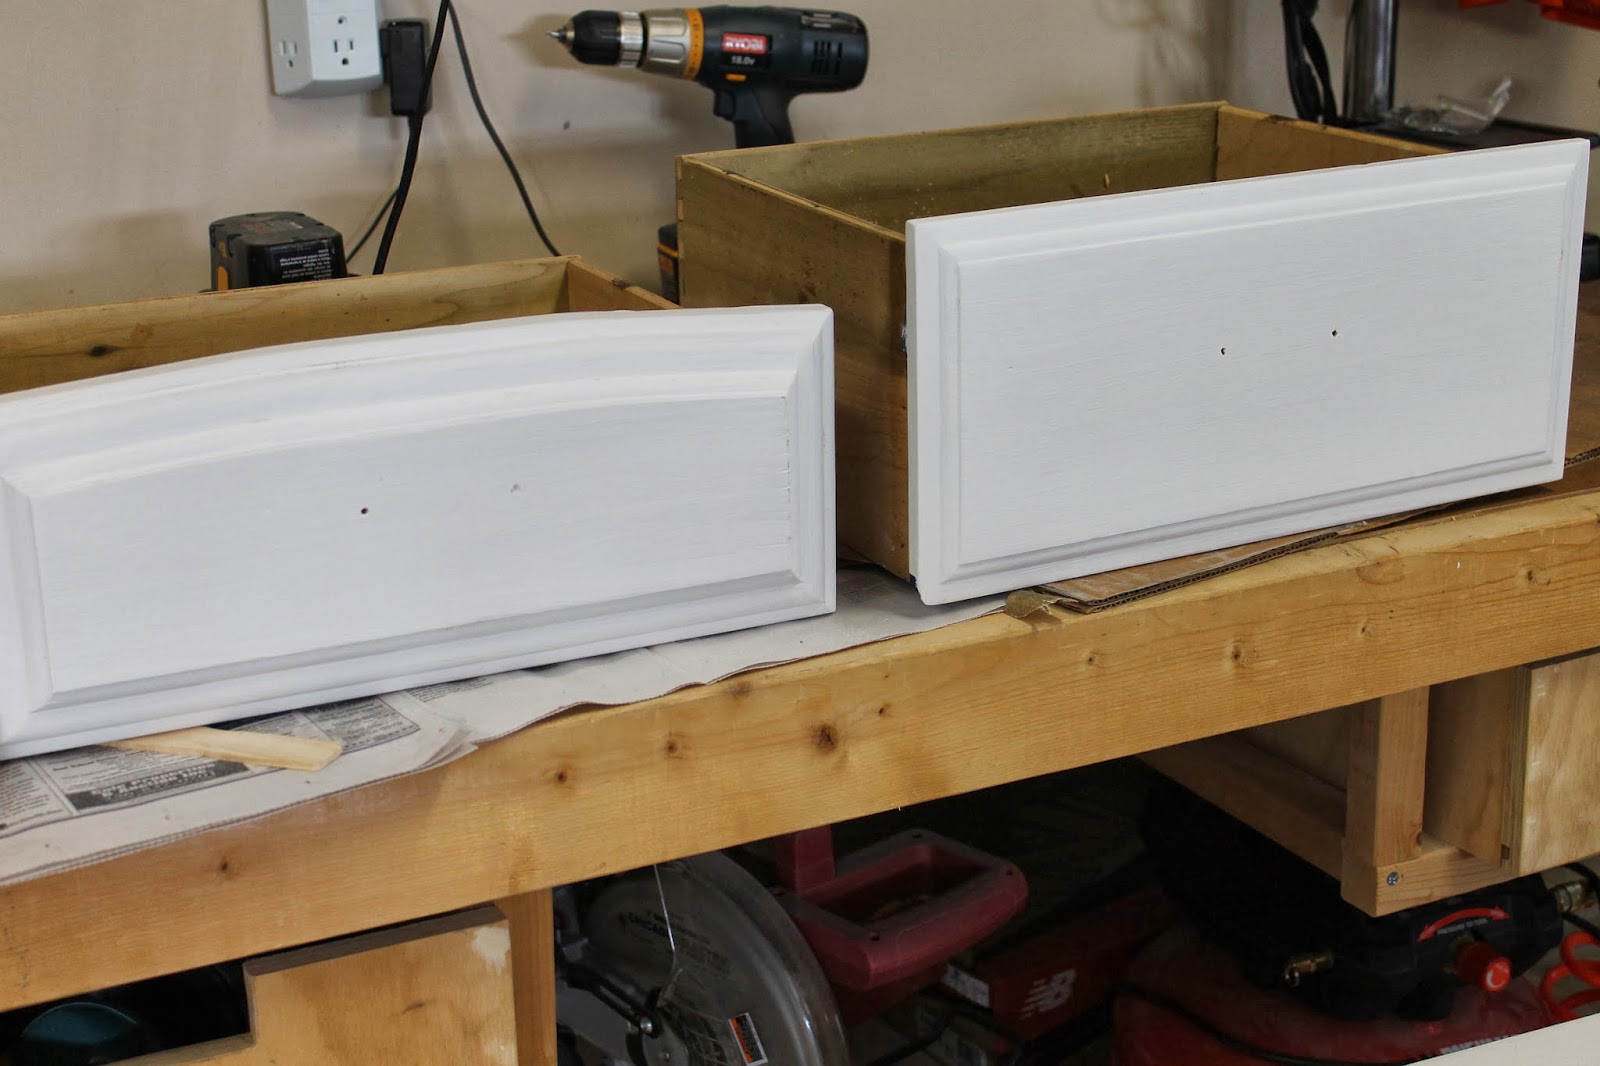
Notice something a bit wonky?  I thought Mr. Thrifty had not drilled the holes on the right drawer correctly.  However, when I unscrewed the handle, I noticed that I had not put the screw into the hole, but rather another space behind the handle.  Once in the correct hole, it was perfect.

And now the finished project.


I was finally, pleased with the results.  We then moved it into place in the bedroom and it compliments the headboard very well.

 
Now this is how the nightstand looks for blogging purposes, but the reality is that no nightstand looks like this in real life.  There are remotes, a phone, alarm clock, a crucifix and a box of Kleenex on this nightstand.  So this is the real deal.  But it looks 100% better than the mahogany stained Korean nightstand previously there.

 
And as a reminder, look at a similar nightstand made by Thrifty Décor Chick, another blogger.
 

I have to admit, I was never so happy to finish this project.  Perseverance is key and without it, this would have been a $6.99 piece of junk.
 

Tuesday, March 25, 2014

MAYWOOD CLEANUP PART 2-THE WOOD FLOORS

 As I had mentioned previously, when I was still single, I had taken up the carpet in the one bedroom on the main floor, the dining and the living room.  We have a marvelous floor refinisher in town.  I think they have been in service at least 60 years. 

In those days, circa 1939, these wood floors were 1 3/4 inch oak, something unheard of these days.  When the sanders had completed the re-sanding and refinishing job back in 1989, the floors were perfect.  Up until 2000, I know the floors were in pristine shape, because I had lived there.  Once we moved and had renters in the house, I always had a lot of angst about them caring for the floors.  Thirteen years later, there was damage, some worse than others.

Once the renters were out, a dear friend obtained the keys from the property manager and he went in to see first hand what shape the house was in.  These are some of the pictures of the wood floors.

This spot was from the dog urine.  Sad, sad is all I can say.
 

The dining room area where the table was sitting had scratches due to furniture with no felt pads on the feet of the table and chairs..


The most shocking floor was the back bedroom.  Five years ago, before the house was rented to a new tenant, the property manager mentioned that without allowing pets cut down on the number of people able to rent.  He encouraged me to change the lease and allow pets, however, at the time I remember telling him that smaller pets would be allowed.
 
Well, come to find out, the last tenant had a 'Marmaduke' type dog.  When the last year's inspection report came to me in the mail, there was a note stating, 'big dog', could not enter the room.  I questioned it, but should have pushed it further with the property manager. 
 
So when I received this picture via email, I was totally distressed.


Besides leaving the dog in this room all day while they were away, one wall of the baseboards were urine filled.  When Mr. Thrifty first saw the picture, he told me that that wasn't a dog, but a bear that had done this damage.  Mind you, at this point we did not know what type of dog the tenant had.
The following picture is a close up of the doorway in the room.  This 1 3/4 inch oak had been scratched down one inch in some places.

 
And a picture of the back of the door.  All I could do with the door was lightly sand, stain and seal it.


When I first arrived on site, I immediately called the same sanders to come evaluate the problem and see what could be done.  Luckily, they buy older homes' oak flooring pieces just for instances like this.
 
The entire floor area under the  door was pulled out and newer 'older' oak was replaced.  Nothing could be done about the door because it was made of Douglas Fir.  This type of wood door isn't even made anymore.  Once the newer wood was replaced, an overall sanding staining and Polyurethane was applied to finish the room.


As I said before, this company of floor sanders are miracle workers.  Luckily, we pressed the property manager into making the past tenant pay for this damage.  The door could not be saved.


The after picture is amazing!


The girls and I cleaned the baseboard with a solvent that pulled out the dog urine, sanded and refinished it ourselves.
 
I am so happy that the floors came back to life. 
 

One other item that wasn't cleaned since 2000 were the floor returns.  I know this because like my Grandmother, I would clean them and place newspapers in them for lining.  The paper I pulled out while cleaning, sure enough was from the year 2000.

 I'm sure Grandma would have rolled over in her grave had she seen this.


A close up...


And after cleaning......(with newer newspaper)


Finished with the metal cover.


After getting on my hands and knees with Murphy's Oil soap and washing the polyurethane floors, they looked like this for the realtor's pictures.  Quite an improvement.  Of course, all the walls in the house except for the kitchen were repainted during these same three weeks.


Notice the built in cupboard.  This cabinet was pretty much untouched from the renters.


And the dog room, as we now call it.


Minimal damage was done to the upstairs bedroom.  This room had wider pine planks.  I had refinished this floor after I had moved in.

 
 So now you have seen the work done to clean up and refinish the floors.  Stay tuned to the next segment posting on the kitchen.


Friday, March 21, 2014

MAYWOOD CLEANUP PART I

This posting will begin a 7 part series on the house on Maywood.  Last summer, the two girls and myself trekked to Illinois to get the house ready to put on the market.  I like to think of this series of postings as our 'diary of a dirty house'. 
 
Having spent 3 weeks this past summer readying the Maywood house for the market was an overwhelming task.  The first issue was Mr. Thrifty could not take the time off of work to help on this momentous project.  The two girls were going to be part of my crew and they would be paid for their efforts.
 
If anyone would have told me how well this plan would have worked out, I would have never believed them.  Having not stepped in the house in over 5 years was a scary thought.(The house had been rented out for the past 13 years.)  A dear friend of mine that lived in Peoria would be my eyes and ears until I arrived in late June.  He would obtain the keys to the house from the rental manager and give me a quick look see at what damages had occurred.  I was astounded.  You have to keep in mind that while my grandparents, the original owners who had built the house, were fastidious housekeepers.  We use to joke that Grandma would catch dust in the air, because the place was always spotless.


Maywood house- circa 1939

 
When I first bought this property, many things needed to be updated.  In 1993, a new roof, new furnace and the first air conditioner were installed.  I spent my first summer going through 2 heat guns, stripping and repainting all the exterior wooden window frames. I couldn't afford to buy all new windows, so that was the alternative.  All the original wooden floors covered with carpet were sanded and refinished.  Every room was painted which was a feat in itself.  While painting the living and dining room, I returned the morning after applying the first coat.  It looked like the walls were in ancient Greece.  They had all crackled because some type of varnish had been applied over the paint.  I guess this was to keep them from absorbing stains.  I had to start from scratch after washing with bleach all the walls in the remaining rooms.  TSP  did not even work on these surfaces. New linoleum was laid in the kitchen and basement stairs.  The basement was painted with paint to seal moisture from coming in.  And that was just the inside.  With the help of a bricklayer friend, we laid a brick patio using old street bricks in the backyard.
 
After I had married, Mr. Thrifty insulated part of the attic and installed brand new easy clean tilt out windows.  He re-plastered and painted all the ceilings on the main floor.  With my Dad's help, he updated the bathroom.  All window sills were stripped, stained and coated with polyurethane.
 

This picture was taken after the new half-circle front steps and the front brick patio were completed. I loved the original wooden screen door painted bright red.  My dad had built and installed the window boxes.

 
By the time we finished, it was a glorious place.  When we moved out of this house, we videotaped the complete house just to validate all the work that had been done.

And this is the picture with all the tulips blooming right before we moved out in  2000.  The new glassed green screen door updates the original red wooden screen door.   This picture shows the lawn at its best. (And seated on the front stoop were our two girls, one of them a newborn baby and myself.


And so begins the documentation on the Maywood home.