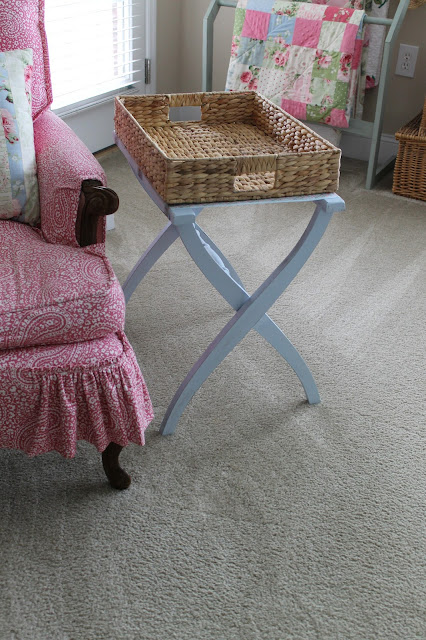
It seems that most of my summer postings have been about food. Today I am going to share with you a project I have completed this summer.
I have had a vintage luggage rack hanging in the garage since we moved here. While sitting in my reading chair in the bedroom, I looked at the stack of wicker baskets that I have been using as a side table. What about if I redid the luggage rack and placed a willow tray on it?
I have had a vintage luggage rack hanging in the garage since we moved here. While sitting in my reading chair in the bedroom, I looked at the stack of wicker baskets that I have been using as a side table. What about if I redid the luggage rack and placed a willow tray on it?
I took a trip to Home Goods and found the type of tray I was looking for. The was half the battle....and what a price!
I brought the tray home and placed it on top of the scruffy rack. The size worked well.
My thought was to use a French ribbon to use as the straps. After looking on the Internet, I found this beautiful ribbon. It was a bit more costly than I would have wanted, but it was in the exact color family that I was looking for. Now the ribbon was not going to be as strong as the burlap, but I wasn't planning on putting anything much heavier on the tray, so I thought it would be fine.
I went ahead and purchased two yards and waited for it to arrive.
Once the ribbon arrived, I had to come up with a color that complimented the ribbon.
The color I had in mind was a soft periwinkle. I had some Waverly white chalk paint and a bright latex periwinkle in the paint box. I decided to mix the two to lighten up to a light blue. The baby food jar shown below is the new mixed color.
I had never mixed chalk paint with latex, so I didn't know what the results would be, but what the heck? After all, it mixed well.
Here is the close up of the blue.
Before proceeding, I wanted to do a paint test to see if the color when dried would still be a good match for the ribbon. Well, it wasn't. It had too much purple in it. So I went back to the garage and found the Annie Sloan Louis Blue paint. Now that would work. I mixed the blue with the white chalk paint.
It did.
The first step was to remove the two worn straps on the existing luggage rack.
A pliers did the trick removing the three worn straps.
After laying a large piece of cardboard out, I placed the luggage rack down and gave the whole piece a once over with 200 grit sandpaper. I then wiped down the entire piece with a damp rag to get rid of any of the sanding dust. Remember that chalk paint is very forgiving so you don't have to sand until the wood is raw...just scuff it up.
It dried quickly, so I was ready to paint.
See my loyal friend napping in the background.
I gave it one coat and let it dry.
After 30 minutes, I gave it one more coat of paint.
When dried, I lightly sanded the rack and distressed the edges in a few places.
A side note here...I store my Annie Sloan clear soft wax in a cabinet above my dryer. If I stored it in the garage, it would become too soft and runny.
I keep the brush in a zip lock bag to keep the wax from getting on any other items.
I gave the entire surface a coat of wax and then buffed it off with a soft terry cloth rag.
I propped up the finished rack in the sun and let the wax bake in. I came up with this idea. The buffed wax is very dry after a few hours in the Alabama sun.
The tools I used to complete this project were a staple gun, a hammer and pinking shears.
Using the pinking shears, I cut 3 pieces of fabric that measured the same as the old strap taken off the rack. The reason I used pinking shears is that the tendency to fray is diminished.
As you notice in the next picture, the wood was so old that the hand held staple gun did not shoot directly into the wood. Using my hammer, the staples were driven in more. It isn't the prettiest but since it wouldn't show, I proceeded. I could have used the electric staple gun, but I would have had to have gotten the compressor out. I decided to forge ahead with the hand held staple gun.
I did fold under about a 1/4 inch of fabric under to make sure that the fabric stayed taunt.

I completed the middle strap first and then the two end straps.
This process of attaching the straps took about 15 minutes. Just make sure that all your straps have the same tightness.
I love the look of the wicker tray on the finished luggage rack.
I could also switch the tray out for the mosaic oval tray.
But for now, I decided to go with the willow tray for the summer. Because it was raining outside when I was writing the post, I didn't get to cut some fresh flowers from the garden to adorn the tray.
But for now, I am pleased with this latest transformation.


No comments:
Post a Comment