Tuesday, November 26, 2013

HAPPY THANKSGIVING 2013(MANTLE CHANGE)


Another Thanksgiving is upon us.  And the weather is less than good.  Everyone be safe on the roads.
 
In my earlier crafting days, my favorite craft was cross stitching.  I made various seasonal pieces and framed them in respective fabric mats to compliment the piece.
 
 The Thanksgiving cross stitch project works perfectly to celebrate one of my most favorite holidays.  Reuniting with family and  reflecting on our blessings received over the year makes for a wonderful holiday.
 
A close up of the project.


An easy addition to the fall mantle this season was to prop the frame up against the scrappy bead board door used in the Fall Mantle 2013.


The Pilgrims came from oer the sea to found a land for thee and thee.

 
HAPPY THANKSGIVING


Friday, November 22, 2013

A SPECIALTHANKSGIVING DESSERT-COBBLER APPLE PIE


One morning, I was in the kitchen cleaning up the counters, when I glanced at my two vintage red topped tin canisters with the glass knobs.  For some reason I had the urge to bake a dessert.  What follows next ......      

       contains a  recipe with a bit of serendipity.


  I had picked up a box of cobbler mix at the store.


  But when I returned home, I found one single pie crust in the fridge.  Wanting to use the pie crust up, I decided to use both ingredients. 
 
First, I laid out the pie crust in a dish, and baked it 12 minutes in the oven.  While it was cooling, I cut my 7 fresh fall apples.  After slicing them, I added 1 teaspoon of cinnamon and let them sit.
 
 
The next step was to mix the cobbler mix as directed with 5 tablespoons of butter.  Once crumbly, I was ready to assemble the cobbler pie.  I poured in the cinnamon laced apples onto the cooked pie crust.  Placing the cobbler mix on top of the apples was the last step.
 
I cooked the recipe about 10 minutes longer so the crust was brown and the crumb topping was a bit crusty.
 
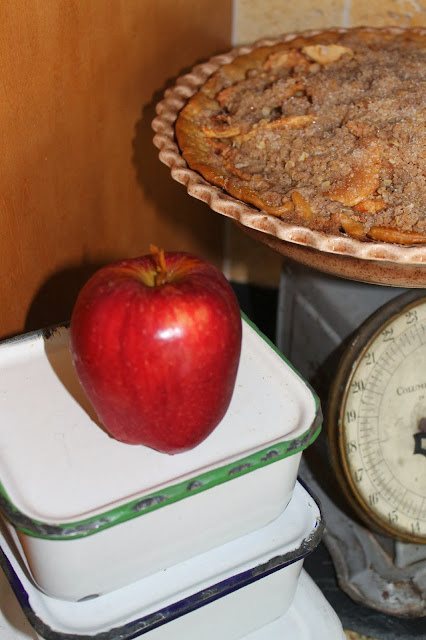
After removing the pie/cobbler from the oven, I placed it on the antique scale to cool.
 
It seemed quite natural to set Grandma's vintage granite ware containers next to the pie.
 
I'm sure my daughters have no idea what these containers were used for accustomed to using Glad ware or Tupperware.


Serving it warm with vanilla bean ice cream completed the plating.
  
Yum.
 
This dessert would make an awesome Thanksgiving dessert.  Between the cobbler crumble and the flaky pie crust, the apples hide between the two layers of lusciousness.
 

Monday, November 18, 2013

PILGRIM MAIDEN

I have had such inspiration from my Victorian lady bust that I purchased from Victoria Trading Company years ago.  I have used my maiden bust in numerous other posts.

 Studying the bust, I noticed the bit of gathering of a ruffle around her face.  My thoughts went to the Puritan ladies of the past.  They had such hard lives.  Compared to today, we are very pampered with our modern conveniences.

  I know that the Pilgrim dress was very plain and unadorned, but I was going to create my interpretation of a Victorian Pilgrim Maiden for Thanksgiving this year in my home.

I Googled Pilgrim maiden images and found this interesting picture.


Instead of the typical plain Pilgrim collar, I thought about the vintage lace collar that I had used  a few years ago on my Irish lassie.
 
 In the days of old, ladies did not have the variety of dresses that we have today.  Adding a lace collar around a neck could embellish a plain black dress to make it go from serene to elegant.

Once I put the collar around her neck, I realized that she had the potential to become a Pilgrim Maiden.  To complete the Maiden, I needed a head covering cap.


So, I went to my fabric tub and could not find a piece of black material to create my caplet.  Hours later with a remnant from Hancock Fabrics in my hand, I placed the fabric over her hair.  And there she sat for weeks.

A neighbor came in and said it looked like I had a nun over in the corner of the room.  That was all the motivation I needed to get down to some sewing business. At this stage, she reminded me of a Postulant.  A Postulant is the first step of training in becoming a nun.


Researching images of caplets in the Colonial days was fun.  Most caps had a wider band around the face and then a gathered cap  was attached to the band to hold in the hair.  I recall while visiting Plymouth Plantation many years ago hearing that the women kept their hair covered to keep it clean.
 
First, I cut a rectangle that would go around the statue's face for the wide band.  I turned it inside out and sewed the two ends.
 
 
Once turned right side out, it was ironed.
 
The next step was gathering the cap material and pinning it to the band.  Once sewn, it looked like this.
 
 
Elastic was then put through the bottom hem using a safety pin attached to the elastic.
 
 
The last step was sewing two pieces of grosgrain ribbon onto the ends of the band.  Once the caplet was on the bust, the back turned out much more differently than I expected.

 
What do you think?
  
 
Now, she takes her place in the fall foyer for the season.
 
Let Us Give Thanks


Thursday, November 14, 2013

THE WHITE PUMPKIN FOYER

The posting today is actually the Halloween foyer minus the spooky elements.  So let's backtrack a bit.
 
Trying to come up with a tranquil white pumpkin foyer was fairly easy.  I used one of my concrete looking urns along side a pediment base.  Stuffing both with newspaper would give the base to lay the cream shredded filler.
 
 
Stuffing the paper filler was added.
 
 
I found some Ashland natural baby's breath like fronds at Michael's.
 
 
The stuffing added the needed texture.  Finally, placing the off white glazed pumpkins on top began the base of the foyer display.
 
 
A concrete looking heart added the third element.
 
 
Placing them on top of the headboard bench was a good backdrop.


Lighting up the school house lamp fixture on the floor gave the display a warm feel.
 
 
At night, it brings a lot of warmth into the foyer.
 
 
The existing mirror throws off the reflection.


The off white display will set the stage for the remainder of fall and transition into the Christmas season.


Sunday, November 10, 2013

AUCTION PROJECT: UPCYCLING A CABINET DOOR INTO A MOSAIC TRAY


It's that time of year again, meaning school auction time.  I needed to come up with one idea this year, because I have the components to make a past project for the other school for their annual auction.

I went out to the garage to find inspiration in the 'heap' as I call it.  This pile has been whittled down, but there is still a lot of potential there.  My eyes focused on one of the two kitchen cabinet doors that I bought in Little Rock for $2.50 a piece. 


Notice the hole smack dab in the middle of the door.  No problem.  Spackling compound will fill that imperfection.

Originally, I was going to make a bed tray with one of the doors.  It just didn't feel right.

These white legs actually came off the original white bench that Mr. Thrifty made out of a headboard.
Eventually these legs will find their way onto another project, just not this one.


You might recall the bench.  Here it is  pictured  with its new legs.


Back to work..... 
So climbing up the stairs, I pulled my tub of china mosaics out.
 
Two sets of handles were pulled from my 'doors and knobs' bucket.  Every visit to Habitat for Humanity leads me to the hardware area.  You never know when you will find them, so stock up while you can.  Normally these recycled handles cost about 50 cents a piece.
 
I was ready to go.
 
The great thing about creating mosaics is that the products you need last a very long time, so once you have the initial investment, future projects are made at a minimal cost.
 
Initially, I purchased tile nippers, a box of non-sanded grout, tile adhesive, and grout sealer. 
 
Because I already have the china mosaics, no cost was incurred there either.
 
Notice the screw holes on the back of the cabinet door.  Spackling compound to the rescue.  You will not even see these again.


 The molding on the front of the door has some dings.
 
 
 Here is my first pair of handles.  I think they have too much flourishing.  Try again.
 
 
 I settled on this kind of handle.  It will look completely different once it has some Annie Sloan paint applied.  I can't wait to see the transformation!
  
 
 Putting the spackling compound to good use......
 
 
 Once the holes are filled and dried, a good sanding is all that is needed prior to a spray primer coat.
 
 
 Since the middle of the door will hold the mosaics, I'm not going to waste my spray primer.
 
In the next step I will measure  holes for the handles.  Then drill and dry fit your handles and screws in the back of the tray. This is a step not to miss.   You will avoid issues when the entire piece is done.  It is a lot harder to work with a finished tray than before you glue down the mosaics.  
 
 
One quick coat of Annie Sloan pure white paint is applied to the cabinet door.  Notice how smooth the back of the door/tray looks-no more screw holes from the hinges.   
 
 
After sanding lightly with 220 grit sandpaper, apply one more coat of white paint.  Remember to paint the handles too.  After they are dried, lightly distress with the same sandpaper.
 
 
It was time to cut my mosaics and fill the insert on front of the cabinet door. 
 
Then using the tile adhesive, take a putty knife, and coat the inside of the moulding  area and sit the china mosaics in place.
 
Notice the excess adhesive squeezing out between the china pieces. This is the time to take a screwdriver and clean this up.  You want the adhesive to be below the china line so it will be able to accept the un-sanded grout.
 
 
 Notice the distressing of the painted edges.
 
 
 I use a  clean yogurt container to mix up the grout.  Directions are so easy.  Mix up, let sit for 5-10 minutes, re-stir and then get ready to apply over the mosaics.
 
 
 I never measure the dry grout.  My clue to texture is that it should feel like peanut butter.  That works every time.
 
 
Here my young helper dumps the grout onto the mosaics.
  
 
 The first step is to spread out the grout with a putty knife.
 
 
 To ensure that there are no air bubbles, I jump in and spread the remaining grout with my fingers.
 
 
Immediately, I get a damp rag and start cleaning each china mosaic getting rid of the excess grout.  Notice the left side of the tray has not yet been cleaned.


 Rinse out the rag and dispose of the liquid in the toilet.  Cleaner water helps clear the grout lines quicker.
 
I love the effect of the iridescent tiles catching the sunlight.
 
 
 At this point, I let the tray dry for at least a week before sealing the piece.
 
Then  the handles are attached.
 
 
 Using a grout sealer will keep the grout from dirt and debris.


 Pour a small amount of sealer into a plastic container.
 
 
 Using a small paintbrush, liberally paint the grout area only.  If you coat the tiles, wipe them quickly to avoid a hazy coat of sealer.
 

Notice the small amount of sealer used on this piece.  


The last thing to add are the foot pads.  These are just cabinet door pads used in normal cabinetry. The pads will keep the screws from scratching a surface.


 Another look of the back of the finished tray.
 
 
The completed tray.


The tray would be a perfect coffee table tray or maybe even for a dressing table.