Sunday, December 31, 2017

WINE BOTTLE CHEESE BALL FOR NEW YEAR'S EVE


Our church had a social meeting with a wine expert as a speaker.  I wanted to have some food that would be associated with wine so I decided to make a cheese ball--in the shape of a wine bottle.

Here is the recipe that I found online. I doubled this recipe.

2 Tablespoons of Buffalo wing sauce
1 teaspoon of black pepper
1/2 teaspoon cayenne pepper
1/2 teaspoon season salt
1 teaspoon garlic powder
1 teaspoon onion powder
8oz. sharp cheddar, grated
8 oz. cream cheese, softened


Mix all ingredients and get ready for an amazing appetizer.

Here is the mixture.


Next, I traced a wine bottle on parchment paper.


Then using the template, I took my mixture and shaped it into the wine bottle cheese ball.


I had this wine stopper that had a bunch of grapes on the top of it. I also printed off a wine label that I found in images online.


I carefully removed the parchment paper and laid the cheese ball onto a silver tray.


I inserted the wine stopper and laid the label over the middle of the 'bottle'.  Then I secured both sides of the label with two toothpicks.


Then, I toasted pecans and pressed them into the remaining exposed areas of the 'cheeseball'.


Finally, I placed crackers on all sides of the 'wine bottle'.


Two cheese knives were laid on the tray.  I also had a tray of green and red grapes to accompany the tray.


The appetizers were a hit.

This would be a great appetizer for New Years.

HAPPY NEW YEAR!


Tuesday, December 26, 2017

CHRISTMAS TREE 2017 AND THE NATIVITY SETS


This year I decided to buy a new-fake-slim tree. I was tired of how the old tree just took up too much of the room.  Initially, I elevated it onto the sewing machine cabinet with the chopped off legs.  Do any of you remember how I cut the legs off this and put the guilded mirror on top of it to use as a coffee table in my husband's office?


So, I removed the mirror and moved in the now short sewing cabinet into the dining room.  The tree fit perfectly on it, until my husband, Mr. Thrifty mentioned that thought he thought the smaller 4 foot tree with the stained glass ornaments would look better on it.  He was right.


So, now back to the slender tree. I placed it back on my buffet drawer turned bench that Mr. Thrifty made for me years ago.

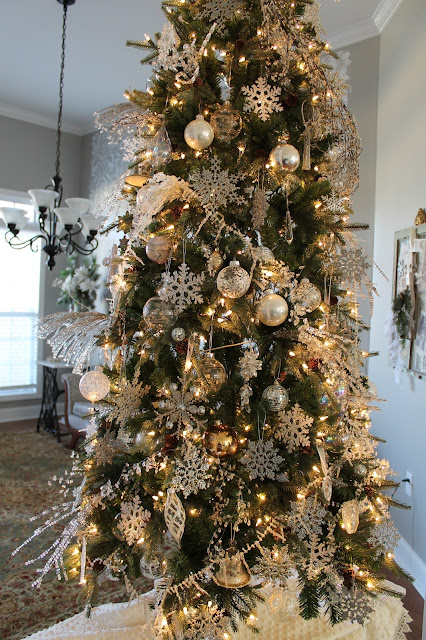
So here is the new tree.  I really like the pinecones on the branches.


Decorating pretty much the same as last year, everything sparkled white and glistening.  Again, I placed it in between the dining room and great room.  You might notice that the dining room table is missing.  Over the holidays, we are going to get a family portrait done, so I put the table in the office.


The crystal branches that I had used on the mantle in previous years was used as a swag around the tree.  You can never get enough sparkle, I say.

The crystal 'firecracker' stems stick out of the tree just to add some interest.


Here is a view from the foyer.


Now onto the Nativities placed around the house.

This one I bought at church from the olive tree sellers.  In the background is a snow globe that my eldest daughter made for me last year.


This is the 2nd Nativity-the petite Nativity in the great room.

The 3rd is from my parents home.  It has an iridescence on the topcoat.


The 4th is on the mantle.


The 5th one is the one my youngest daughter stenciled in her pre-k class back in 2004.


And the final one, the 6th is from my sister Terri's mother in law that she made for me many years again.


And that concludes my Christmas decorating for this year.
Merry Christmas!


Thursday, December 21, 2017

CHRISTMAS DECOR 2017 AND MANTLE


This year my decorating cost absolutely nothing, well almost nothing and I can't wait to share with you how this happened.

For years, I had wanted to use my Oriental blue and white pottery in my Christmas decorating, but I couldn't manage a theme.  This year, my theme was the Nativity.  So... let's begin.


It all started with a trip to Home Depot.  I went into the Garden department and inquired about purchasing some evergreen greenery.  The store employee took me to the Christmas tree trimming department and pointed to a bin of cut limbs.  "Take all you need, she said."  When I asked her how much they were, she told me that they were free.  I do have one disclaimer, but I will fill you in on that in a minute.


I loaded up my trunk and came home.  I don't have to tell you how thrilled I was.


The first place I placed the greenery was around the vintage scale of my grandparents.


Here is the disclaimer.  Right before I went to Home Depot, I stopped at Fresh Market and found a bunch of greenery with some cedar. This I purchased for $4.99.   I placed that bunch in the pitcher on the coffee table.


Then, it was on to the mantle.  I bought this Nativity set at the base thrift shop last year for $5.00.  I was attracted to the simple cream pottery.  This would be the centerpiece of the mantle. I placed other pieces of my Oriental pottery, a West Point plate and some inexpensive cobalt blue pitchers that I had received with fresh flowers years ago.  More greenery and tree branches were placed in my large vase on the floor.


I love how the mantle and coffee table incorporate the whole feeling in the great room.


More greenery was placed on the top of the kitchen eat in buffet.  All my blue and white pottery is accented in the cabinet.


More greenery was put on the top of the Menu frame.


It is time to sit back and enjoy the scenery.  And I haven't even got to the Christmas tree yet. 


I love this room in the morning  as the sun creeps in, casting sunbeams across the mantle.


Friday, December 15, 2017

PETITE NATIVITY


I ordered a beautiful petite Nativity set from Victorian Trading Company.  When it arrived, the cow was missing an ear.  I called the company to ship it back and the customer service was amazing.  They immediately sent me a complete new set.  You don't normally have such an amazing service.  I will definitely be ordering from them in the future.


Meanwhile, I figured that I could fix the broken ear. I got the spackle out of the garage and molded a new ear onto the cow.


I touched up the ear with some gold guilding paste.  It looks almost brand new.


Meanwhile, the other set arrived and it looks beautiful under the vintage gardening dome.


There is the cow.


 A beautiful homemade card from my dear friend Susan adds to the most beautiful  vignette in the great  room.


Sunday, December 10, 2017

UPDATING THE TRUMEAU MIRROR


I have a great story behind this next project. 

 When my Dad and Mom married in 1962, they were given a beautiful Wedgewood cigarette holder. It's funny that neither one of them smoked, but the delicate blue and white container just spoke of Mom's favorite colors.  This would be my inspiration for updating the Trumeau mirror.


Before picture.....I originally bought this piece because of the raised cherub in the top of the mirror.


I laid a piece of newspaper on the mirror itself and taped around the edges so I wouldn't have to clean paint off the mirror.  This really saves time after painting.


I used all Annie Sloan products on the mirror. I purchased a small bottle of Louis Blue-my favorite Annie Sloan color.  I also bought a bottle of the white wax too.  It is always fun to try a new product and I was hoping to have a white film on top of the blue to tone it down.  Clear wax from Annie Sloan was going to be used for the top coat.  I love the way the clear wax buffs out.


This picture shows the first coat which does not cover completely.  That is ok since I was planning to paint two coats.


Here is a close up of the first coat.


Notice how much brighter and more uniform the coverage is after the second coat.


Once the second coat was dry, I applied the white wax.  It subdues the blue color. 


Then I applied the clear wax, let it dry and buffed it out.  I liked the finish but it was missing something.


In order to make the raised areas pop, I used a small paint brush and painted those areas with white chalk paint.  I immediately wiped off the surfaces of the white paint with a rag so the recessed areas would pop...and they did.


Once I was satisfied with the end product, I clear waxed over the previously painted white areas.


I think I accomplished my idea of painting the mirror in lines with the Wedgewood cigarette holder. I think Mom would love it.


Here is the before and after.  I think it is a huge improvement.  And the piece fits in perfectly with the new and improved guest room.


Well, this project is almost done--wait, there is just one more project.