Tuesday, August 28, 2012

Chandelier III-Habitat Find

While shopping for a chandelier for a friend at our local Habitat Restore, this one caught my eye.  How dated it looked!  But it was only $15.00!!!!!   I really liked the ornate arms of the chandelier.  I knew exactly  what I wanted to do with it.


I immediately took off the shade.   A good donation back to Habitat. I got out my trusty ladder and white primer spray paint and went to town.  Don't you think it already is an improvement?


                              Here is after one coat of primer and 2 coats of topcoat.


My secret for spray painting chandeliers came from my dear friend Tara.  We topcoat over the primer with white appliance spray paint.  It has the most amazing sheen to it.  Two coats of this and it is ready to go.

This is the brand of appliance paint that I use.  I bought this unopened can at an estate sale for .50.  Usually it costs $5.00.

Now this project would lie abandoned for months.  The outside summer projects began and I really didn't know where I could put this in the house.


I need to digress for a minute. Once I had spray painted this chandelier, I put it aside. I couldn't come up with an idea on how to embellish it.  Sometimes a project might take years just looking for something to complete it. Patience is a virtue.


Months later............................................


Two weeks ago, while looking in the Redstone Thrift Store, I spied these fabulous turquoise prisms for $1.00  a piece.  This was exactly the inspiration I needed to finish the project. The chandelier had three arms on it and I could hang one of three turquoise crystals from them.  With the infusion of the turquoise, I could hang the chandelier in my daughter's room with it's lime green and turquoise theme.

  I went to my stash of odds and ends prisms in storage  and laid them out.  I was ready to finish this project.


I went to find wire from the lighting store to rework the chandelier into one with a plug.  This gold wire is the type that they use to rework antique lamps.  This wire is half of the width of regular 18 gauge wire.


Mr. Thrifty now can rewire the fixture.  After the chandelier was rewired, it was time to hang the crystals.


I needed 15 like crystals.  Since I didn't have even 5 of any like items, I was going to use the hodge podge method and just start hanging them. The turquoise ones hung from the bottom of each stem.

                          Once it was rewired it, it was threaded it through the chain and the plug was added.

The next step was to go to th fabric scrap bin and pull out a 6 foot by 5 inch strip of duponi off white silk.  I guesstimated the width of the chain to be about 3 feet, so I doubled the length to allow for gathering.  I sewed a seam down the strip. 


                            Trim the edges with pinking shears and invert the fabric tube.  The pinking shears always help fabric from raveling.

                           Next, run the chain and electrical wire through the fabric tube.


                         Here is what the room looked like prior to hanging the chandelier.

 
The before lamp fixture had more color, but took up a lot of room on the night stand. This chandelier frees up much space for my youngest daughter.
 
 
Look at the hanging turquoise prism.


                       Here is the first look at the multitude of prisms hanging from the lamp.


I went to Home Depot and purchased a white ceiling hook and need Mr. Thrifty's assistance to attach it to the ceiling.  With minimal effort, the chandelier was hung.
Here is the chandelier hung and unlit.


And lit.


I love the romantic addition of the chandelier and I think it will grow with her into her late teens.

To sum up, a $15.00 chandelier, a .50 can of appliance spray, a box of jumbled prisms, a remnant of off white silk material, a ceiling hook, and refurbished piece of lamp wire created a very nice look for around $20.00. 


Saturday, August 25, 2012

Reworked Chandelier

As I sit here writing, I get very tickled just thinking of the story involving this project.  In the previous blog, I showed you how to up cycle a brass chandelier.  In this blog, I will put a new twist on it.


To begin with, the Little Rock house had a 10 light heavy black chandelier in the dining room.  I wanted to find a way to soften the black rod iron of the fixture.  I found a delicate light blue shabby fabric on line.  The idea was to make shades for this chandelier and add a cozy to the chain.


Once I glued on the printed fabric and trim, I wanted to add some dimension to the finish.  I rummaged through my bead box and pulled out a box of coral seed beads.  For those of you not familiar with seed beads, these are tiny, tiny beads that can be added for accents. 

I began looking at each covered shades and focused on the coral roses.  I applied Elmer's glue to areas in the rose and using  tweezers, placed the seed beads in random bunches around the shades.


I loved the effect that the beads added.  I was having  a former military boss of my husband's for dinner the next evening.  I hung the shades and cozy.  I thought that it looked gorgeous. 

Now, I have turned the chandelier on using the dimmer switch.  The ambiance of the room is set.  I serve the dinner and seat myself.  During the conversation, I am listening to the two talk and I see something fly out of the corner of my eye.  Then another and another.  It doesn't take long to realize that my chandelier shades are imploding.  When the light heats up the shade, those seed beads that didn't have enough glue to set them are ricocheting all over my dining room. 

The best part of this is that neither man was aware of the 'bombs bursting in air'.  I just giggle every time I see those shades.


When we moved, I packed up the 10 shades and cozy.  Up in the craft room, I needed some added lighting. I used the old up cycled dining room chandelier and added these shabby shades and cozy.


 I love the soothing calm that the fixture brings to the space. Every time I look up at it, a smile comes across my face.


Wednesday, August 22, 2012

Chandelier I

 To begin this blog, I must apologize for not blogging the past week.  I thought I had published this blog on Aug. 18th, but it had vaporized in space. 


While in Dumfries, I pulled this scrappy chandelier out of the Prince William County Dump.


Never having up cycled one of these, I needed to enlist the help of Mr. Thrifty.  I wanted to suspend this from a hook in the ceiling, so I needed it rewired with a plug on the end.


After going to the lighting store, I found long white tubes that could replace the beige old cracked tubes that were suspended on each of the five arms. Later, these will be cut to size with a hand saw.

The first step was to remove the light bulbs.  The tubes slide up and off the stem of each light.  I then stuffed each of the light bulb hoes with paper towels.  The chandelier was wiped down of any dust and grime.


I suspended the chandelier underneath an opened painter's ladder.  Then, I gathered heavy duty plastic all around the outside of the ladder forming a tent. 

The first step is to prime with a white spray paint all areas of the chandelier.  Open the tent to expose the chandelier to air so it will dry.  I usually wait a few days, but this depends on the humidity in the air.


The top coat uses a great product.  You can find white appliance spray paint at Walmart, Lowe's or Home Depot.  I usually topcoat with at least two coats of this paint.  After this step, remove the paper towel wads from each socket.  Don't forget this step before painting or the lights will not work properly.


Usually this costs about $5.50.  This particular full can was picked up at an estate sale for $.50.


The shades were picked up at Tuesday Morning.  I wanted to embellish them.  I had a large piece of Duponi off white silk that I had purchased in order to make a First Communion Dress.  That is another story.

First I made a pattern of the shade, adding 1/2 inch.  It was sprayed with Elmer's adhesive glue lightly and the fabric rolled onto the shade.  At the seam, I turned under the fabric.

The final step was to glue gun a dangling trim with glass like crystals.


 The cut white tubes are attached over the stems.  New light bulbs and the embellished shades completed this project.


                         This chandelier was completed in 2005.  In 2009 it was given an update.

Tuesday, August 14, 2012

Our David and Goliath Project -Part II

While we were gone for the family wedding, Mr. Thrifty sweat and slaved over finishing the retaining wall project.

Two major items needed to be completed.  The caps needed to be placed and glued  onto the top of the wall.  Also, defining the rest of the  perimeter of the flower bed needed to be addressed.

After bringing home the concrete caps, the two of us tried to dry fit them.  Instantly, we realized that this would not be a snug fit especially around the corners.  A saw used for cutting through concrete was rented to make the exact cuts.  I think it makes such a huge difference to see the top caps fit tightly together.

While building the current house, I came  over one rainy day after they had finished bricking the exterior and picked up the remaining brick tossed into the mud. I probably picked up about 300 brick that day.

 At that time, we were looking into adding a 3 foot brick wall on the outside edges of the concrete.  Here is a similar look at our Little Rock home.


Since then, that priority has slipped down the list.  However, the brick would come in handy in defining the remaining perimeter of the flower bed.  Mr. Thrifty dug a 6 inch tunnel around the back of the bed.  Finally, he lined up the brick and filled them with sand to stabilize them.

    Notice the alignment of the caps on top of the wall.  They fit so perfectly together especially around the curves.


                                                            And the final picture. 

                                                            I think this is a job well done.

Sunday, August 12, 2012

Back to School

Well, it's back to school this week.

 Bless our educators for all their hard work.  Bless our children that they will have positive learning experiences this year.


                   I always stop and think of those teachers that touched my life.

                                                            Thank you!


All the supplies are at the ready.  Uniforms are cleaned and pressed. Time to say goodbye to sweet memories of a laid back summer.

Friday, August 10, 2012

Our David and Goliath Project-Part I

Let me begin by saying that this was our summer project.  We started in middle May thinking that it would still be cool.  Unfortunately, with this season's high temperatures, we did not escape the heat.

When we first moved into the house, there was a retaining wall built into the hillside.  On this hillside, included was a  planting of 6 trees.  Here is the before picture:


                 The backyard always looked messy.  I never liked the look of the middle 4 trees.  It never seemed to be balanced.

                                                                                
I had planted some peonies, forsythia and iris' in the bed.  It was so unsightly and too steep of an incline to hold soil and mulch.  Mr. Thrifty came up with the idea to add yet add another smaller retaining wall. 
Of course, we were going to do this project ourselves.  Heavy sigh.  I'm getting too old for this!  So, for the next two weekends, he dug a trench to start the first course of brick, which must be buried.
We made  3 trips to Lowe's for the building block, pea gravel and river rock.

The first step was to measure  using a measuring tape, string and a garden hose.  We laid the hose out first to see if we liked the shape.   Then, we pulled out a opened can of white spray paint and painted over the hose leaving our line of demarcation.  Since it was an old hose, it didn't matter that the hose became rather sticky from the paint. 

                                             
                          This next picture shows the gentle curve up into the hillside.

                                                                                 
                                           You can barely see the white line of paint.


 After measuring, Mr. Thrifty used a flat edge shovel to cut through the sod.   It didn't take long before he realized that he needed his work boots to cut through the clay with the shovel.  I think he looks much cuter with the boots on.


I might interject here that even though you can't see me in the pictures, I am helping.  I left the digging to him, but I was out there supporting him in any way I could getting supplies and lending a hand.

                                      He cut through 8 inches of soil.


 The first course of brick needs to be below ground level.  Since the brick's depth was 6 inches, we had to level yet another 2 inches of pea gravel below the brick for the initial placement.  This is what it looked like with the pea gravel balanced inch by inch with a level.


Here is a closer look at the two strings, the lower one for pea gravel, and the top one for the top of the brick.
Once it was cut 8 inches deep, he strung two lines of string down the trough. The first string measured 2 inches up for the pea gravel had to sit. The second higher string had to follow the top of the first brick laid in on top of the pea gravel


This shows the first course laid.  A very important point to be made is that on the first course only, remove the ridge underneath each brick to make it level.  This ridge can be removed with a hammer and chisel.  I could even do this part.  Here is a picture of the bottom of the block with the ridge.


                    Every other added course needs the ridge to lock onto as you build up the levels.


Notice how each brick on the first course has to be leveled so it settles perfectly into the pea gravel.  This step is very time consuming but is worth all the work, because each additional level will just have to be placed one on top of another without the level.


                              Notice the top of the string is level with the top of the brick.

                                                 
                                        Now it was time to cut up into the slope.


A 25 foot sheet of black weed preventer was laid down under and behind the back of the brick.

 As a side bar, when we lived in Little Rock, we realized quickly why it was called such.  Every time you would dig into the clay, you would find little rocks.  This place should be called Big Rock.  Here are some of the boulders we have literally extracted out of the hillside.  I have shown a house brick to compare their sizes.


I love to watch the TV show called IF WALLS COULD TALK.  People purchase older homes and excavate unbelievable treasures.  Well, we found something.... 

                                                                   
                     A very aged shuttlecock????  No treasures on this plot of land.  Maybe next time.
                                               
Now it was time to add the second course.  Other than carrying the brick, this was the easiest step so far.  This course is offset.    This will be easier to see in the 3rd course.

                       Make sure to lock each brick with the ridge on the underside with the previous row of the lower block.


                  Here is the 3rd and starting of the 4th course.  Notice the pattern of the brick.


                                     Here is a picture of the brick being built into the hillside

                                                
                    This is the final course of brick.  We will be adding a cap brick when finished.


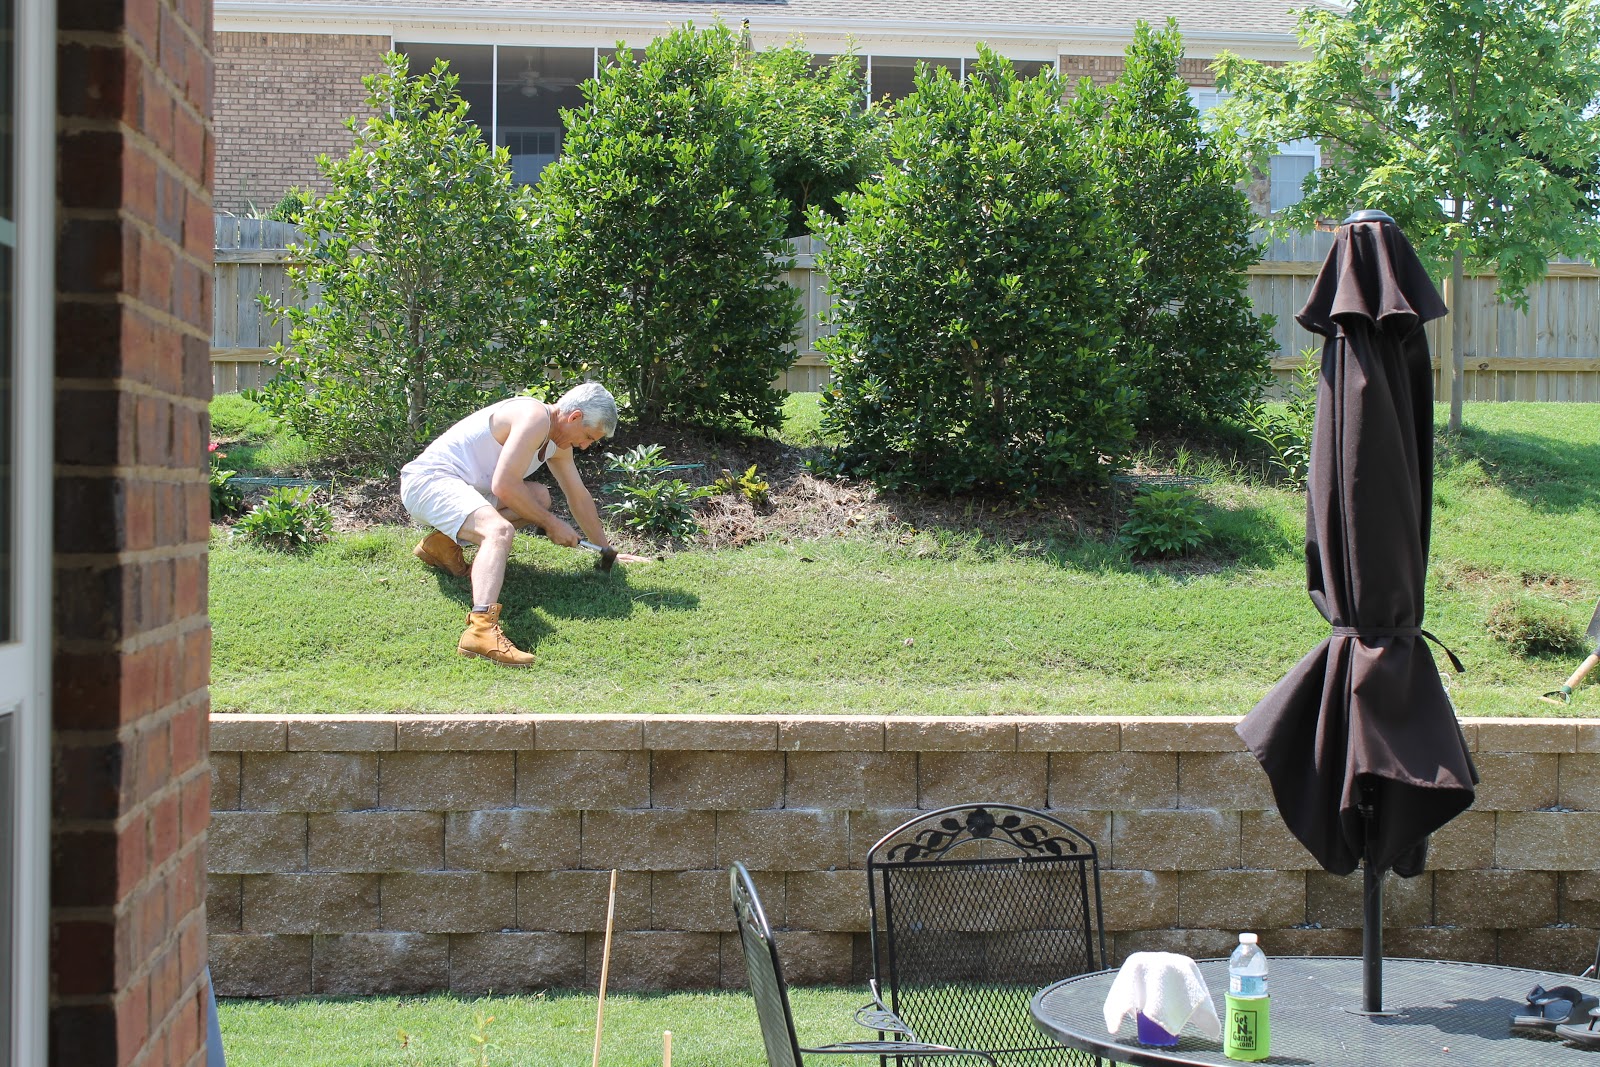
Standing back looking at the new wall, I realize how badly the trees looked  in their formation. 3rd weekend, here we come.  The moving of the trees.

Now, we needed to stabilize the wall.  Mr. Thrifty pulled a sheet of plywood out of the garage.  He placed it behind the new brick halfway to the soil line.  While I held the board, he scooped in river rock on the immediate backside of the rock.  On the other side of the board, he pushed and stomped soil.  This is how it looks looking down at the board.

                                          
                       Then the board was removed and the soil and river rock settled into place.
So I would have more room for my perennials, I wanted to take one tree completely out of the formation, move two other trees back to make an arc on  the hill.  The third weekend was taken up with digging up and moving the trees.  Once again, the clay got the best of us(or should I say, Mr. Thrifty).  He purchased an even larger pick axe.  We worked like archeologists, carefully cleaning each rootball so as to not traumatize them before moving to other spots.

 The last tree had to be moved up to the top of the hill.  Two 2x4's were used as fulcrums and the Mr. pulled his car jack out of the garage.  I didn't get a picture of this, because I was sitting on one of the 2x4's as he was jacking it up.  The girls got into the fray too.  Once he raised the jack, the little one would take my spot on the 2x4 and I would help the Mr. and our first daughter heave it up a few inches.  Oh my goodness, that was one of the worst jobs we have ever attempted.

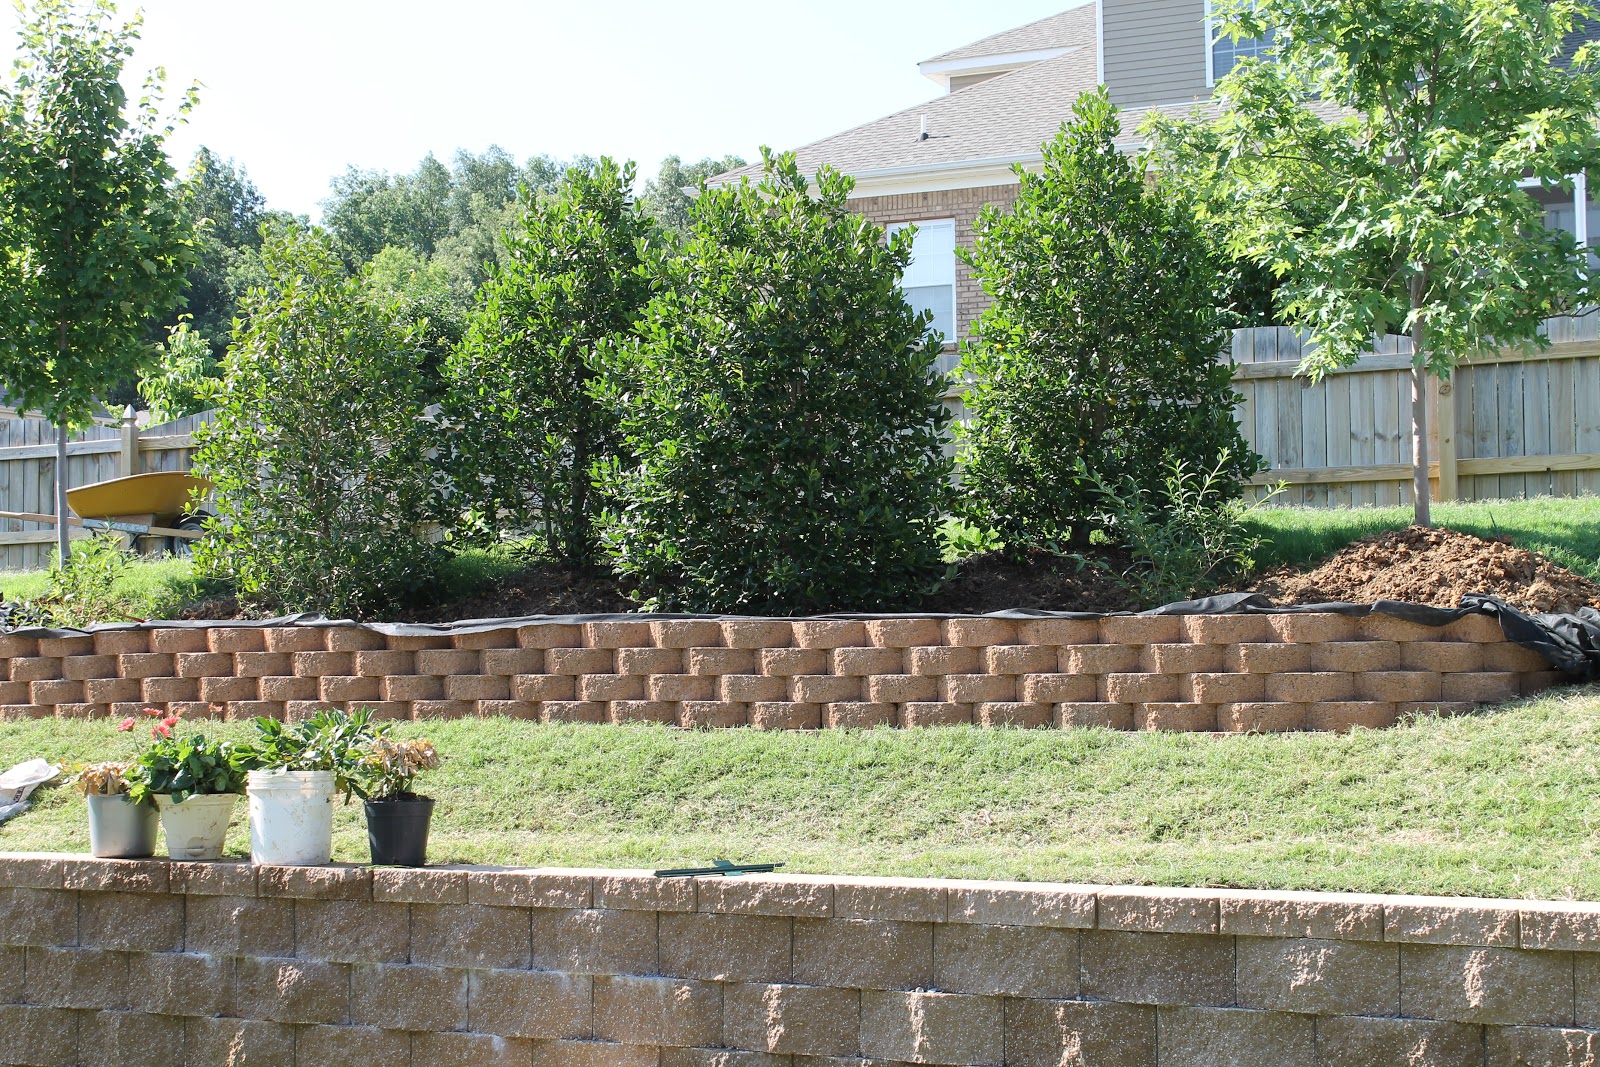
However, once it was done, it looked like this.  Mind you this is two days worth of work since the last picture.

                                                                 
Once the trees were moved, we needed to level the bed.  Before, the mulch would run off because of the hill being so steep.  Now we shoveled all that dirt back into the hill.  The perennials are ready to plant.  I still have 21 bags of topsoil, 2 bags of manure and 1 large bag of soil conditioner to finish out leveling the hilltop bed.


We still  have 2 very small birch trees that were given to us to  plant.  Mr. Thrifty named them after the girls.  I am going to plant them on opposite ends of the 3 holly trees.  I think the arc of trees will be a nice barrier between the neighbor's yard and ours.


I'm taking a break here. Off to Illinois and Wisconsin for the family wedding.

On the next blog, see the job that Mr. Thrifty completed on the backyard while I was away. He works too hard!