Tuesday, July 31, 2012

The Baluster of the Ball

             While I was at the salvage store in New Hampshire, I picked up these gingerbread pieces.

                                                                            
                                             This baluster will become the leg on the table.  The vintage pieces were stripped and painted white, just to make the piece look better as a whole.  Mr. Thrifty trimmed  and flattened the bottom of the baluster to allow the three pieces to fit up securely to it. 

                                                                             
              I found the base at Home Depot.  It was a round disc.  I primed and painted it out white.
                                                        
                                              All put together, it looks like this.


It's a perfect setting for my tea service and mosaic silver tray. 


Friday, July 27, 2012

The Tale of Two Porch Posts-Part 2

                                        I found this one in the archives.  I promise a new posting next week.


Here is the continuation of the Porch Post Project Part 2:


The other sole post just leaned against the wall in the garage until we moved. As the movers were bringing the lone post into the garage, I immediately noticed something awry and asked,  "Where are the gingerbread pieces that belong on the post?" "They weren't there when we picked it up!", which means, they knew it was broken.  After clearing out all the moving boxes, the two gingerbread pieces were found. These are the very ones I use in staging. (See picture.)


  Literally, all I did with all these porch post pieces was to take them outside, give them a give scrubbing with Soft Scrub and a rinse. When they dried, it was amazing how they whitened up without removing the great chippy parts.

While getting the new garage in order, I knew that we were constantly working around this lone remaining post. One day I mentioned to Mr. Thrifty an idea. What about it we cut this post in two. Easier said then done. Since the middle is cylindrical, it was hard to cut them on a flat surface. Long story short, the Mister cut the post in two.


As you can see, they aren't the same height, but that was fine with me. Now onto the bases and tops. I wanted something substantial, maybe a few graduated layers. Here is what we came up with.


I was happy with the bottom bases, but there was something missing on the tops. Back to the drawing board. We needed more chunkiness.


                                 Now we had the chunky tops to compliment the bottoms.

I puttied around all the edges between the cracks of the wood. Paint was the last step. I did not want to cover the chippiness on the poles themselves.


                                Notice that all the wonderful chippiness still is seen in the post.


After Christmas, they lived in the kitchen eat-in area. Now that it is spring, I put them outside. I think it gives the back porch some old time country charm.


                       And the beginning of May, she was moved to her proper place  outside the
front door welcoming guests.


Isn't she lovely?

Monday, July 23, 2012

The Tale of Two Porch Posts-Part 1

Way back when to the days of living outside DC, there was a quaint antique store called Boswell's Corner on Rt. 1 Jefferson Davis Highway.   I had gone there on my regular route of flea findings.  This day, I pulled up to the front and two old, chippy porch posts were leaning against the building.  I don't know what got into me that day, but I knew that I must take them home.  I guess I was hoping that someday, they could stand in my little antique shop hanging items from their gingerbread trim.

Inside the shop I went to hopefully score a good price.  I think I did.  Quickly, I loaded them in the van.  On the way home, I called my husband to forewarn him about the latest purchase.  I think he was shocked when he first saw them.  He said, "You are going to strip and repaint these, aren't you?"  I responded back with "Heavens No!!!"   I could see this fantastic vision and he wanted me to clean them up.  Anyone knowing shabby chic would know that this finish is something to value.  This would have destroyed the character of the pieces.

So the posts sat until we moved to Arkansas.  I had just finished redoing a brass chandelier (see  future posts) and I couldn't decide where to hang it.  Mr. Thrifty and I talked it over.  I pulled one of the porch posts into the bedroom and asked him if he could hook up the chandelier to it.
  First he had to build a base for the post so it would stay upright.  Since the post stands behind a chair, the front legs of the post can be pushed right under the back of the chair.  With the base, there is no fear of it falling over.  The base was given a quick coat of white paint.


 Then he drilled a whole in the top of the gingerbread piece, inserted a hook to hang the weight of the chandelier and pulled the rest of the cord back over the top of the post.  The chain now draped on the other side of the trim where another piece of gingerbread trim was once secured.


                          Once suspended, the chandelier looked like it had been there for years.


What is really great about this post  is that I can change the up cycled chandeliers around the house to get a different look.  All that is needed is to unhook one and attach another one.

Friday, July 20, 2012

Mother of Pearl Buttoned Birdhouse

While preparing for a silent auction, I organized an art project/donation for each of the pre-K through eighth grade classes.     I needed to come up with 10 different projects.  Each level had to involve the collective help of all the students. 

This project was made in the kindergarten class.  I should preface that I found the vintage baluster at the same place I bought the mental hospital wood shutters in New Hampshire.  Mr. Thrifty built  a base to hold the birdhouse leg.  The birdhouse was donated by a parishioner. 

I painted out the base and birdhouse and cleaned the baluster.  I like the look of the chippy leg stand.

For the kids part, they helped glue the mother of pearl and white, cream and ecru buttons onto the roof.  Each child picked up a few buttons and  showed me where he or she wanted to place them.  Since I was using hot glue, basically they handed me the buttons and I applied them.  It was so cute at the end of the art session, I held up the birdhouse and they applauded.  They were all very proud of their involvement on the silent auction project.


Since I don't have any closeups of this particular birdhouse, I asked my dear friend Tara if I could see pictures of the one that I made for her.  She most graciously passed on these photos.  Thank you!


Doesn't it look great in the woodsy scene?  I can almost see her garden in the top right hand corner.  Notice the awesome chippiness(is that a word?) on the baluster.


I forgot about the sweet button on the perch.


I do recall now after looking at the pictures, that I crackled the birdhouse itself prior to painting it white.  I also distressed the roofline just a bit.  The birdhouse has held up rather well for 5 years. 

Tuesday, July 17, 2012

Patriotic Chair

I believe this is the last project to complete from this pile of  'junk'.  All the other projects have been completed.  The chair I will be telling you about today is the one with the cream seat and 4 turned spindles in the back.  I found a similar idea on eBay long ago and wanted to duplicate the look with my twist on it.  I was  needing an auction project and living in a large military community, a patriotic item would be popular.


I had always wanted to quilt.  My grandmother made at least 75 plus quilts in her day. She began quilting with the St. Boniface Ladies Quilting Circle while she was in her early teens and continued to quilt until her mid 90's. 

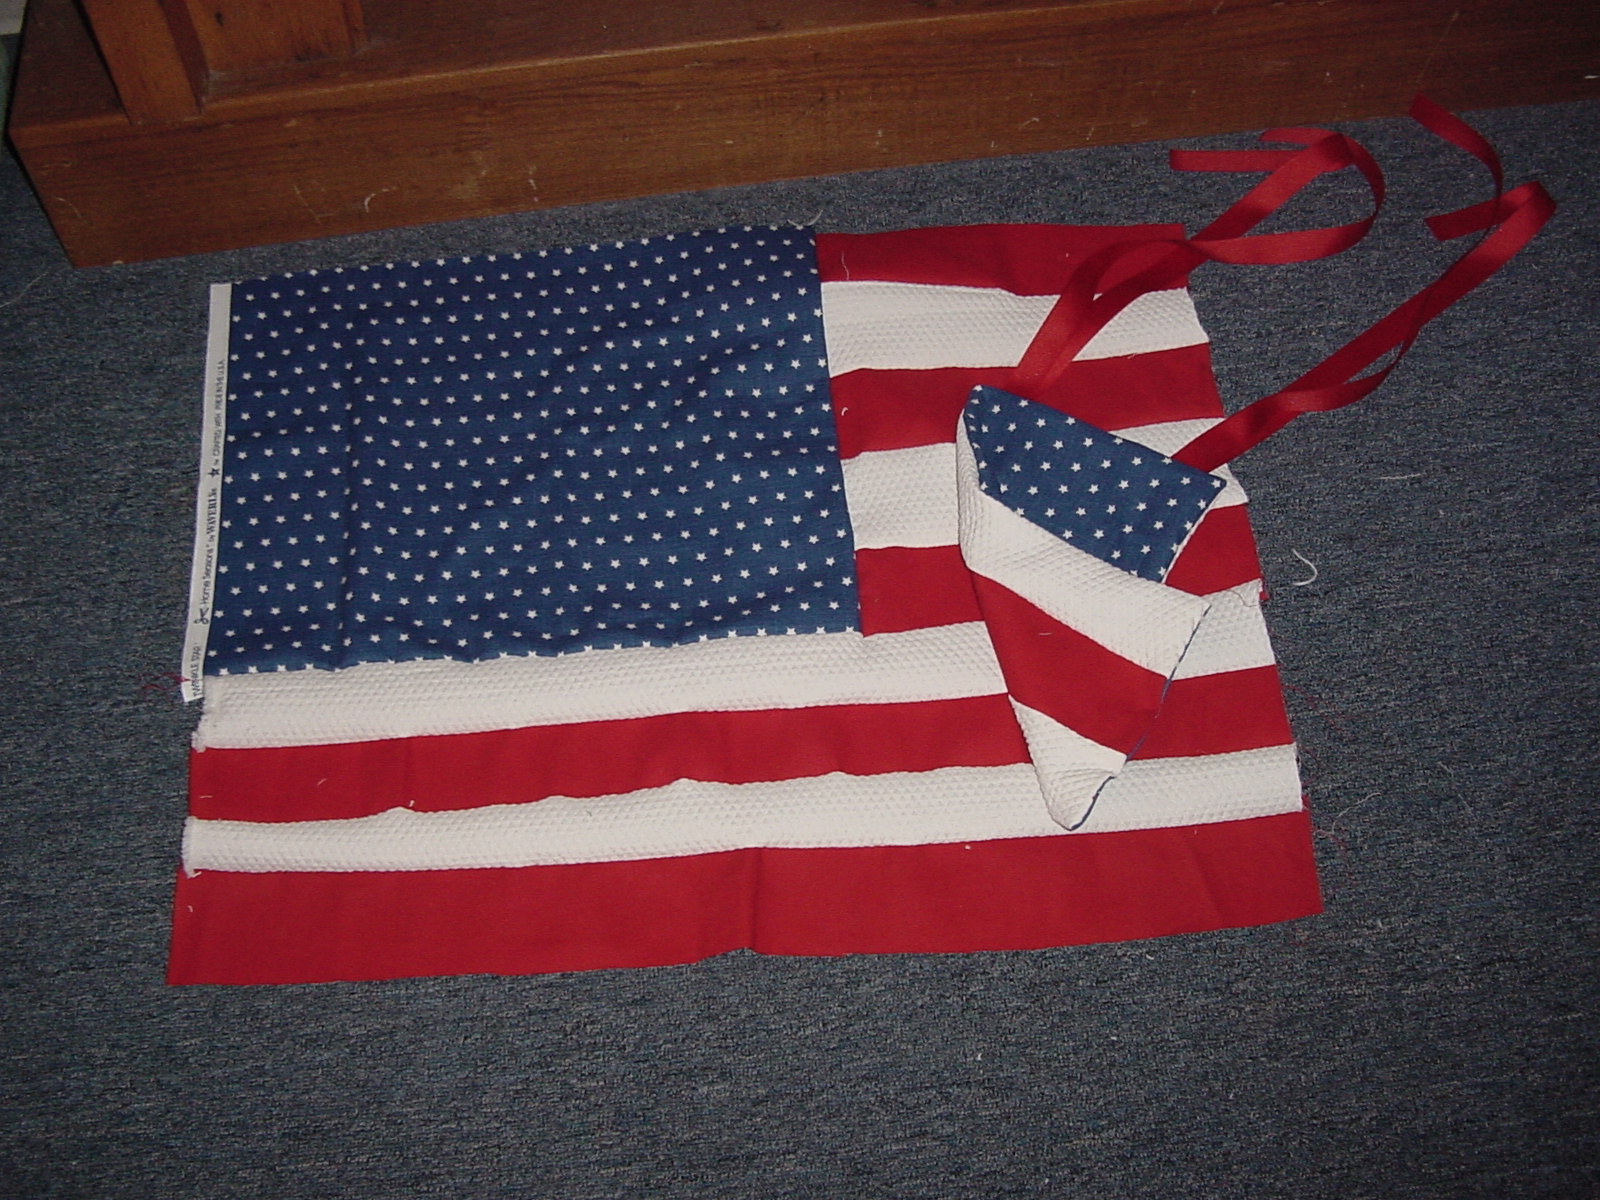
Not having any formal learning about quilting, I thought I would try my hand at it.  I found three fabrics: a red, a textured off white and a blue for this seat covering.  I liked the idea of using different textures.  In order to make a pattern similar to our own flag, this is the chair seat covering prior to attaching it to the chair.  The ribboned rectangle to the side will be a pillow that will hang from the back of the chair.  Notice that both sides of the pillow are contrasting fabrics so it can be interchangeable.


I cut strips of red and white for the stripes and a deep blue with tiny stars to recreate the union.  After I measured the chair, I sewed the pieces together to give myself extra to tack under for the seat.  Using red grosgrain ribbon, I sewed two sets of ribbon into the top of a elongated pillow to stuff later for the chair back.  On one side were the red and white stripes and the reverse was the blue fabric.

The seat was then covered with foam and batting. The actual quilted seat cover topped the batting.  Prior to covering the chair seat, I took a trip to Home Depot.   I bought boat paint that was oil based and vibrant red.  I stripped the chair, primed it and gave it 3 coats of the red paint.  When it was dry, Mr. Thrifty helped me secure the seat back onto the chair.


This chair was auctioned off at the elementary school.  I had so much fun with this project, that I have completed two similar chairs since.


This chair was made for a dear friend.


This is the back of the chair that I did for myself.


And this is the chair that is used as my husband's office chair.
                                                              
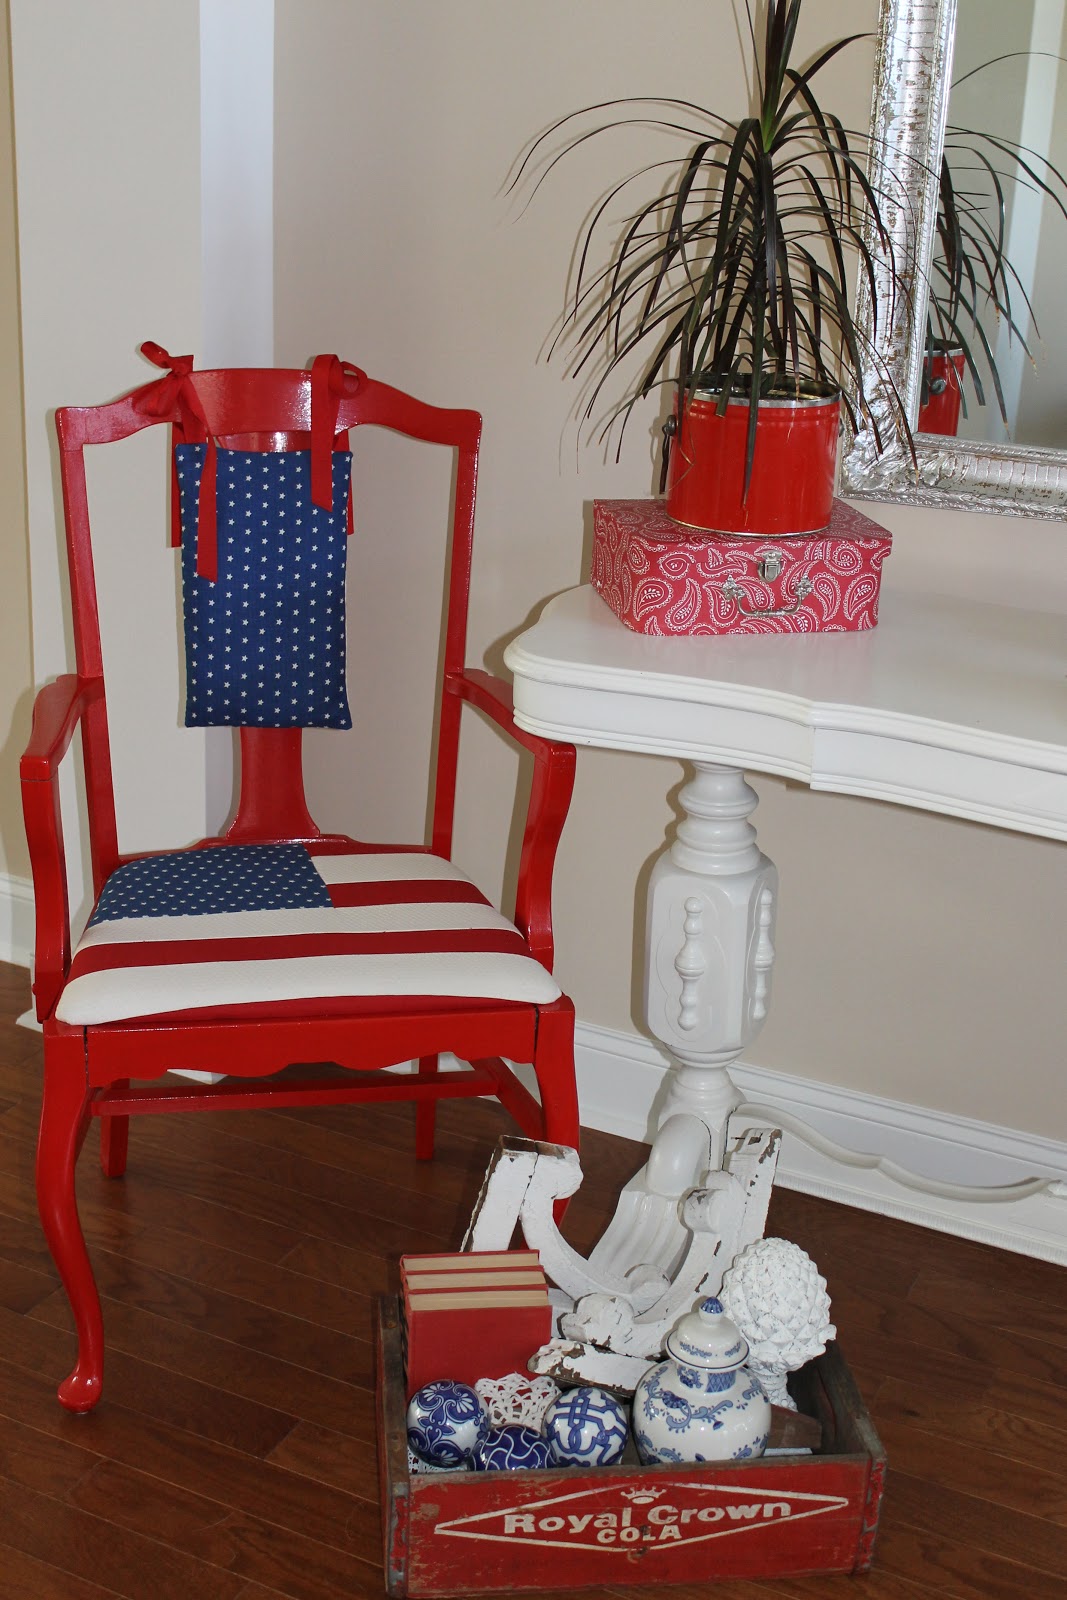
During the month of July, this chair moves out to the foyer.

I found the Royal Crown cola vintage bottle box at an estate sale for $5.00.
Filling it with the cobalt blue oriental accessories complements the red in the chair and the books.  None of the items in the box have a patriotic theme to them, but combined, they give an 'out of the box'  red white and blue theme without the use actual flags.


Here is to the RED, WHITE and BLUE!

It is amazing how the red, white and blue brightens up the foyer. 


Saturday, July 14, 2012

All things Red, White and Blue

July is very special in this retired military household.  We can't seem to get enough flags in, or outside the house.  

                               This rusted garden chair was found in the VA dump.


With some added flowers in a pot and flags, this chair makes a stately presence to our front door entrance.


There still is a project left in this piece.  I have envisioned doing mosaic on the seat of the chair and the heart shaped back.

Wednesday, July 11, 2012

Headboard bench

While shopping on a day long venture in Dumfries, VA, my friend and I came upon a junk store.  There was a set of twin head and foot boards that were selling for $25.00 a piece.  I loved the design of the headboard.  My dear friend loved the foot board.  We purchased both pieces.  I wanted to make a bench out of mine.

Neither one of us took before pictures of the pieces.  They were dark and stained.  Initially, both of us stripped and painted them.

                         Mr. Thrifty constructed a box and put legs on it.  This is the result.


                                      This is what the bench looks like from the back.


While in Little Rock, I had a friend who staged pictures for Leisure Arts Design magazines.
        Here is a picture of the bench as it appeared in the book of Crochet Afghans.                                   


                  It was fun to watch the staging process using my antiques and up cycled furniture.

                     Here is a rather poor(blurry) copy that I took as they were doing the vignette.
                                 You  can see how much they edited the frame.

                                                                 
We now use the bench for extra seating at the kitchen table.  It also serves as great storage for my large volume of decorator napkins and plates.

                                                                
             There are two divided sections in the entire base.  This is a view of the entire piece.


                            As you can see, the bench has very practical seating plus storage.

The next picture shows what my friend Tara did with the matching foot board to this piece.  She painted it out and uses it as a firescreen.  Don't you love her style?


And here is another picture of the same foot board at her Virginia house.  Isn't it just beautiful?


I wanted to enlarge the picture, but it increased the blurriness.  She is a grand piece don't you think?

I think it is awesome that out of one twin bed, we now share it together.  I love the fact that we both took a very similar piece and created different practical objects.  Think...out of the box!

Saturday, July 7, 2012

Patriotic Mantle

When my husband retired, I wanted to make a cute and simple table decoration.  I bought a few yards of red and white gingham and made 18 in. squares. Then, I sewed all the edges under.

We had a store in Little Rock called Garden Ridge. Since it was a July event, I looked for something summer-like.  I found these cute galvanized watering cans filled with tomatoe red geraniums.  All that was needed to finish off this piece were a few small flags. Place the gingham as a diamond draped on top of a plastic red tablecloth.  This really brightened up the room.


 Knowing that I could use at least some of them, I packed them away for summer.  When getting ready  to work on the July Mantle, I instantly thought of these.  I pulled out my silverplated cupcake stand to give it a bit more height.


So once I had the watering can, I thought, what other pitchers could I pull out to carry on the theme? 
I needed a white pitcher and a blue one.  The blue was easy.  I love anything cobalt blue china.  This pitcher actually came from Cracker Barrel.  I use it all year round.

                                          
               The white was simple.  I used my stand-by cream roses in the silverplate pitcher.


  I love the look of the three liquid containers in this setting.  The touch of the flags looks good.  Having flags sticking out of every container would have been too much.


                                         And the entire mantle...............................................

           
                                                         Three cheers for the U S A!!!!

Tuesday, July 3, 2012

Summer fun and Patriotic Bench

I have blogged about the fun headboard bench that hubby helped me with.  Now, it is time to get a little bit of color on it for the 4th.


Because I love all things RED,  and it is July, this was my jumping off point.  Years ago, I was into red cherries, so I had accumulated lots of them.


                           This step stool resided in my grandmother's basement. I have painted it numerous times, but I still love the shabbiness.  The vintage towel used to hang over my kitchen window as a valance.  And the cherries---I still love them.  Adding the milk pitcher just added another layer of white.


                            An antique cherry decorated cake carrier was the next addition. 
                                      

                     I moved the step stool over to the headboard bench for added dimension.


Now, let's add red.  I had a bolster pillow that was taupe damask.  I pulled a kitchen towel out of the drawer and literally(and embarrassed to say) taped it with packing tape down the horizontal seam.  Using some leftover red and white twine held the towel in place on both ends.


Now that adds a bit of color!  I placed a melamine patriotic plate behind the basket of cherries.
I have always loved this pattern and actually found 4 of them at Tuesday Mornings for $1.99 a piece.  Years ago you could find them in the  CS Post catalog.  Antique silver plate teaspoons fill the milk pitcher.


                                The 'cherry' on top of this vignette culminates with the flags. 


                                   I am ready for the fireworks!(Picture of vintage postcard).