Monday, September 30, 2013

MAYWOOD UPDATE


After 37 days on the market, the Maywood house closed today, Sept. 30th.

It's hard to believe that we have had the property for 24 years.
 
All our hard work during the month of June readying the property for the listing paid off.
 
I hope to do a posting on all the repairs that were warranted during our 3 week visit.
 
A lot of prayers have been answered.


Thanks Larry!


Friday, September 27, 2013

THE $30.00 EMPIRE COUCH MAKEOVER

It's hard to believe that it's already the end of September.  We are experiencing a bit cooler mornings here in the south.  Where does the time go?


On one of my older blogs, dated February 22, 2013, I showed the $30.00 Empire style couch in its original fabric.  This was the couch that my storage unit manager had called me about.  Someone had cleaned out their storage unit and left this poor thing behind.  When I asked her how much she wanted for it, I stood silent for a moment.  I didn't need another couch, so I really gave her a low balled offer, never in a minute thinking that my $30.00 offer would be accepted.

 
 This piece had two brass plated front legs.  Of course, once they were polished, the legs were drop dead gorgeous.
 
 
Now it was time to give this piece a makeover.  I was looking for a black and cream small hounds tooth wool blend to recover this couch.  Because the couch remains in the study, I thought that this fabric would give me the masculine look I was striving for.  When it came down to it, that particular fabric would not have held up well.  Also, if I wanted to swap the white Ikea couch in the great room, this fabric would have given me limited décor changes.

So I went back to a fabric that I had used on the $5.00 estate sale slipper chair.


 Because of the wood trim, instead of being slip covered, the couch needed to be reupholstered.  Using the same material as the slipper chair was a given.  I found a fantastic upholsterer in the area that completed the couch in three weeks.
 
Look at the brass plated front legs with the newer fabric. 
 
 
I think the fabric gives a richer feel to the couch now.
 
 
In the future, I can see switching the off white Ikea Ektorp couch in the great room with this couch.  I believe it will compliment the Annie Sloan grey painted coffee table beautifully.
 
 
I think the possibilities are endless with the new shades of grey color scheme.
 

Monday, September 23, 2013

REFURBISHED SLIPPER CHAIR

 
I found this slipper chair at an estate sale many years ago for $5.00.  The fabric was rather dated and needed some help. 


Since I was veering away from the off white furniture in my great room, I found this fabulous fabric at my fabric store. In light in a taupe room, it comes off greige.  In a blue room, it comes off as a cool pewter.
 
 
It is a beautiful pewter colored chenille. It has a very good price of $20.99 per yard..  That is fantastic when you are looking for a well wearing upholstery fabric.
 
A close up.
 
 
My great slipcover lady sewed this cover.  It is a great seat for the bathroom vanity. 


The chair blends well with the taupe bathroom tile.
 
I think it brings a great texture to the master bathroom.
 
I have also used the leftover chenille in making auction projects.  I think this fabric has become my new matelassé.
 
If you are interested in this fabric, I found it at King Cotton Fabric Store in Huntsville, AL.


Thursday, September 19, 2013

TWO MINUTE CRAFT PROJECT(CHEESE GRATER)


My oldest daughter came with me for a jaunt to the Thrift shop.  As we were entering the store, she took off in another direction.  We met up in the home goods section.  Here there were shelves containing old glasses, knick- knacks and kitchen items.
 
 
She pointed to an item and said, 'Could I buy this?'  Since it was 30% off one dollar, at $ .70  I couldn't refuse her.
 
Upon returning home, she rushed to her room and within minutes called me in to see her latest project.
 
 
Lo and behold, this was her thrift shop item used in her bedroom.
 
 
 I'm excited to see that she too, can see out of the box and repurpose a regular household item.


Sunday, September 15, 2013

RECREATING AN AMERICAN GIRL-JULIE'S BOHEMIAN OUTFIT

I have to begin the blog this morning with a shout out to Mom, who turns a youthful 91 years old today.  Unfortunately, I will not be able to see her in person but some of my siblings will spend the afternoon with her.  She is such an inspiration to all of those in our family. 

I love you Mom.  You are the best!!


After I made  Molly's PJs, I wanted to find an outfit for my younger daughter.  She is a neat, quirky kind of kid.  She had the Elizabeth doll, but she wanted something out of the ordinary.  She liked Julie's(another American Girl) bohemian dress.  I thought, yes, I could make that too!

This is the image from the American Girl catalog.  Meet Julie, a San Francisco eclectic little girl.


I already had the grosgrain ribbon.  Finding two floral fabrics was on my shopping list was the next challenge.  The handkerchief scarf would be a no-brainer.

 
I attached the bottom ruffle directly on top of the other fabric and top stitched it in red thread using a zig zag stitch.


Using fusible webbing, I ironed on the grosgrain ribbon to the sleeves and dress front.


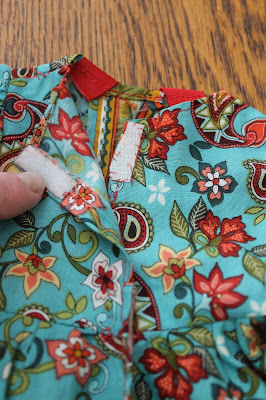
Using the white Velcro, I hand stitched the pieces onto the back of the dress.


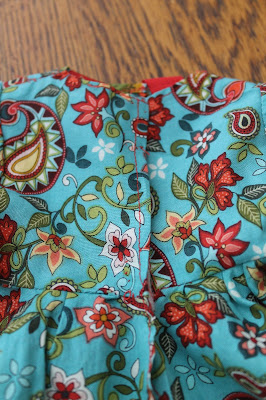
When closed, the back of the dress was complete.


A complimentary fabric was cut into the v shape on the dress top.  Using the fusible webbing and grosgrain ribbon again trimmed out the front.


The handkerchief scarf was made making a two sided piece of fabric with red polka dots and ribbon  ties at the end of the kerchief.


Now Elizabeth is ready to make a trip to Peoria to visit her Grandma.


Another fun outfit is complete.


Wednesday, September 11, 2013

RECREATING AMERICAN GIRL- MOLLY'S PJ'S


Before I begin the post, I wanted to stop and reflect on the anniversary of September 11th.  Who would have thought that it has been 12 years since that tragic event changed our lives? 

Please say a prayer for all those lost, their families and friends.

GOD BLESS AMERICA


Back to the blogging world....  It's time to get your sewing machines out to work on some special outfits for Christmas presents this year.
 
 
After completing the American Girl doll beds for Molly and Elizabeth, I wanted to see if I could sew the dolls some outfits.  My Grandmother made clothes  out of fabric scraps that she had laying around for my Barbie when I was a young child.  I might be dating myself, but in those days, Grandma did not have Velcro.  She used metal snaps instead.  Since I could sew, I thought this would be the way to make a copy of Molly's PJ's with little trouble.

 This is a picture from the American Girl catalog of Molly's pajamas.


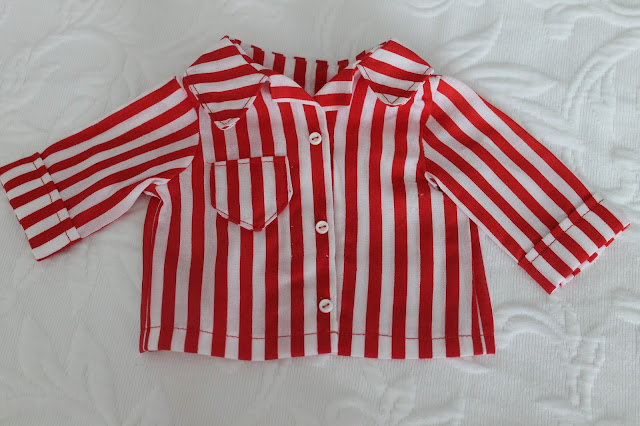
Molly's PJ's would be easy to recreate because the fabric is rather common.  Mini white buttons  embellished the PJ's while Velcro was used as fasteners.


The first step was finding a sewing pattern for 18 inch dolls.  This was rather simple. 
 
After making the pajama top, I used Velcro in place of the buttons.  The false buttons were just sewn on to the front of the top.


Using 1/4 inch elastic created the waistband on the pants.  A cuff was sewn in and top stitched.
A belt was made out of the same fabric.


The pattern worked perfectly.
 
 
The fluffy red slippers were purchased from the catalog.


 Molly is ready to sleep in her new bed.  What a fun project that was.  The girls were surprised that I didn't buy the outfit from American Girl.
 

Thursday, September 5, 2013

FIXING A BROKEN SPRINKLER LINE FOR UNDER $4.00


Digging in clay in Alabama brings more of a challenge.  Because our soil is so heavily clay laden, regular digging can cause a problem.  Mr. Thrifty generally uses a pick ax to cut through the soil.  However, the pick ax can cut through more than just clay so a person needs to be very careful about the exact spot they wish to dig.  Also knowing where the sprinkler system lies is also crucial to be aware of  before you begin.

On the occasion that the pick ax comes in contact with one of the PVC pipes, it can obliterate it in one hit.  Calling a sprinkler expert guarantees at least a $100.00 charge for coming out to fix one of these lines. 

So, I am going to go step by step to show you how Mr. Thrifty fixes this broken line.  As Mr. Thrifty was working on installing a drain in the yard, the pick ax found its mark.  Let me show you a picture of one such break.


First, make sure your sprinkler system is turned off.  Then clean at least 8 inches on each side to avoid getting soil into the clean line.  Make sure to dig underneath the pipe also to give you a relatively clean field.


Then cut  the hole out and leave two even ends.  The Mr. even files the ends of the pipe in order to get a clean edge before attaching the new piece.


The two adhesive components are shown here.


Each line must have a coat of PVC cement primer first and then it is followed by the PVC cement.
 
This is the actual coupling piece that costs $3.38 without tax at Home Depot.


First an adapter coupling is attached to one end of the pipe to accept the 3/4-inch end of the extension coupling.  Primer and adhesive are covered inside and out of the accepting PVC pipe.


The coupling is attached to the cut pipe first.


Once the coupling is attached to the the broken line, you can expand the coupling to span the gap to the other line.


 Once the coupling is completely attached, let it dry for 24 hours.  It is wise to wait the full 24 hours before testing your sprinkler system.

The next day, we ran the sprinkler, the line was fixed and we were back in business.  We saved ourselves a lot of money on this one.  I hope the explanation and pictures could allow you to walk through the same problem.  Good Luck!
 

Tuesday, September 3, 2013

UPDATING THE RAIN BARREL

While enjoying the use of the rain barrel, we came into a problem.  When we wanted to drain the barrel with the garden hose, Mr. Thrifty realized that the barrel was not high enough to send the water via hose to the front yard.
 
So, yes, another project revision was at hand. 
 
When he gave me a cup of  steaming hazelnut coffee at 6:37 a.m. on a Saturday morning in bed, I should have known something was up.  I was up for this activity however I did share with him that carpool running would start at 9:30.  Getting my work clothes on, I met him at the rain barrel.
 
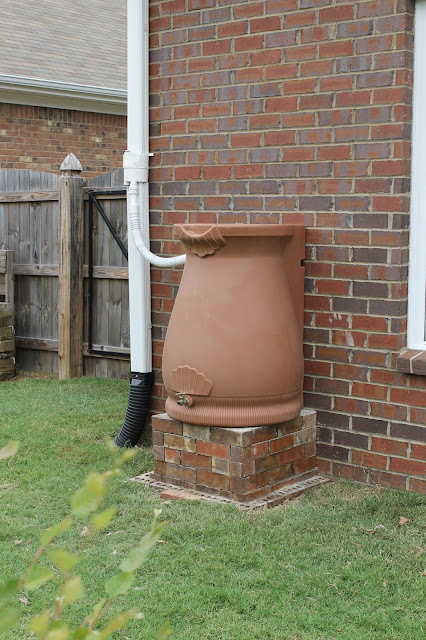
You might recall the initial placement of the rain barrel last summer.


To begin building up the base, I hauled over leftover brick from the house.  Adding the layers was fairly easy.  Each level had to be offset for structural purposes.  The electric Ryobi cutter went through the bricks like butter to allow for off centering of the layers.

Once all three levels went up, we used brick pavers left over from the retaining wall project last summer to fill in the void.  After that, Mr. Thrifty surrounded those block with rocks that he had been saving digging up different projects in the yard.  Using bulkier block and rocks saved us from purchasing them.


The leftover white rock(from the retaining wall) filled in the empty spaces.
 
 
As you can see, I am not doing much work except taking photos of the procedure.
 
 
Once the white rock was somewhat leveled, leftover pea gravel filled in the remaining spaces.
 
 
Leveling off the top surface was important.
 
 
For further stability, pea gravel was pushed into the brick holes.
 
A bit of side tracking... onto Ask.com.  Why are there holes in bricks?  Here is their answer.
 
Bricks normally have three holes to allow even firing. They allow a consistent heat distribution throughout the brick when it is cooking in the kiln, resulting in a thorough and even cure and provide a key way when filled with mortar locking one brick to the next. Holes in bricks also help to save up on building material needed in making these bricks.
 
Well, you learn something new everyday.
 
 
Now comes the pounding of the base.
 
 
One more layer of brick on top and this rain barrel is not going anywhere.


More pea gravel added to the top layer.
 
 
Usually, when you begin one project, one more seems to come along.  In this instance, the drain from the gutters had to be raised in order to fill the now taller rain barrel.
 
I took a quick trip to Home Depot and bought one length of gutter.  After some basic measuring, Mr. Thrifty cut a piece in order to raise the connection port to the barrel.


Once the rain barrel was reattached, the Mr. realized that it was too high on the spout.  If we allowed it to remain at this height, the rain would be pouring out of the barrel.
 
A little bit of trimming and the spout was level with the barrel.
 
 
Believe it or not, this project took us(well, the Mr.) under 3 hours to complete.  Now we can water the trees in the front yard during drier periods.
 
  And I was off on carpooling detail.