Sunday, June 24, 2012

Memory Ornaments

I have seen this idea on other blogs and wanted to try my hand at it.  To wrap a wedding present and attach this ornament to the ribbons would be a delightful surprise.

However, in the case, a dear friend had just given birth and I wanted to make a memory ornament for her baby.

First, I printed out the name, birth date, height, weight, parents names, and siblings' names on a piece of dusty blue toile scrapbook paper.  Using the paper trimmer, I cut the details into  tiny slips of paper.  Next, taking a pencil, I twirled the slips around it and curled them.  The last step was inserting the curled slips into the large glass ornament.  I wanted to find the large, glass, iridescent ones, but could only find the regular large glass ornaments.

On other blogs, it suggests wedding invitations that normally are made out of card stock.  Whether the card stock works better with the curling around the pencil than normal scrapbook paper, I don't know.  The next time I make this project, I will print on card stock.  I will report back on the results.


    I pulled out my glitter adhesive alphabet and put 2011 for the birth year on the front of the ornament.


Adding a satin bow finished the memory ornament.  A sweet baby card completes the gift.

You could also make birthday, wedding or even  anniversary memory ornaments using the same techniques.

Wednesday, June 20, 2012

The Happy Couple

When the bride and groom topper was complete, I began building the table top centerpiece for June.

When we were married, my brother and sister-in-law gave us a beautiful set of champagne Waterford goblets.  I had also acquired over the years, a small church like terrarium that could serve as a chapel.
Here was my first attempt at staging.


Something was lacking.  My next attempt was to take a silver plated cupcake stand, a glass dome and my ring bearer's pillow that my sister-in-law made for us (Earlier blog) to compile a scene. As much as I loved the wooden church, I was missing too much of the couple. 


On my last attempt, I pulled out my clearance silver plated cake stand and my ivory silk roses.  This was set out on a beautiful dotted Swiss voile tablecloth that was given as a present.  The wooden church was returned back to the staging.


It is so easy to manipulate a themed centerpiece.  Moving items in your staging gives you an entirely different visual picture.  Try using a library table or buffet instead of the dining room table to feature your scene.  In this case, the cake base was too wide for either one, so it was back to the table for the display.
 The bride and groom placed inside the chapel just invites the eye to peek in on their happiness.

Friday, June 15, 2012

The Wedding Gift

I had a great time coming up with a  shower present for my Godson and his fiancee.  I knew it would be a challenge to come up with a spectacular personal gift for the two of them for the wedding.

Windows kept coming to mind.  Once their registry was set up, I went on line to browse to see if I could get a feel for their likes.  On the list was a wall mounted rack to hang jackets, and another item was a vintage botanical in a rustic frame.  They are into recycling, so I got to thinking.  I think I can combine these two gifts into one present.

Out in the garage I pull a window for the base.  I know that it's pretty shabby, but I think in the end it will all come together.  Here I have cut the three pieces of cardboard(Out of a moving box) as backing for the pictures.


When I lived in Boston, I had ordered these vintage botanicals online.  I wanted to make it a bit more vintage, so I went to Graphics Fairy and found these newsprint pieces to use for the background.  I also pulled old music sheets with the Love theme, marriage bands, an old love letter, music of Faith and grouped them into three different piles.  On top of each pile, I laid one of the botanical prints.  The next step was to arrange the background papers haphazardly.  There really is  something to this.

I looked at the frame again and realized that it wasn't 'shabby' enough.  I took it outside and washed it with a hose and removed a lot of the chippy white flakes.


                        Here are the three piles of paper that will be made into the window collage.
 I wanted to show specific words, and pictures to tell a story. I typed their last name and the year that they will be married on a piece of  ecru card stock.   Once all my pieces were in the correct piles, I placed them very carefully into the frames.


Now on to the hardware.  They had requested a hang up wall rack to hang light jackets, and aprons(since I know they both like to cook).  I went to Hobby Lobby to find some hooks, but they were too pristine for my likes.  I bought two and returned home to retrieve an old rusted hook that I had in my stash.  By now you are probably thinking that this woman has a lot of 'junk' in her stash.  All of my 'junk' is so readily available to me now that I have it all organized.  I know exactly where the 'knobs and handles' are or the glue gun.  Organization is the key to keeping all this 'junk' contained.

I soaked all the hooks for about 2 weeks in a solution of white vinegar and 1 cup of salt.  This solution breaks down the finish on the items and begins the rusting process, which is exactly where I want to be headed.  Rinsing them off will stop the 'rusting' and they are ready to use. 

I drove to Home Depot to get some square dowels to secure the pictures to the back of the frame.


  I  took the window to Home Depot and had them cut the three pieces of glass.  Evey time I have done a window project, I measure myself, but without certainty, each pane measurement is different. To avoid this,  I take the window frame to Home Depot to have them cut to measure.  It saves me a lot of headaches.  The window cutter will mark each pane so when you return home, you can insert the glass with ease into its appropriate slot.  All that is needed is to clean the panes before their insertion into the frame.

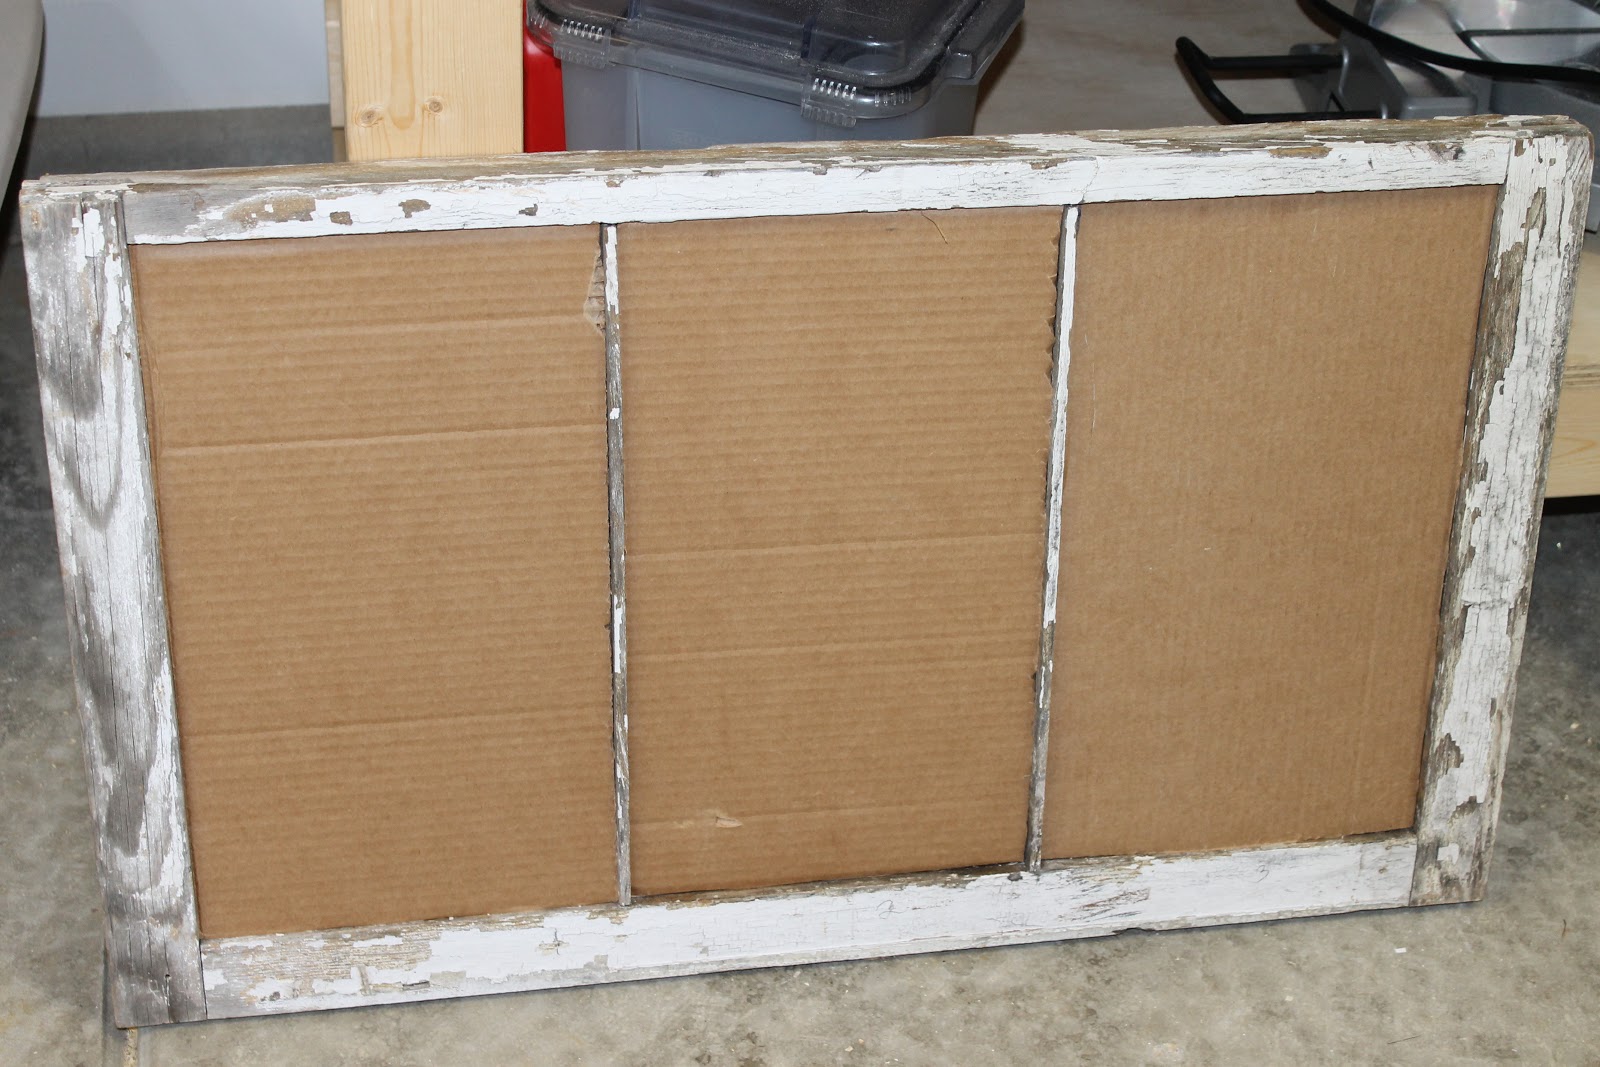
Before inserting the glass, I drill the holes for the hooks.  Then, I lay the pictures in the slots.  Next, I pre-drill the tiny holes in the dowels so they do not splinter.  Here is what the window looks like when it is complete from the back.

 Note:  This is the bulletin board project that I completed for my daughter.  You do the same steps in this project.


The last step is securing the hooks to the front of the window with the screws.  Also, I use heavy duty wire to attach to hang the frame.  Here is the result.


I am so excited about this so very personalized gift.  Given that the  couple is having a barn reception, I believe this gift will reflect their style.
                   

                  Wedding wishes to this wonderful couple!

Monday, June 11, 2012

A Wedding Gift with Sentiment


For my wedding almost 16 years ago, my dear sister-in-law surprised me with a wonderful homemade gift, one that I still treasure.  She made the ring bearers' pillow for the wedding ceremony.

First, she sewed the heart shape on the center of an ecru  piece of linen cloth.  Then, she intertwined ribbon and embellished it with beading and a ivory heart. Finally, she added lace ruffling and a string of pearls all the way around the pillow.  I love the ivory color.  I have used this pillow in many rooms of the many houses that we have lived in.  It just fits in beautifully wherever it lies.


  An incredible element of the pillow is that she attached a vintage doily that had belonged to my grandmother  to the back of the pillow.


                                   How special this gift was then and remains so today.

Friday, June 8, 2012

Homespun Linen napkins and placemats

Still trying to come up with an idea for some homespun placemats and napkins, I went into this great upholstery store here, called King Cotton.  They have an amazing bin of discontinued upholstery samples that you can purchase for $1.00 apiece.  Because the newlyweds are just starting a household, I thought that they could use a set of linen napkins, which would look very natural.  I bought 2 of each in coordinating fabrics.  Also, I bought a leftover floral linen yardage that was $10.00.  Now, off to the sewing machine. 

Most importantly, I washed them in warm water to avoid shrinkage after use.  Now, the bride can wash them again and again in warm water.

I wanted to get 4 placemats and napkins out of this material.  The front of all the placemats would be the floral pattern along with the napkins.  The back would be the two rustic linen tweeds.  Here is how they turned out.


Finally, I wrapped the gift  in brown paper and added a burlap ribbon with a bit of lace.


To welcome our newest family member(the bride), I attached a tag with a picture of her soon to be husband's great grandparents on their wedding day.  And the family continues........

                                               
                                             And the gift ready for presentation.


                                               May they have many happy days ahead.

Monday, June 4, 2012

Wedding tray

Remember this sewing machine cabinet?

This is a picture of it sitting in my driveway during the garage sale.  To no avail,  there were no takers.
It was a good thing because this cabinet would come in handy later.

I needed to come up with an idea for my godson for a wedding shower present.  Both the bride and groom are into recycling, so I wanted to make something that was old and I could re purpose.  I thought of this sewing cabinet. 

It is always nice to have a tray on an ottoman or coffee table.  Here is what I came up with.

I unhinged the lid that opens up on the top of the cabinet.  Then, it was stripped and sanded and given a very coats of Golden Oak Stain.  Because food might be placed on it, I sealed it with mineral oil twice.  Bacteria does not grow in this type of oil, so I put two coats of the mineral oil on it.  If they ever want to use it as a cheese  tray, it will be food safe.


I needed to find some handles.  I went to my stash and found these that I picked up at a Restore Habitat store for a quarter a piece.


These handles just didn't make that statement I was looking for.  So, off to Hobby Lobby to look for handles that just happened to be 50% off.  The handles were $3.99 apiece.  Do the math, and for a bit over $4.00 I had my answer.


All that was left was the drilling of two holes for each handle to attach properly.
Of course, I can never let well enough alone, but staged properly.

                     
  I hope the newlyweds get a lot of use out of this tray.


The next blog will include the making of Homespun napkins and linens that were given as part of this shower  present. Stay tuned.