Sunday, May 31, 2020

BOOM BOOM SHRIMP


I love Bang Bang Shrimp at Bonefish Grill.  While in Walmart the other day, I saw a Great Value Boom Boom Shrimp sauce.  I thought to myself, I could have Bang Bang Shrimp anytime.  I looked on the internet and found this recipe.  But, I simplified it.  You will not believe how awesome this recipe tastes.


Instead of making the sauce, I used the Boom Boom Sauce instead.  The important part of this recipe was in breading the shrimp.  I took the garlic and onion powder plus a little bit of white ground pepper and shook it in a ziplock bag.  Then, I added the cornstarch and shook the bag again.  Just remember, if you want to make more than 1 pound of shrimp, double your recipe of the dried spices and cornstarch.  I laid out parchment paper on a cookie sheet.  Then, I coated each of the shrimp in the ziplock bag spices and laid out the shrimp on the parchment.  This can be done ahead of time and it gives the shrimp time to absorb the coating.  However, your fridge will smell like garlic while the shrimp is cooling in it.  The smell went away quickly after removing the filled cookie sheet.

Also, a quick note, while frying your shrimp in a pan, do not overcrowd it.  You will be so surprised how tender and moist the cooked shrimp are which I believe is the cornstarch coating.


Drain the shrimp on paper towels and immediately place in a metal bowl. I squirt in 1-2 tablespoons of the Boom Boom sauce and carefully toss with a tongs until all the shrimp are coated.
Lay on a bed of romaine leaves.


Honestly, this recipe is so easy, I plan to have my own version of Bang Bang Shrimp often.


Tuesday, May 26, 2020

CORONAVIRUS CALZONES 2020


During this 'stay at home' scenario, I have been learning how to make breads.  So far, with the help of my youngest, we made focaccia.  I have also made banana bread, zucchini bread, apple cakes, pizza dough and today--yeast dough for calzones.

Mr.Thrifty reminisces from time to time, a place at West Point where the guys would go to buy calzones and a drink.  They were the best calzones he had ever tasted and they were made with ricotta cheese in the inside.   With a little effort, I looked on the internet and found multiple recipes with this significant ingredient. 
Yesterday, I got to task to recreate the calzones.  I made up the filling, set it aside and started in on the dough.  After using up the dough and having over half of the filling leftover, I asked Mr. Thrifty what he thought of the 1st batch. He liked it but I realized that the tops were poofing up and there could have been more filling put inside. 
 He went to the laptop to look for YouTube videos on pizza/calzone dough.  He came up with 3 interesting points.  Authentic great calzones use a fork to seal their edges prior to cooking, they score an X on the top to let steam out and after taking them out of the oven, they brush a little bit of olive oil on them.
So, let's get to it.  First, the recipe.


Working on the dough in the Kitchen Aid mixer.


Cooking the Italian sausage and diced onions.


Letting the dough rest for an hour.


 Mixing the cheeses and spices in  for the filling.

My favorite quick marinara sauce.

6 inch dough


First, I laid 1 Tablespoon of marinara down on the dough.  Next came the filling.


Before cooking.


This is one of the second batch of calzones.  Notice the X scored on top.  They were also brushed with olive oil after baking.

This next picture shows the difference between the first batch(to the left) and the second batch.  There is only room for more improvement is the next few tries.

On the second batch after laying down the marinara, I placed 4 slices of pepperoni down prior to the Italian sausage mixture.  I increased the filling to about 1/4 cup instead of 1/8th as shown in the recipe.  This gives the calzone a better crust/filling ratio.


I packaged the remaining calzones in parchment and then in a freezer zip lock bag.  The next day, I thawed 2 and placed them in the toaster oven at 300 degrees for 20 minutes. They tasted as fresh as the previous day's calzones.

This recipe is a keeper!

Thursday, May 21, 2020

FRONT YARD PLANTINGS 2020


As I get ready to post this, I have already pulled up with pansies and starting to plant perennials instead. I did add some guineau impatience.
So back to the original post  


Last fall, I asked Mr. Thrifty to pull out bushes along the brick side of the garage.
The bushes were getting too big.  See the rounded bushes to the right.


I wash ready for a fresh look to the front bed.  I wanted bushes that were smaller and didn't need as much trimming.

This shows after the bushes were cleaned out.  I was also wanting more color in the bed.


The Mr. also moved the center hydrangea bush to the left of the left one you see in the picture.

Cut to early spring. The 3 hydrangea bushes are now separated.


 I added 2 Encore Autumn Mist azalea  bushes and 3 blush pink nandina bushes in front.  They will give me more color.


The winter pansies are still doing well.  Once the bushes fill in, I think it will create less work for me.


As the summer progresses, I will update you on the progress.


Saturday, May 16, 2020

SPRING PLANTINGS 2020


I have a beautiful Gardening box(thank you Tara!) full of seeds, some dating back to 2000. 


 This year, I planted numerous varieties of the seeds. I had pink and purple larkspur from Grandma Ruth's perennial bed in Peoria. Coleus, pink thistle, primrose, Queen Anne's lace-I know you think it's a weed, but it makes a fabulous bouquet, and basil were planted in my cardboard egg cartons.

I purchased some Cherokee tomato seeds. They are an amazing tasting tomatoes-think BLT's. If you find a plant while out at your gardening store, pick them up.


 I have been collecting egg cartons all winter to use in my plantings.


I filled each hole with seed planting mix.


Once they were watered, I laid a piece of saran wrap over the cartons.

 In six days, the Cherokee tomato seeds began to sprout.


Thursday, May 7, 2020

COMPLETING AN ESTATE SALE QUILT DURING THE CORONA VIRUS CRISIS

Another crafting project I have completed during the stay at home order was this one.
One of my junking friends is always on the lookout for items that would interest me.  Every once in awhile, I will mention that I'm  looking for a particular item.

One day this past winter, she texts me a picture of a hand quilted front that she saw at an estate sale. She knew that I had worked with quilting(though I am far from an expert) and told me that the topper was on sale for$10.00.  Now, think a minute.  Just to cut all of those pieces out and then, hand
stitch all of the triangles together!  That took a lot of time and energy. 
Part of the reason I said yes was because every crafter knows, that for every one project you complete, there usually is another that is NOT finished.  It is so aggravating.  I wanted to complete this stranger's project.

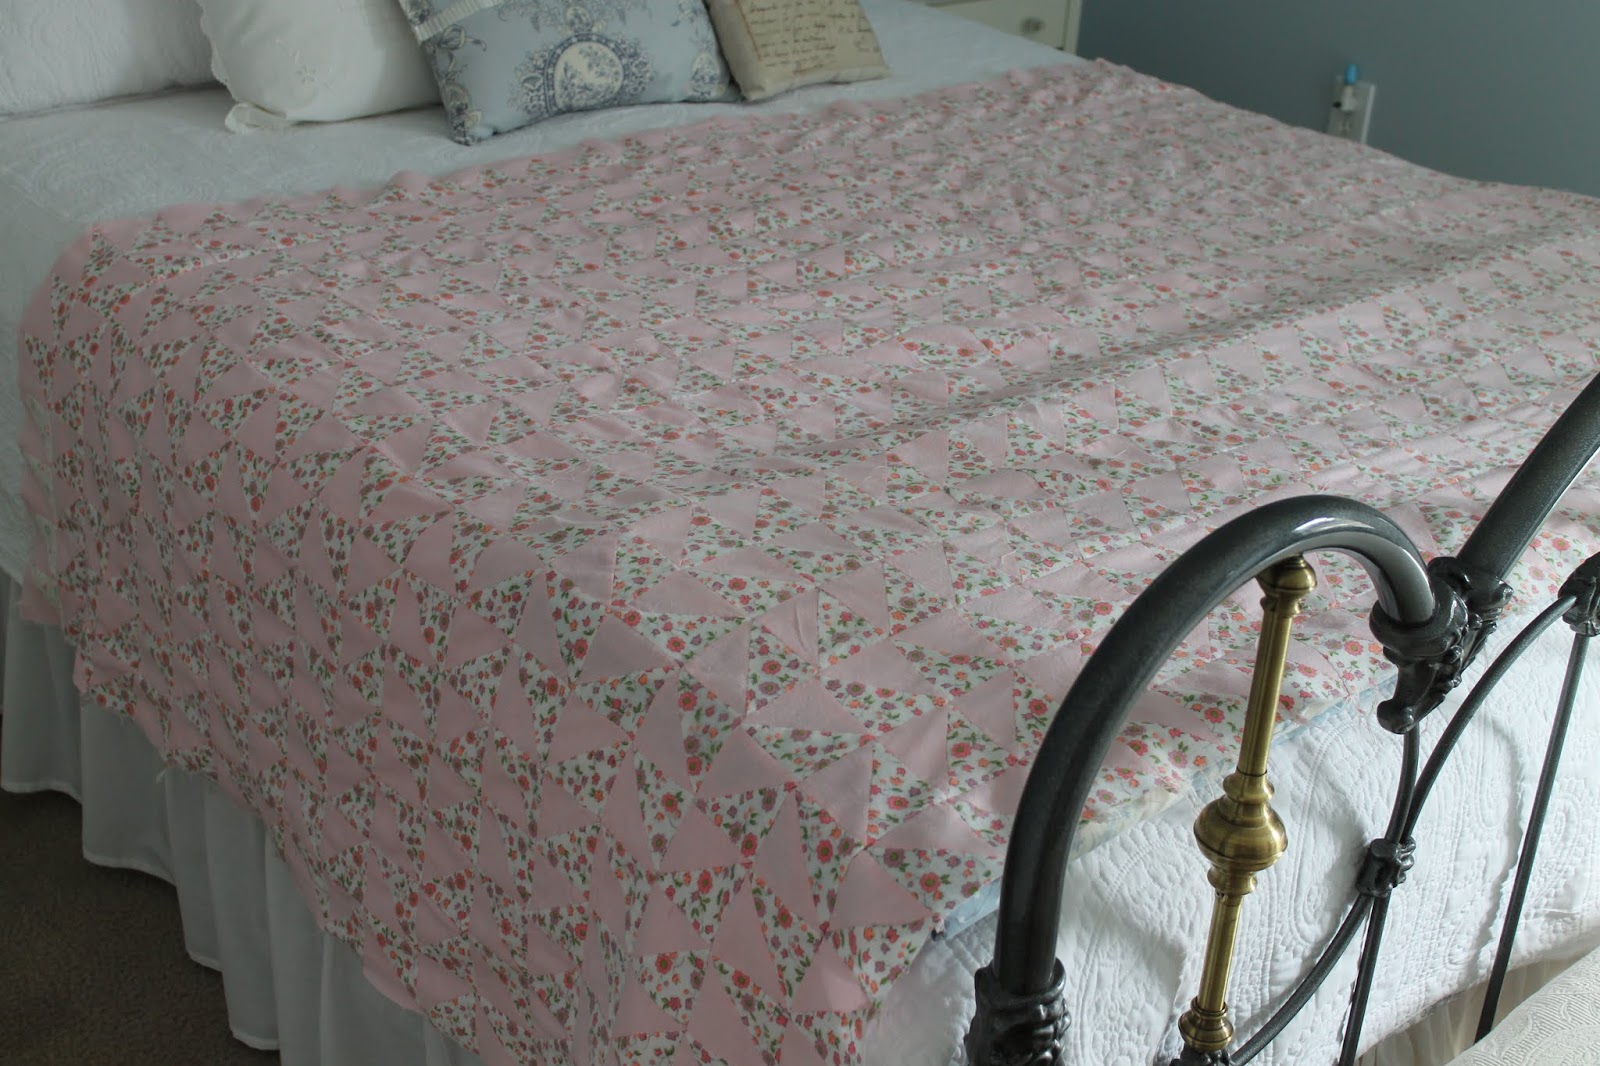
Here is the quilted fabric.  It was made with flannel fabrics, so its very soft.


 I believe it's a twin size quilt. I have it laying across the queen bed in the guest room.


Martha, my quilt expert, mentioned that for a while now, instead of putting batting in her quilts, she uses mink fabric.  She states that if the person lives in the south, she purchases light weight mink and if they live in the north, she purchases heavy mink fabric.  I'm sure you have all seen mink fabric.  When it first hit the fabric stores, a lot of it had dimples.  I made a pillow using this fabric.

Getting back to using mink fabric for a backing.  Martha says that instead of having 3 layers to sew together, you only have 2 because the weight of the mink fabric is substantial.  I bought my mink fabric and it comes in multiple colors.  I was lucky enough to be there for the 40% sale.  (See ticket)  Important note.  Always wash it before making it into a quilt.


I think in the old days, we used to call this a fur type fabric.


The light pink fabric matched the front of the quilt.  Now, all I had to do was buy the binding.

The stores had closed down so I had to order my binding online. 


Martha suggested that I buy Repositionable Adhesive.  You have to buy it at sewing supply stores.  What is so great about it is, you don't have to pin your 2 fabrics together.  She suggested laying the backsides together.  Then starting in the middle, spray the adhesive and spread the fabric flat and work your way down the quilt.  The adhesive is forgiving so if you made a mistake, you can move your fabrics.  She also had tried numerous types of adhesive and found this one to work best.  Pay attention to lessons learned by the experts.


I basically just quilted on my machine every 2 squares in each direction.  I always start at the middle.  Using the adhesive made sure I have no bunching of my fabrics.

When I was done quilting the quilt itself, I sewed around the entire perimeter and trimmed the extra fabric.


If you have never sewn quilt binding on, watch a few YouTube videos.  I also learned the correct way to hand sew binding to the back of the quilt.  I'm still  progressing using a thimble and learning how to perfecting mitered corners.  I am improving, but have a long way to go.


So to the sweet lady who started this quilt, I finished it for you.  She is a beauty and so nice to have on chilly evenings.  The quilt would make a nice twin bed covering for a little girl.


Friday, May 1, 2020

THE MONTH OF MARY

Today begins the month of Mary devotion.  During these times, it is so important to pray for Mary to intercede for us.