Thursday, November 29, 2012

Mini Ornaments for Teen Gifts


What do you do when your teen comes to you at 8:00 at night and asks for 8 Christmas presents for her girlfriends?  Oh, and by the way, 'I need them tomorrow morning, Mom.'  Well, this Mom always has a stash ready for this type of crises.

Every year when Michael's or Hobby Lobby has their mini ornaments on sale, I stock up.  Usually, they are 40-50 % off.  Stock up. 

With a few sheets of scrapbook paper, adhesive stickers, ribbon and  scissors, you too can be Super Mom.  Look at some of the mini frames I have on hand.


                                             Scrapbook paper............................................


                                                 Alphabet stickers...................


                                                  And ribbon........................


                     Oh, and before I forget, a nice fabric bag to put them into............


                         And voila..................Personalized ornaments in under 5 minutes time!


                                           Another idea......................


                     These ornaments are so easy that even the girls can make them themselves.

Monday, November 26, 2012

Christmas Collage Gift #1


I wanted to try my hand at making a Christmas collage.  Basically, this process was part card making and part picture design that could be used as a display on a bedside table during the holidays.

It was important that the design used many elements and had a lot of dimension in the finished product.

Finally, I wanted to then take these designs, and put them in ornate frames to give as presents.

I fell in love with this vintage postcard.  The artist is Ellen Clapsaddle, born in NY during the Civil War years, who created  postcard designs depicting precious children.  I had collected many of her other holiday postcards throughout the years.  Since I was making this particular gift for close girlfriends, I found this picture very appropriate.  This could also be used as gifts for sisters too. 


 The first thing I did was pulled a piece of red gingham scrapbook paper. This was the bottom layer.  I then trimmed out the vintage postcard and placed that onto the right side.  At the bottom of the piece, I layered a holly and music themed scrapbook paper.  Using decorative scissors, I trimmed the top of this sheet. 

The next element I added was dimensional holly. I found a Christmas card similar to this which showed a vintage depiction of holly. I cut the image of the holly out and added some holly berries here and there.  Then, I glued and glittered some of the areas of the berries using red glass glitter to create shadows. 

A piece of ornate gold fabric trim was placed on the upper portion of the card.


I printed off the words Joyeux Noel on a sheet of crackled scrapbook paper .  This was glued to the garage sale tag.


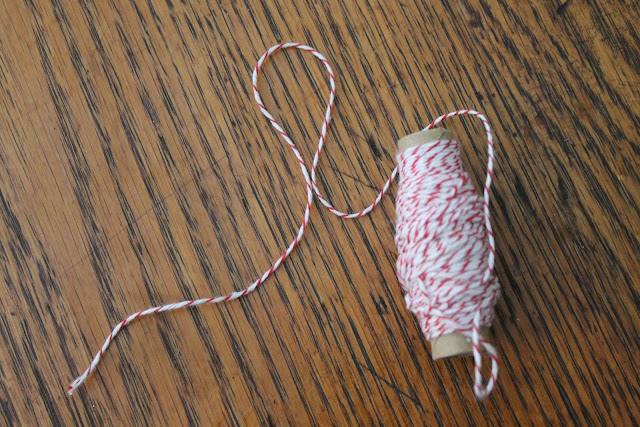
                        Using red and white baker's twine, I made a knot through the hole of the tag.


                  Using foam adhesive dots underneath allowed the tag to become dimensional.

Once the design was completed, I purchased an ornate distressed black frames at Hobby Lobby at a 50% discount.

                    Once the design was placed into the frame, the whole picture came alive.


I find that the gifts made by hand also allow me  design a piece uniquely for very special friends and family.  Why don't you try your hand at creating your own holiday collage?


Thursday, November 22, 2012

Completing the Thanksgiving Vignette


                   During autumn, the following display was on the fireplace mantle.


I really hated to fuss with the design for Thanksgiving, so I brought in another level at the base of the fireplace.


                            Adding a low cost cranberry vase pulled in the colors of fall.

                                                              
                                           From afar, the fireplace is ablaze with autumn glory

                                                              
                                                    Be grateful, be happy and enjoy your families.

                                                     HAPPY THANKSGIVING

 As an added thought, I just made Texas Roadhouse cinnamon butter for the big feast. I found it on the Internet.  It was so easy to whip up and it would be delicious on dinner rolls.


                                        Texas Roadhouse Cinnamon Butter

1 c. butter, softened
1/3 c. sweetened condensed milk, chilled
1/2 tsp. Karo light syrup
1 tsp. of Cinnamon

Beat with a mixer and chill.

Delightful!!!!!

Tuesday, November 20, 2012

Updating the Advent Wreath


Advent is a season that takes place 4 weeks before Christmas.  It is a preparation time for Catholics to prepare for Christ's birth.  At this time, we light one candle per week starting with a purple one.  Week two is another purple candle.  Week three is a rose or pink candle.  The final week is a purple candle.

After moving last year, I couldn't find the box that held my Advent wreath base.  So, I improvised and used 4 small glass candle sticks to create one. It suited the purpose for this season.

 
After all the moving boxes were unpacked, the wreath base appeared.   The Advent wreath base that I was missing was made by my father. Basically this wreath base is a 11 inch circle with four holes bored out around the edges. It looks like this.  I'm sure, knowing him, that it was constructed out of a scrap of wood.


 It came in handy when the girls were in elementary school and needed to construct a wreath for Religion class.


Years ago, I had stapled fake greenery to the top of the base.  Easily, my 4 Advent candles slipped into the base.  This year, I wanted to kick it up a notch to make it a bit more elegant.

I pulled some ecru lace ribbon out of my stash and quickly glue gunned it to the outside of the base. 


             Once it was set on a silver plated compote, it gave me the look I was going for.


I printed off a vintage copy of the song, "O come, O come Emmanuel".  Putting it under the glass dome tied the two items together. 


Dad would not recognize the wooden base today.  But I know one thing for sure.  He would be thrilled that it was up cycled.


                                         Now, we just need to wait for Advent to begin.


Friday, November 16, 2012

Framed Tray with Vintage Wedding Ephemera

What kind of present does one come up with for a dear college friend for her wedding? My dear friend has always been into very vintage but tasteful decorating.  Something unique would be necessary to pull this one off. 

At the time, I was still scrap booking heavily.(It sounds like an addiction.)  I was just beginning to use ephemera.  These designs are usually vintage and can be used for your own use(not profit).  Graphics Fairy is an excellent site.


Since this was a wedding present, I wanted to use things all about marriage.  I wanted a rather Victorian look to the project.  This sample was not used in this project.

I started with a 11 x 13 inch frame.  I picked up some gold spray paint that would match the frame and painted the handles.  I drilled two holes in each end in order to place the handles.  You can screw them from the back or hot glue gun the handles into the frame.

Now, onto the embellishments.  Since the largest scrapbook paper is only 12 x 12 inches square, and the frame was 13 inches long, I realized that I had a problem.  Using rolled wrapping paper avoids this problem altogether.


I found a paper lace rectangular place mat in my buffet.  I cut it in two lengthwise.  This was placed on each of the ends.  The scrapbook paper was laid on top.  From then on, it was just a layering process.  I used decorative cutting scissors, ribbon to make photo corners and a few decorative punches for accents.


                  Small doilies and scraps of ribbon embellished some of the items on the collage.


  After doing about 5 of these trays in different themes, you can never overdo your items.  Just make sure that you leave exposed those particular parts of the Ephemera that you want showing. The tray should have a 'carelessly tossed' effect when finished.

      Before placing the glass over the piece, make sure to clean it thoroughly with glass cleaner.

I normally glue a sheet of flannel over the back so the bottom of the tray does not scratch the dresser top surface.  This picture is not the back of this tray.  I had to take a picture of my tray that I will discuss in another blog. ( Please ignore the corner feet.)


What is so fun about this project is that I never know at the beginning what the end result will be.  Always a surprise!
 
 
Placing the original wedding invitation into the collage would work well with this type of tray.


Monday, November 12, 2012

Burlap Runner Using Vintage Doilies


                                  Last summer I made a ruffled burlap runner for myself.


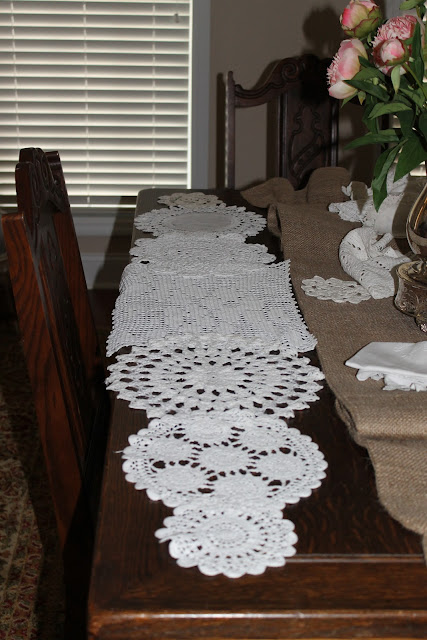
I wanted to make another runner for my friend Tara.  She had been sending me pictures of vintage  white doilies.  At that point, I thought it would be a good idea to start looking for doilies at estate sales.  They were readily available for $.50-$1.00.  Once I had accumulated several doilies, I laid them out in a random pattern.


Instead of making a burlap ruffle, I pulled out an antique lace place mat that I had accidentally shrunk in the washer.  Other than becoming too small for a place mat, it still had good integrity in the woven material.


  I cut the place mat horizontally and created two even pieces to attach to the ends of the runner.

                                  
I planned to give this runner 2 different looks. I wanted to attach the doilies at the ends to create a runner in itself. If Tara wanted to lay this doily runner on top of the burlap runner, then the doilies would tie into the place mat ends of the burlap runner.


                                    Adding the doily halved place mat just kicks it up a notch.


Then laying the runner of doilies on top of the runner gives it yet another look.

                         I hope that she will enjoy using the two runners for years to come.

Thursday, November 8, 2012

Thanksgiving Centerpiece

Instead of collecting many of the items the day before Thanksgiving, I gathered them up and created my centerpiece now.

Always needed for the Thanksgiving table is a silver plated tray for the turkey, napkins, candles and a table runner.  With a few beaded pumpkins, a bunch of Indian corn,and suitcases, I am on my way to setting the Thanksgiving table.  I would even leave the candles in the same place, rather than the normal placing them on either side of the centerpiece.


 Truth be told, we always travel to Illinois for Thanksgiving, so I don't need a centerpiece. Someday this idea will be used in my home.

I set up the centerpiece on the front foyer table, but it can be easily  transferred to the dining room table.  I really like this copper glittered honeycomb candlesticks.

                                                                               
                The coloration of the vintage suitcases looks good with all the orange and yellow.
                                                          
 
 Actually, the suitcase could be the first level on the table with the silver plated tray sitting on top of it.
 
Using a white linen tablecloth for the table, topping it with the burlap table runner sets the stage for the actual centerpiece. Layering a smaller vintage suitcase on top of the runner would work too.  Isn't this a great way to ready your Thanksgiving dinner long before defrosting your turkey?
 

Monday, November 5, 2012

Fall Pillows

Once that fall comes around the corner, I like to swap out my summer pillows on my Ikea Ektorp couch.   You might recall the blue and white pillows that I have used for the spring and summer months.

                                                                
While living in Boston, there was a fabulous shop called Gold Lion.  It was an upscale thrifty decorator's store.  In one corner of the shop, there was a large table of fabric remnants, mostly for home decorating projects.  I pulled 4 or 5 remnants in the same color line and put them in my fabric tote for a later day.

On great thing about having a very neutral sofa(off white in my case), allows me to change out pillows during the year to complement the season.

I pulled out the golden fabrics and played with different ways to create the latest pillow design.  I should stop here and tell you about yet another collection of mine-----old buttons. 

Not to change the subject, but my father used to bring home these plastic containers from the church.  They held the Communion hosts.  He gave me one.  Since then, I have picked these containers up at estate sales for about $1 a piece.  These jars are great for collections.  I use them to store buttons, thread and wooden  knobs.

                                                                  
                                  They are readily available on the shelf in my craft armoire.


Cutting the fabric, sewing a few seams, and adding buttons for some character, this easy project can be made in under an hour.  Once I put the right sides together, I sewed the seams on three sides.  Then I turn the fabric right side out, inserted the pillow form and sewed up the last seam on the machine.  An important step that I would like to share is that whenever I make a homemade pillow covering, I always spray all   sides with at least 4 coats of Scotchgard.  This will keep it relatively clean.  Of course in my house, I have a  cardinal rule.  NO ONE is allowed to eat on the couch.  This prevents crumbs and spills from soiling these handmade pillows.


                         The golden pillows blend well with the orange hues of fall.

Friday, November 2, 2012

Cranberry Crate

I can't believe it is November already?  And with November comes the planning of that most favorite holiday meal.

When I think of Thanksgiving, it brings back memories of our visit to Plymouth, Massachusetts.  The girls were so much younger than and showing them Plymouth Rock and the replica of the Mayflower was one of the most fun 'field trips' that we took. 


                                                     And we can't forget the boat!


                                          It is hard to believe that the girls were so little.


                           With that being said, Plymouth brings thoughts of cranberry bogs.  Then I remembered that I had a vintage crate from Grandpa


Years ago when we first moved, I gathered up all the food crates that were in the garage before our first move.  I believe that they came from my Grandfather's grocery store.  What a connection that is!  This one was one of my favorites.


                The very authentic label shows wear and tear, but you can almost imagine  the crate filled to the brim with fresh, plump cranberries.


                      Using vintage trunks started the layering process for the November holiday.


Using the fall flora, Indian corn, pumpkins and golden leaves layered with vintage luggage and the Cape Cod Crnberries crate set in front of the black iron gated fireplace screen completes the whole fall mantle scene.