This post has probably been in the making for at least 5 years. I still recall purchasing the chippy baluster from the New Hampshire salvage yard 13 years ago. I bought two of them at the time. I found them very interesting and wondered to myself what and where these were initially used in their initial use.
My idea for this project was to make a flag pole with multiple flags hanging from the baluster. I think this will be one awesome 4th of July centerpiece.

The following picture shows the top of the post. In order to add the finial to the top, this needed to be shaved off.

Getting one of Mr. Thrifty's toys out completes this job. I know he is doing me a favor by completing these tasks for me, but it also is time for him to use these tools. To be honest, the safety goggles don't make me feel safer. I would rather defer to him to do the work with the electric tools.

I have to admit that the Mr. does teach me some skills. For example, making an X on the end gives you the exact middle to place your drill bit when making the hole. Notice the screw sticking out of the finial. Sorry for the poor picture.

Drill a pilot hole into the center where the two lines meet. Proceed to drill the finial into this hole. How easy is that?

Now this is where it gets tricky. Before we started the project, Mr. Thrifty asks me what angle I wanted the holes driven for the flag post. Duh??? I had no idea.
Because of his engineering background I suppose, he begins to tell me that he needs to make a jig so the holes will be at the exact same angle when drilled with the drill press. At this point, I smile, and just wait for further directions.
This next picture shows the jig at a 30 degree angle. Ok??

When he proceeded to fit the jig into the drill press, it was too tall, so he needed to improvise. So....
It might be easier to visualize the baluster laying into the jig. At the bottom, notice the clamp that will help the baluster remain stationary.

Now we are ready to drill our first of 24 holes. I bet you are wondering about the multiple turquoise dots all over the baluster. I made these marks with a Sharpie so we would know where to drill the holes. However, once we drilled the first hole, the random placement of the other holes were not going to work.
So the Mr. suggested making 3 holes on the 4 sides of the baluster and then coming back and making a line of 3 holes in between each set of holes to create 24 holes. So this is what we did.

The next step was to find two pieces of scrap wood in the pile to create the base for the post. Once again, using a metal ruler, I found the direct center to drill a hole to attach the baluster to the base.

To make the hole stable, he used the drill press using a paddle bit to drill the hole so it could be attached using a washer and a screw.

You might be wondering about the blue duct tape. He will drill the hole to the bottom of the tape.


The finished hole.

Even though it is now painted, this is what the base looks like when finished.

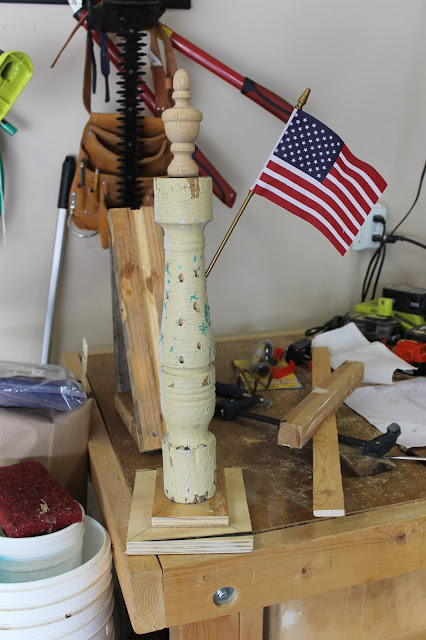
So before I paint the post, one flag is inserted into one of the holes. It is the perfect angle.

A coat of primer is applied.

Because I didn't have any white chalk paint on hand, I ran over to Wal-Mart and picked up a small jar.


Years ago, I sewed a runner used the stars and navy background and added a crimson red border of trim. This runner was draped over the porch post.

Once the flags were inserted, the July 4th post was finished. I love it!

The post looks great sitting behind the chaise lounge in the Great Room.

I am thrilled with the results. The vision was exactly as I had hoped, of course, with a lot of help from Mr. Thrifty.

Now the area is ready to celebrate the 4th.

My idea for this project was to make a flag pole with multiple flags hanging from the baluster. I think this will be one awesome 4th of July centerpiece.

The following picture shows the top of the post. In order to add the finial to the top, this needed to be shaved off.

Getting one of Mr. Thrifty's toys out completes this job. I know he is doing me a favor by completing these tasks for me, but it also is time for him to use these tools. To be honest, the safety goggles don't make me feel safer. I would rather defer to him to do the work with the electric tools.

I have to admit that the Mr. does teach me some skills. For example, making an X on the end gives you the exact middle to place your drill bit when making the hole. Notice the screw sticking out of the finial. Sorry for the poor picture.

Drill a pilot hole into the center where the two lines meet. Proceed to drill the finial into this hole. How easy is that?

Now this is where it gets tricky. Before we started the project, Mr. Thrifty asks me what angle I wanted the holes driven for the flag post. Duh??? I had no idea.
Because of his engineering background I suppose, he begins to tell me that he needs to make a jig so the holes will be at the exact same angle when drilled with the drill press. At this point, I smile, and just wait for further directions.
This next picture shows the jig at a 30 degree angle. Ok??

When he proceeded to fit the jig into the drill press, it was too tall, so he needed to improvise. So....
It might be easier to visualize the baluster laying into the jig. At the bottom, notice the clamp that will help the baluster remain stationary.

Now we are ready to drill our first of 24 holes. I bet you are wondering about the multiple turquoise dots all over the baluster. I made these marks with a Sharpie so we would know where to drill the holes. However, once we drilled the first hole, the random placement of the other holes were not going to work.
So the Mr. suggested making 3 holes on the 4 sides of the baluster and then coming back and making a line of 3 holes in between each set of holes to create 24 holes. So this is what we did.

The next step was to find two pieces of scrap wood in the pile to create the base for the post. Once again, using a metal ruler, I found the direct center to drill a hole to attach the baluster to the base.

To make the hole stable, he used the drill press using a paddle bit to drill the hole so it could be attached using a washer and a screw.

You might be wondering about the blue duct tape. He will drill the hole to the bottom of the tape.


The finished hole.

Even though it is now painted, this is what the base looks like when finished.


So before I paint the post, one flag is inserted into one of the holes. It is the perfect angle.

A coat of primer is applied.

Because I didn't have any white chalk paint on hand, I ran over to Wal-Mart and picked up a small jar.

So with the chalk paint finished, the post has a unified look.

Years ago, I sewed a runner used the stars and navy background and added a crimson red border of trim. This runner was draped over the porch post.

Once the flags were inserted, the July 4th post was finished. I love it!

The post looks great sitting behind the chaise lounge in the Great Room.

I am thrilled with the results. The vision was exactly as I had hoped, of course, with a lot of help from Mr. Thrifty.

Now the area is ready to celebrate the 4th.

No comments:
Post a Comment