Years ago, in my single days, I took a Chinese cooking class with my sister no.4. We had such a fun time and learned many new authentic recipes. There is a fabulous won ton sweet and sour sauce recipe, called Duck Sauce, that I will tell you about. I can make it up, split it in two and freeze the 2nd half in a Tupperware container for up to 2 months.
The real reason that I am blogging about the kitchen is today after making won tons for 30 some years (gosh I sound old!), I discovered the best won ton skins. All this time, I had been picking up the won ton skins at Kroger's or my regular neighborhood market to use for this recipe. After going to pick up skins at the Walmart super center, they were out. So, I went to an old time Chinese market up the street. The only skins they had were in the freezer section. I always question about how fresh their freezer food, but that is another blog. So, I spied the won ton skins. They looked more yellow than the normal ones that I usually buy, but with my stuffing for the won tons was already made, I had no choice. I purchased them and thawed them over night in the fridge.
This afternoon, my oldest, a 14 year old helped me(she is an amazing won ton wrapper!-I'm sure that won't go on a college resume.) Anyway, I started the canola oil in my Dutch oven on the stove and turned it to medium. To test if the oil is hot enough, I put a drop of water in the oil. When it instantly bubbles, it's ready. I layer old newspapers to the side of the stove so I can just transfer the won tons when they are golden brown. It you want to freeze some for later in a week or two, I cook them until they are light brown and remove them from the oil and drain. The frozen won tons just take about a 15 minute warmup in the oven.
Here is the label from the authentic Oriental store. I'm sure any brand at one of these stores would be fine.

Now, back to the posting.
We have an annual bonding time in our house, when my daughter and I make fried won tons. My Mom taught her daughters to make this special appetizer when she would put on family wedding receptions. This was such a special memory to me and I wanted to pass it on to my daughters.
The recipe follows at the end of this postings.
First, the ingredients:


After peeling the fresh ginger,

slice it.

Using my mini chopper, I chop the ginger.

Next, I chop the water chestnuts the same way.

Both the ginger and water chestnuts are added to the ground pork. After pouring some sesame oil in the pan, all of this is cooked. Salt, soy, thinly sliced Napa cabbage and sliced green onions are also added.


When finished cooking, drain the mixture in the colander and let cool.

Filling a small bowl with water. Take out your won ton skins out of the fridge. Keep them covered while working with the skins as they dry out quickly.

Place a small amount in the middle of a won ton skin.

Here is where my daughter does her magic. You really need two sets of hands to make these won tons. One to shape them and the second to fry them.
Daughter number 1 dips her finger into the water and draws a line on two sides of the skin.

Next, she folds the skin over to make a triangle and press the wet edges together. They stick beautifully to each other.

Then, she turns the two corners

And cross them at the tail.

Fry in hot oil until golden brown.

Drain on racks over paper towels.


I couldn't resist posting this picture. I think she was tired after spending a few hours making the won tons. Boy, it was a great time.

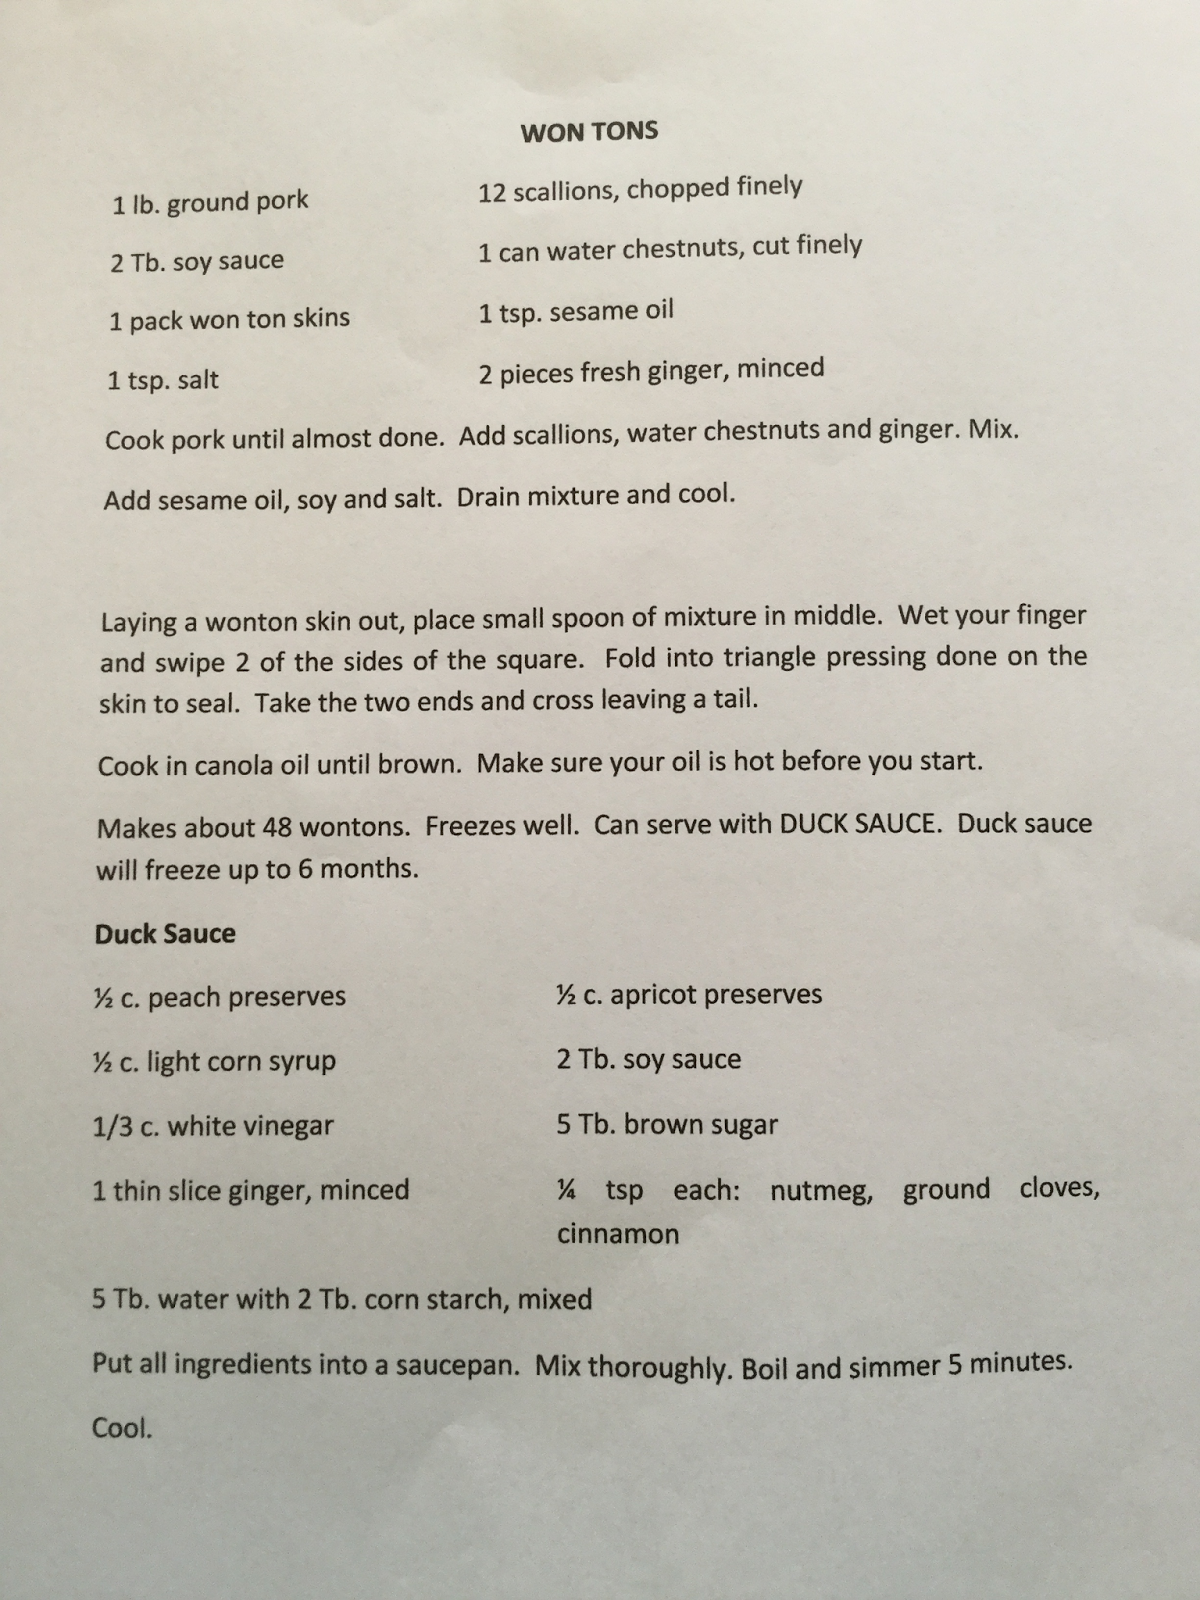
This is truly a time tested awesome recipe. I usually let them cool after cooking them, place them on a cookie sheet spreading them out and freeze them. When frozen, I place them in freezer bags and keep them in the freezer for up to 6 months. When I do take them out of the freezer, I place them on a parchment covered cookie sheet and bake them for 10 minutes at 350.
No comments:
Post a Comment